
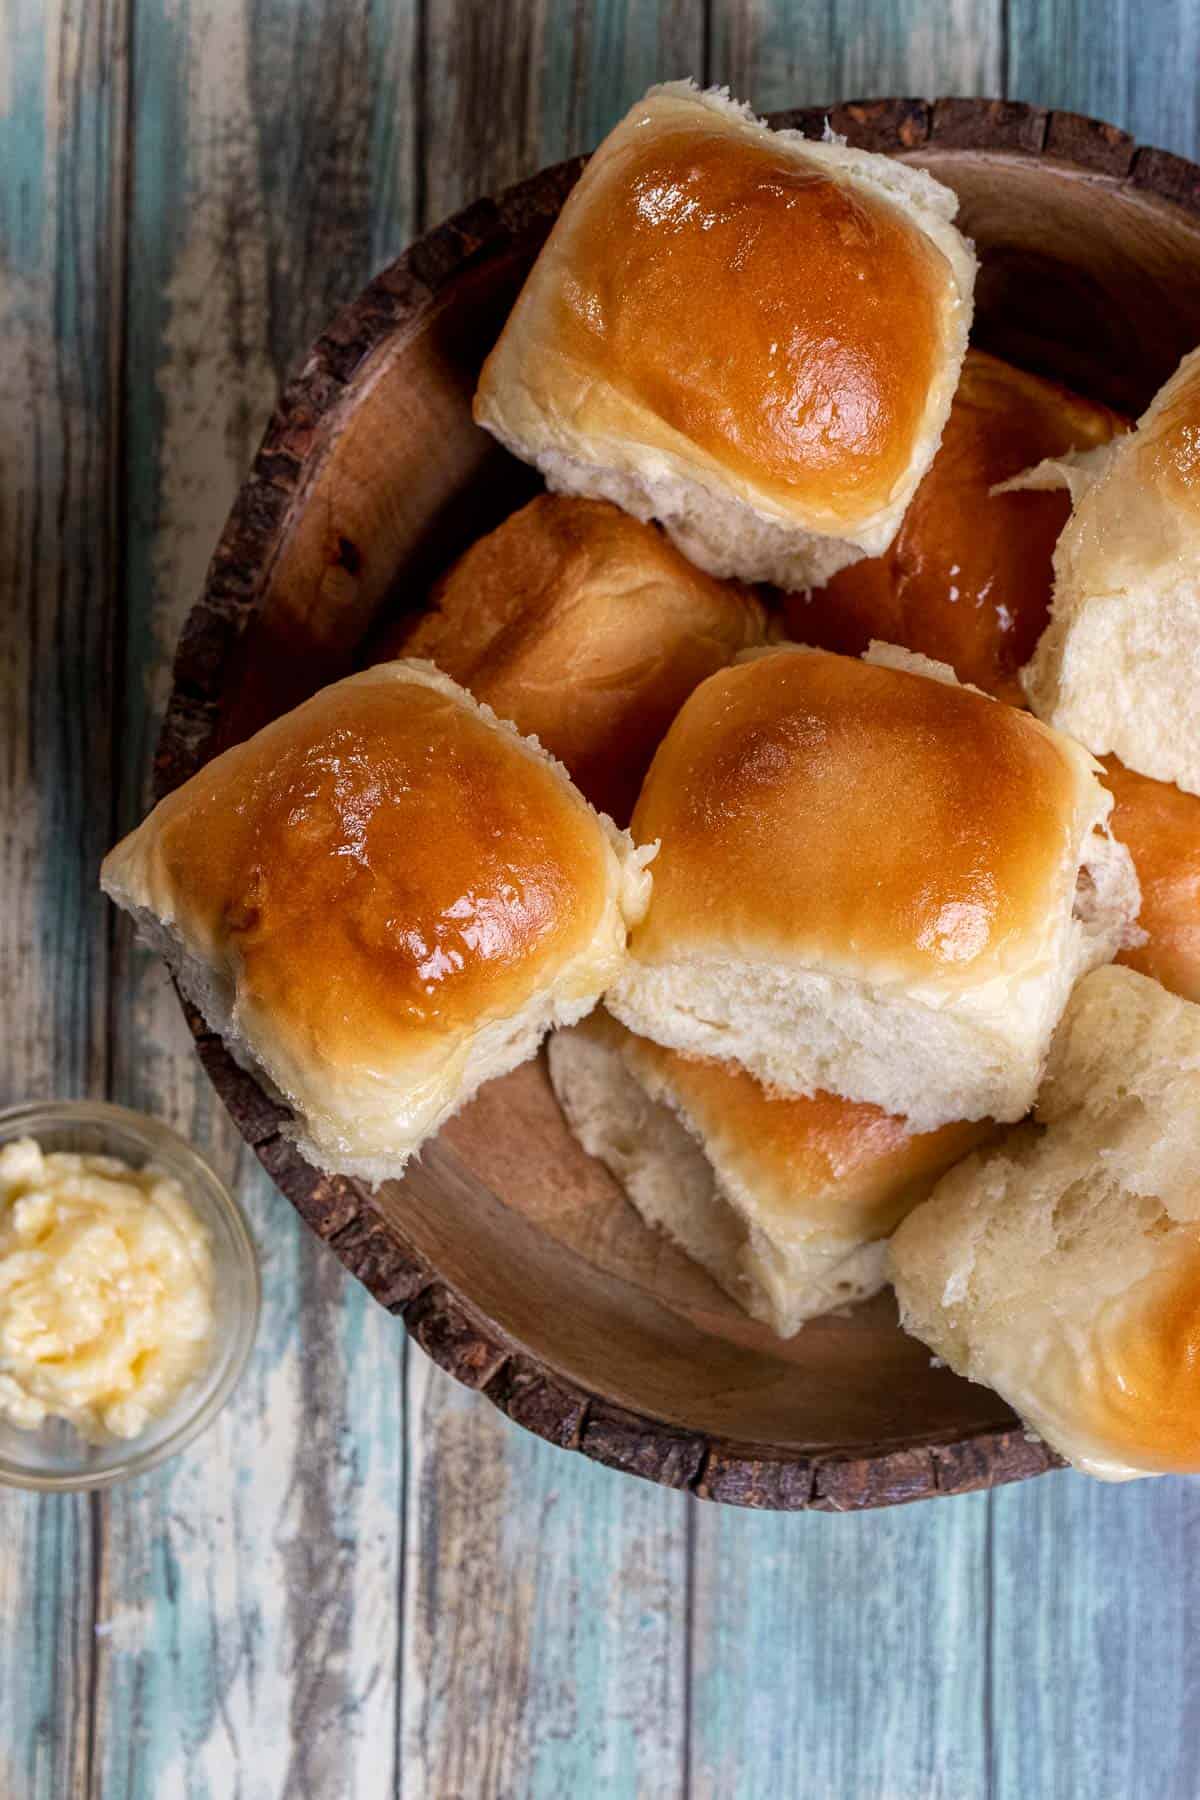
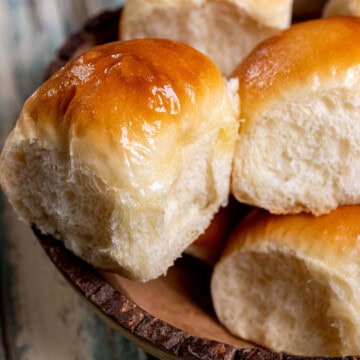
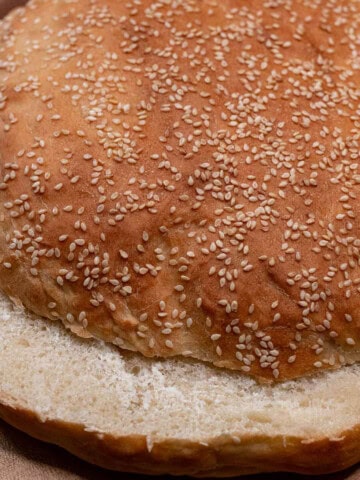
Rich, tender, soft, and slightly sweet, these honey butter yeast rolls are some of the best dinner rolls I’ve ever made. Soft and buttery, these rolls have a wonderful texture and flavor, and when topped with honey butter, it puts their flavor over the top.
I love making yeasted dinner rolls for holiday spreads. Other than waiting on them to rise, they're simple to make and don't need many ingredients. This honey butter version feels so simple, but their flavor is incredible.
This dinner roll recipe makes incredibly soft and fluffy rolls with a pillowy center and lightly browned top. Brushed with a quick, homemade honey butter when they're fresh out of the oven gives them even more flavor with a buttery sweetness you can't get enough of.
I first made these honey butter dinner rolls for a scratch-made Thanksgiving dinner I did for my folks back in 2017. Since then, they’ve been requested by family every year, and for every holiday from Thanksgiving to Christmas to Easter.
While they are a little time-consuming to make, most of that is hands-off because of the two rising times. If you’re making them for a holiday dinner, they can easily be made ahead of time and warmed up just before serving.
The base of this dinner roll is an enriched bread dough, like a brioche, which means it uses milk, butter, and eggs to create a rich tasting bread. All the sweetness comes from honey, and topping the bread with homemade honey butter as soon as they come out of the oven adds even more flavor.
These honey butter dinner rolls also make a perfect vehicle for leftover turkey or ham sandwiches after the holidays; I especially love them with my herb-roasted turkey, maple whiskey turkey, and maple bourbon glazed ham.
Jump to:
🥘 Ingredients for Honey Butter Rolls
A nice thing about making these honey butter yeast rolls is they only need 6-7 ingredients, and you may have them all on hand already, especially if you do much baking at all.
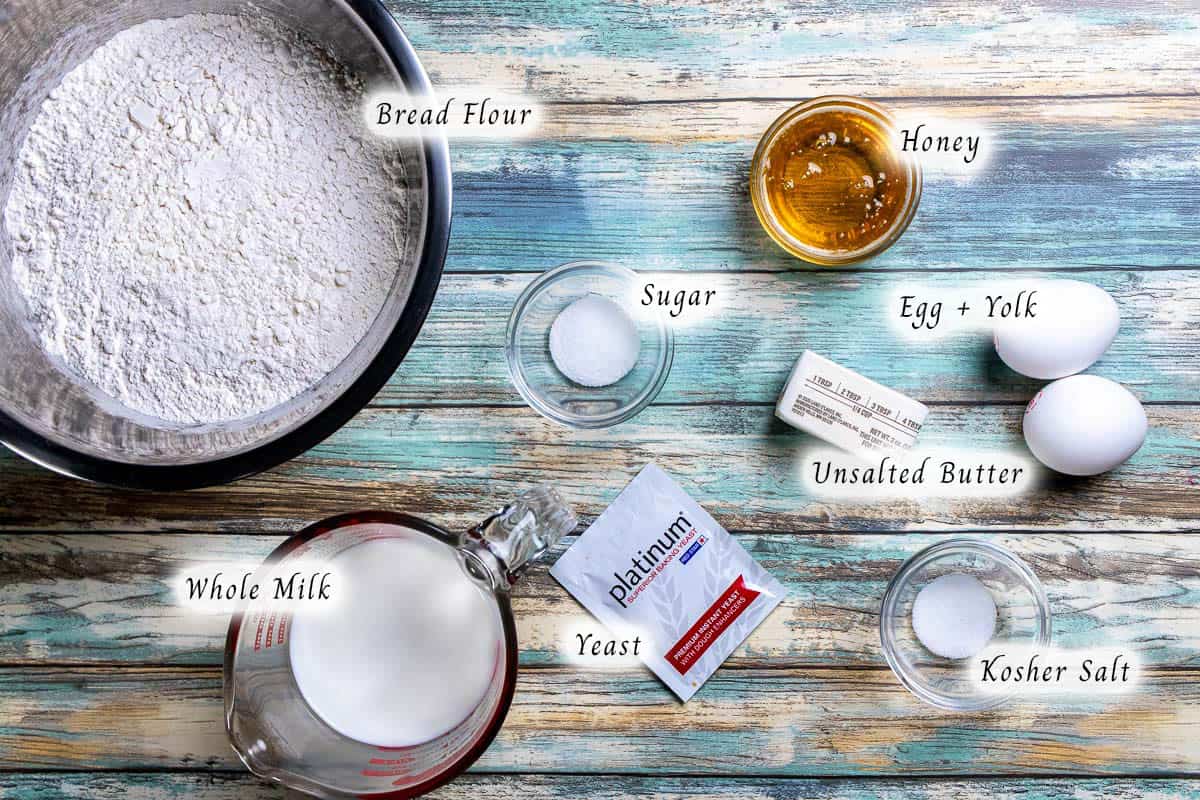
Flour – You could use all-purpose flour and they’ll turn out good, but I do prefer bread flour here. With the higher protein amount, they give the rolls a better gluten structure for chewier texture.
Milk – Use warm milk instead of water for a richer flavor and texture. Any milk can probably work fine, but whole milk gives the best flavor to an enriched bread.
Yeast – Active dry yeast or instant yeast can be used here. I use instant yeast, but I still bloom it, which I always recommend doing. It’s much better to find out if your yeast is dead a few minutes in, instead of using all your ingredients and waiting an hour or two to realize it was no good.
Sugar – I use just a small amount of granulated white sugar to feed the yeast as I bloom it, but you can swap that out for some honey instead.
Honey – The honey will both flavor and sweeten the dough. You’ll use some in the dough itself and mix some with softened butter later for a homemade honey butter topping.
Eggs – Use one whole egg and one egg yolk at room temperature for enriched bread dough. The extra yolk helps to add moisture and keep the finished texture soft.
Butter – I use unsalted butter for the dough, and since you melt it, it doesn’t need be at be room temperature first. Use some more butter for the honey butter topping, and that can be salted or unsalted.
🔪 How to Make Yeast Rolls
Make the Dough & First Rise
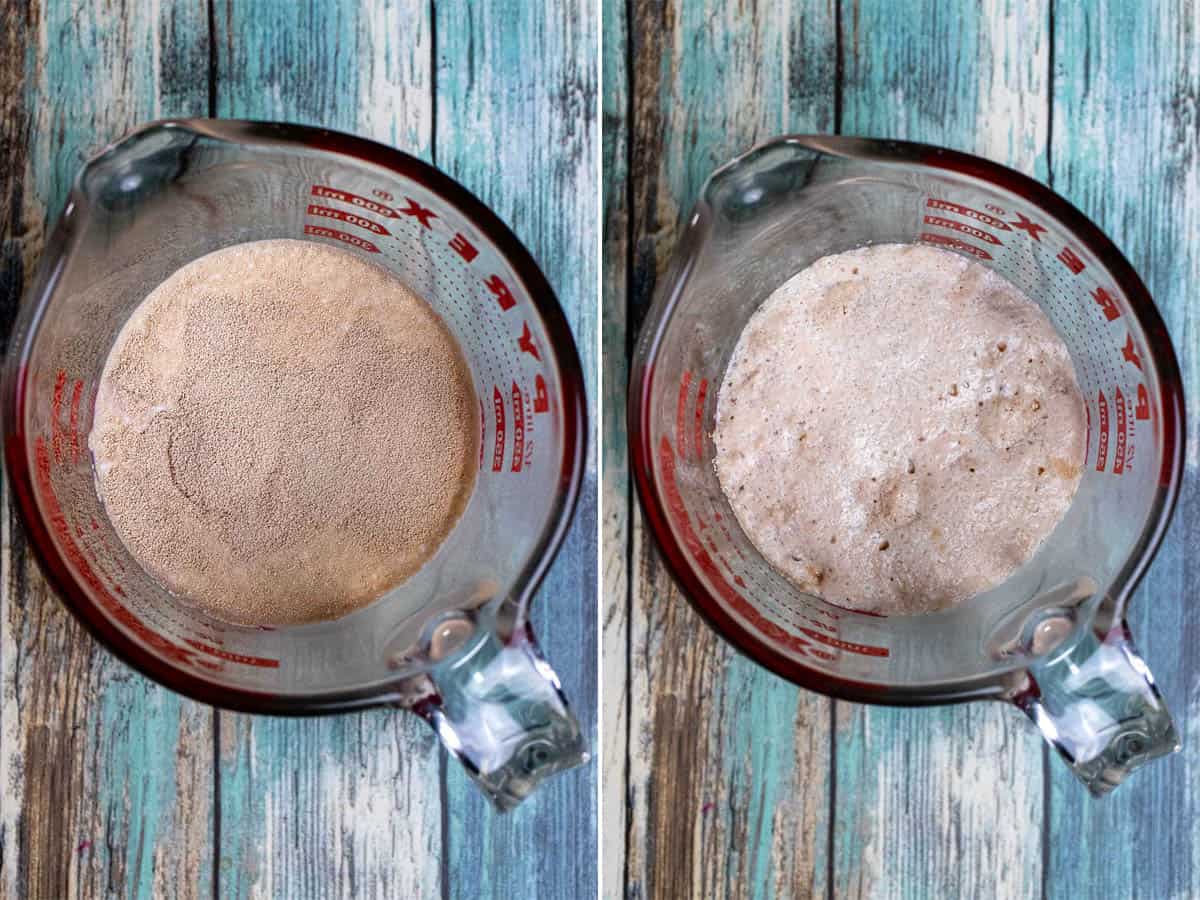
Begin by melting the butter and proofing the yeast. In a liquid measuring cup, heat the milk until warm (about 100°F / 38°C), add the sugar (or honey) and the yeast and stir together. Set aside to bloom for about 10 minutes. Place the butter in a small bowl and microwave for 20 seconds, and in 10 second increments until just melted. Set aside to cool slightly.
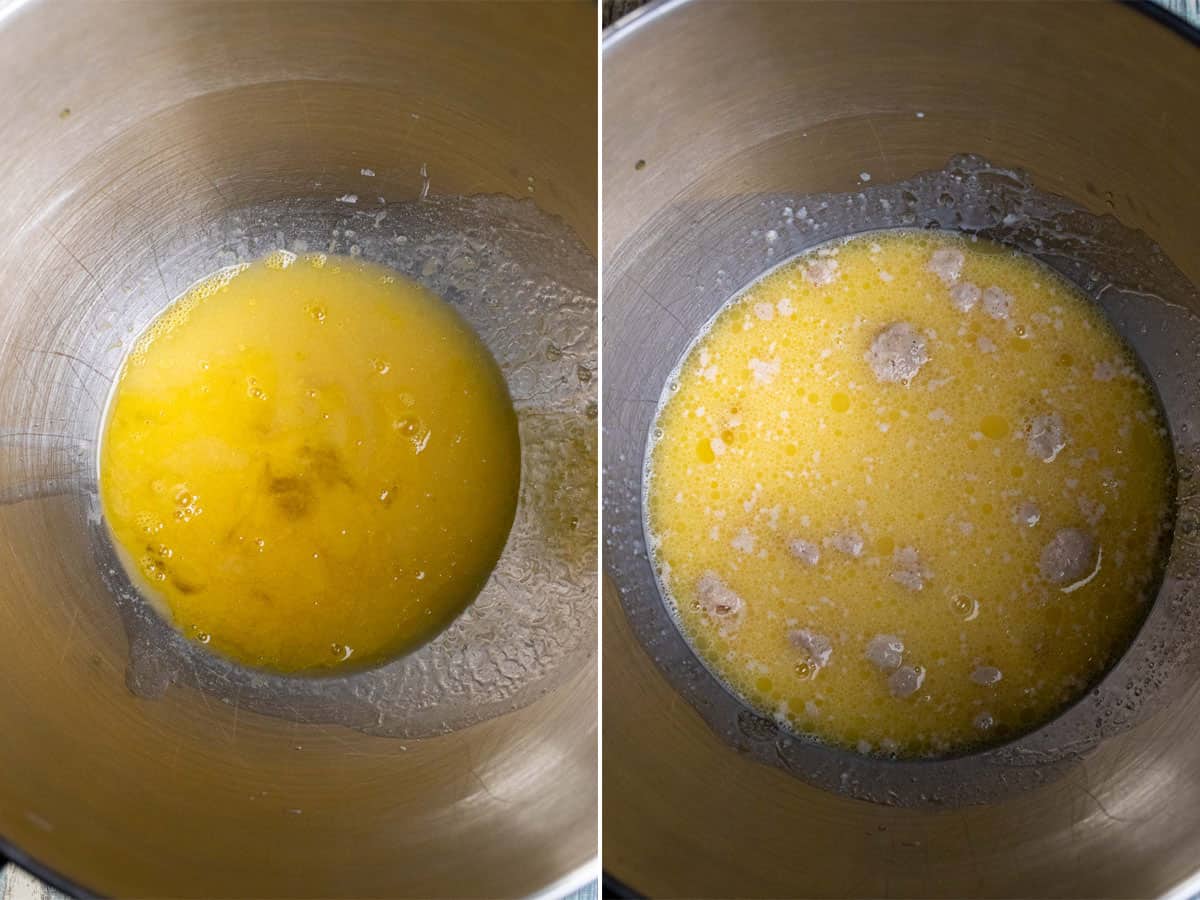
If the yeast and milk are bubbly and frothy looking after 8-10 minutes, the yeast is good, and you can begin making the dough. In the bowl of a stand mixer, or in a large mixing bowl, add the egg, egg yolk, honey, and melted butter. Use a fork and mix until the eggs are nice and scrambled, then add the milk and yeast mixture and stir together again.
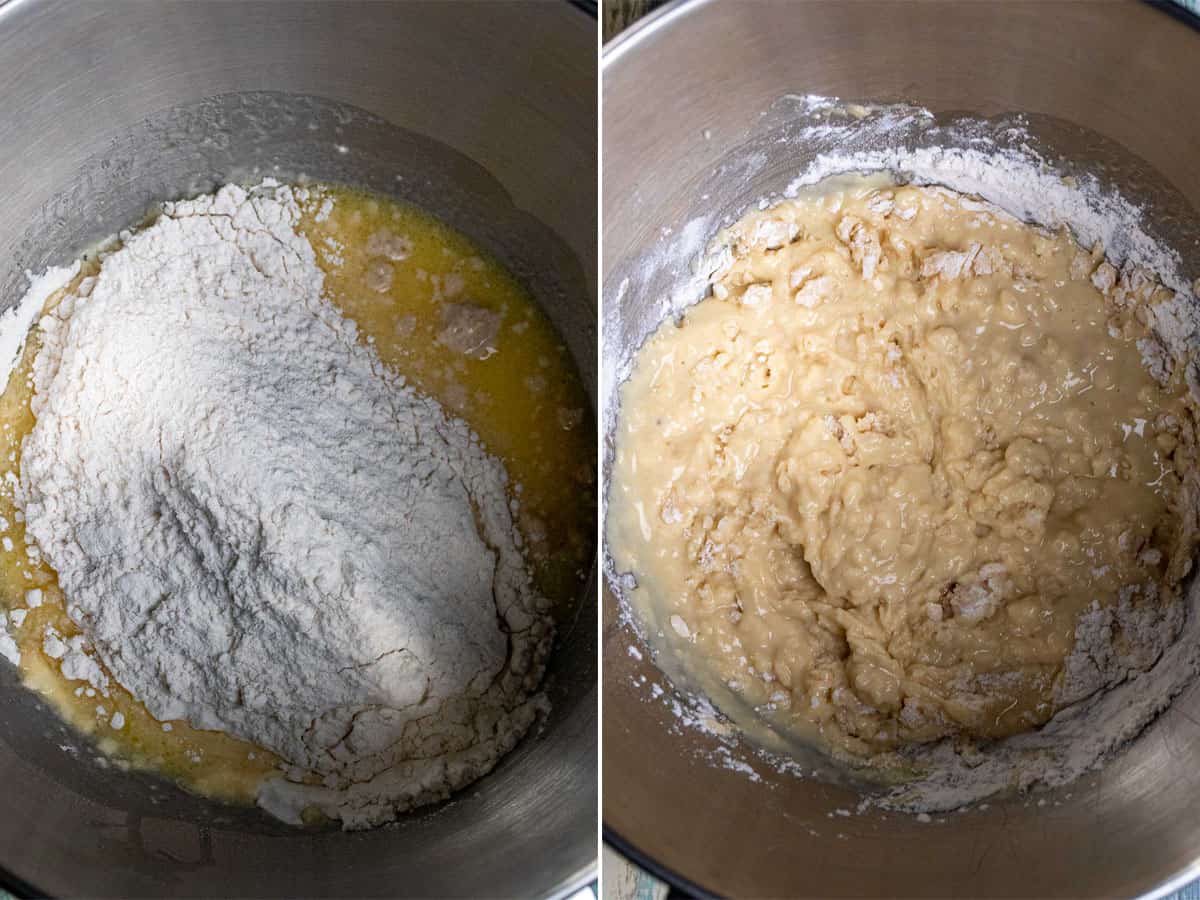
Add most of the bread flour, reserving roughly a ½ cup, and place on the stand mixer with the dough hook attachment. Mix for about two minutes at stir speed, scraping down the sides, until a shaggy dough begins to form.
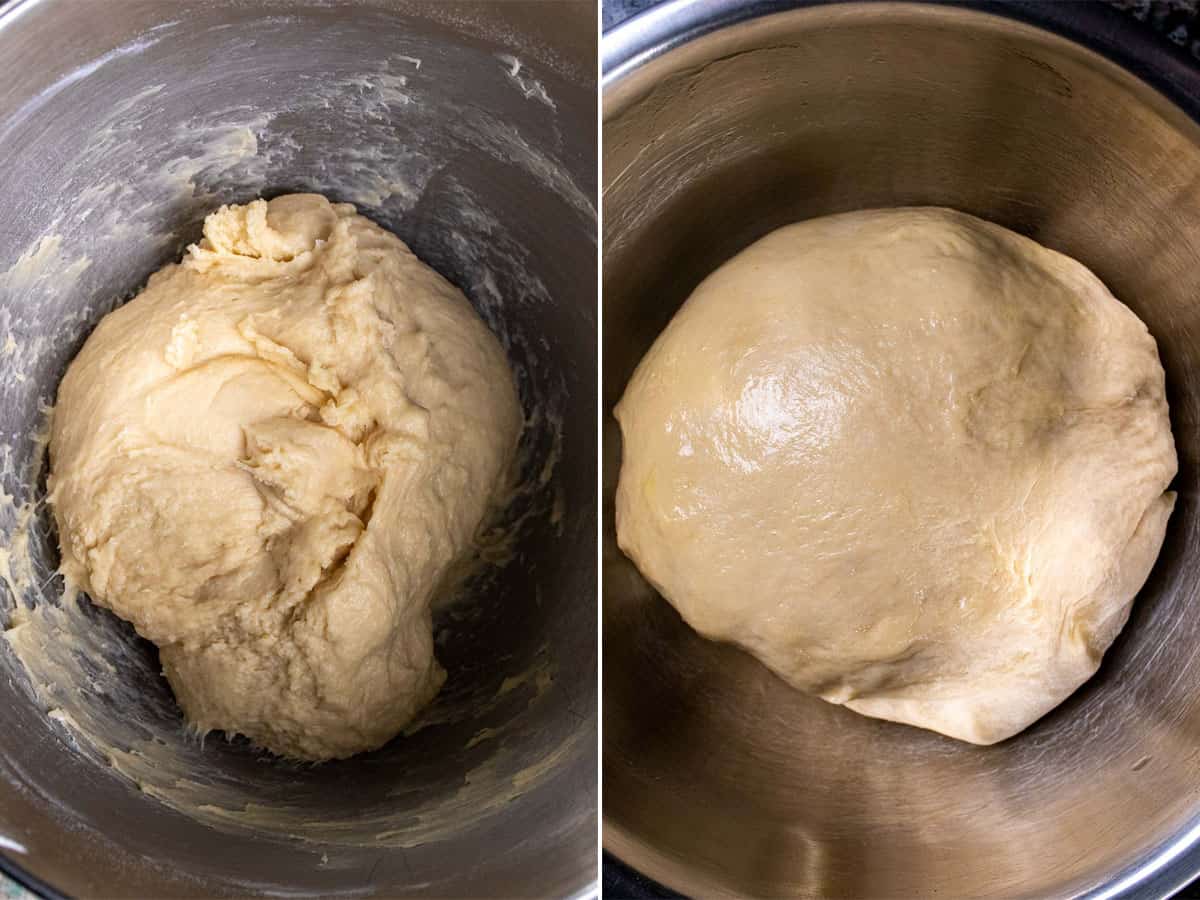
Toss in the salt and the rest of the flour and continue mixing at stir speed until combined, then turn to low speed and allow the dough to knead for 8-9 minutes. The dough should be slightly tacky, but not sticky. If it feels too sticky, add more flour a tablespoon at a time until it feels right. Lightly oil a large bowl and add the dough, turning to coat. Cover with plastic wrap or a damp towel and place in a draft-free, warm environment. Let it rise for 1-2 hours, until doubled in size.
Second Rise & Baking
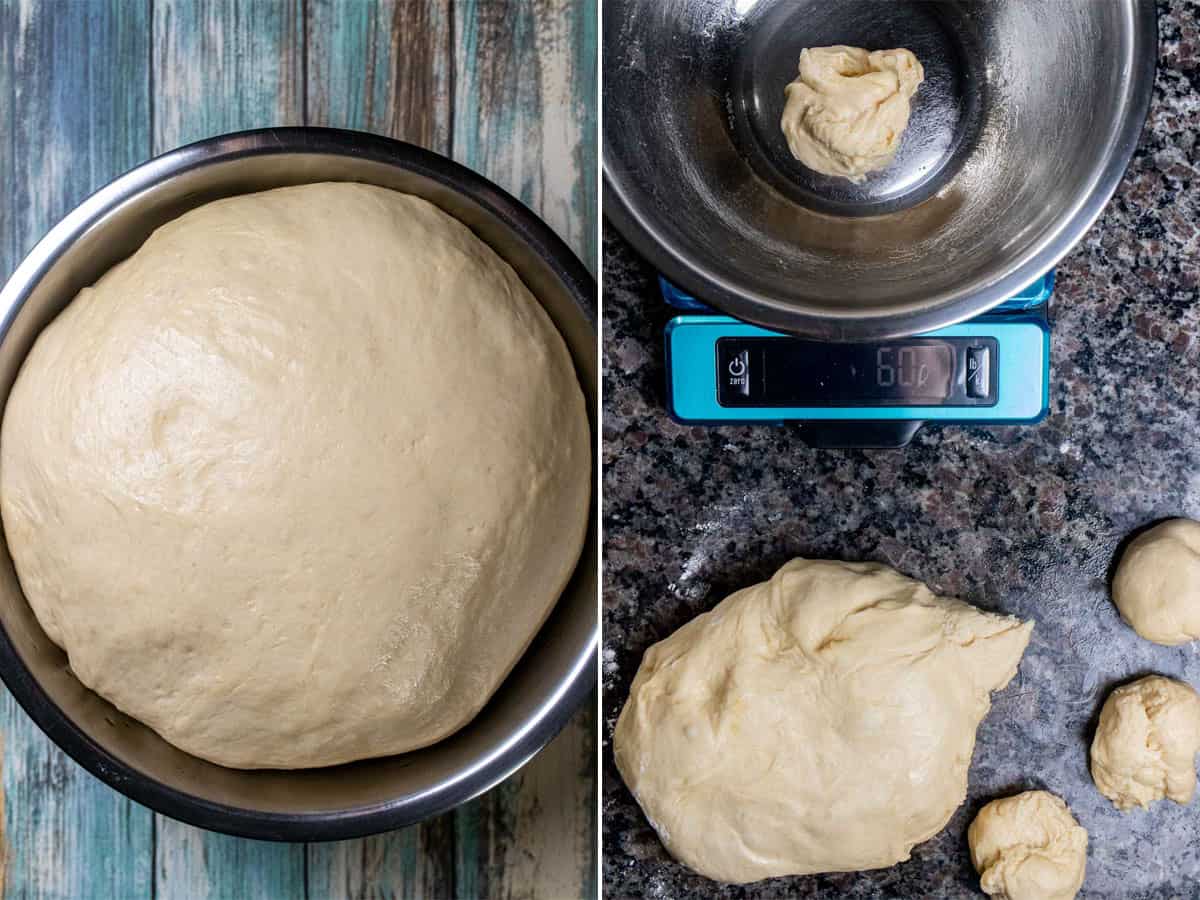
Once doubled in size, punch down the dough and turn out onto a lightly floured surface. Tear off pieces of dough to form 15 equal pieces. If using a kitchen scale, my dough was just under 900 grams, so about 60 grams (or 2 ounces) for each roll. Take each piece of dough and push your fingers under the dough towards you until a smooth top forms and pinch the bottom together. Place it on the floured surface and cup your hand over the ball and gently roll back and forth to seal the bottom and make a tight ball.
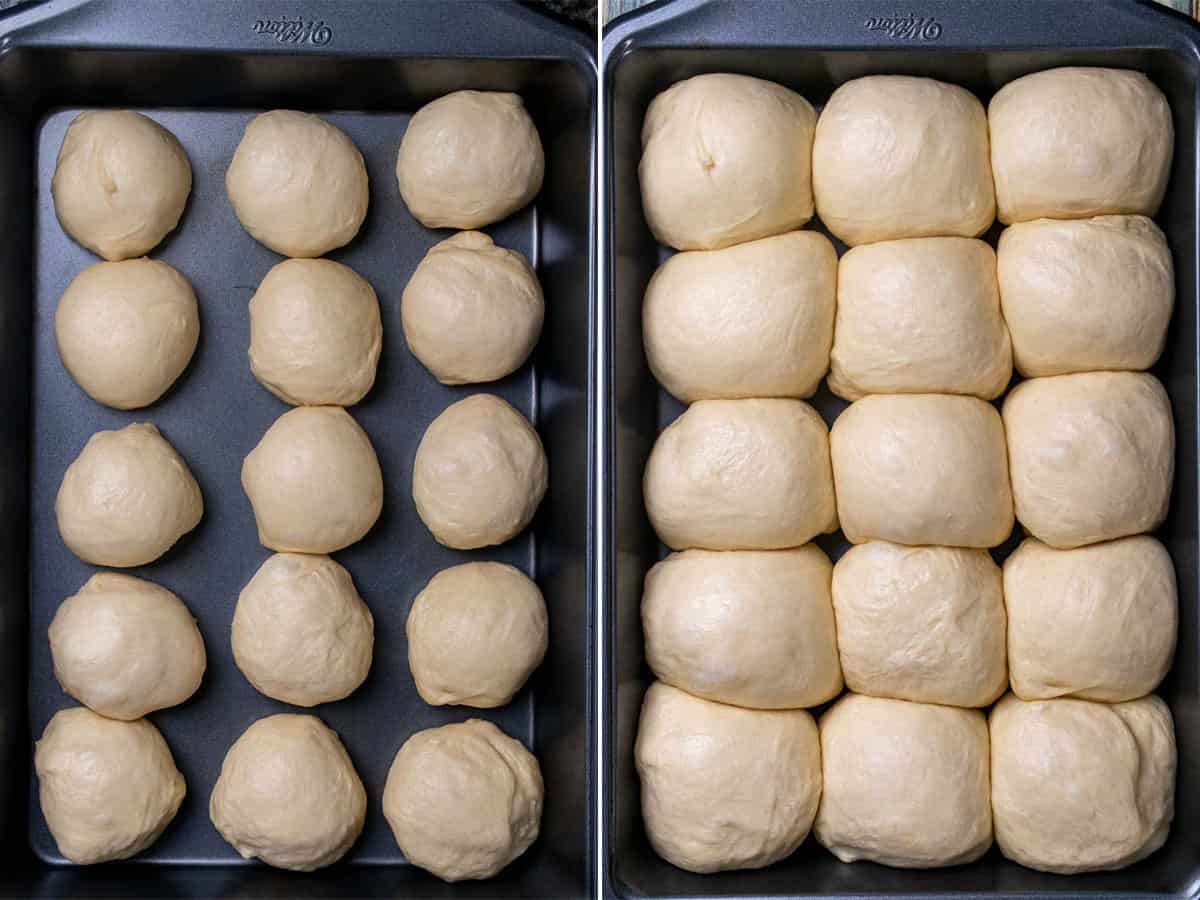
Place all 15 dough balls into a nonstick 9x13 baking dish and cover again for a second dough rise. This should take around 45-60 minutes. In the meantime, set aside a ¼ cup of butter to soften. When the second rise is almost over, preheat your oven to 350°F / 180°C.
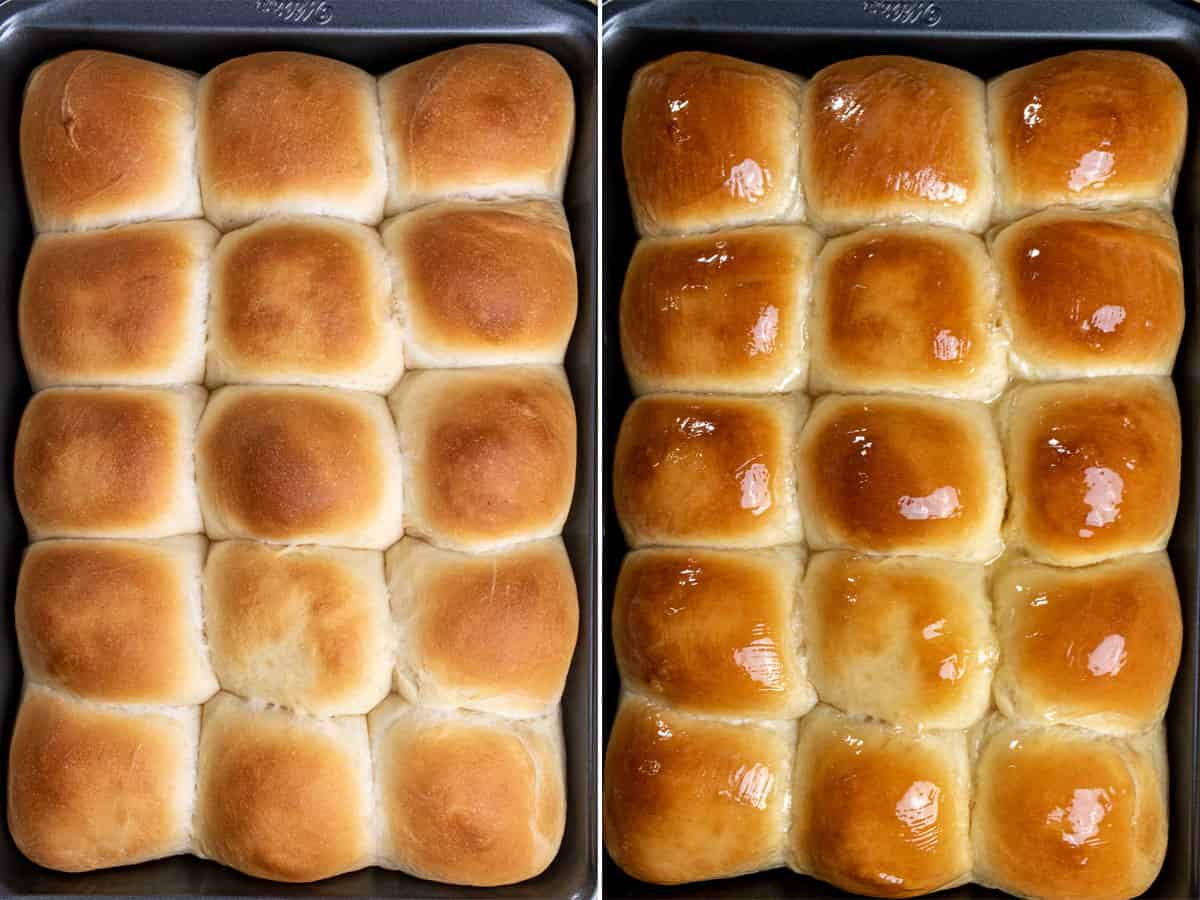
Once the dough has risen a second time (they should be puffed up and touching each other), set on the middle rack of the oven and bake for 18-20 minutes. While baking, place the softened butter in a small bowl and add honey to it. Use a fork to mix the honey into the butter until fully combined.
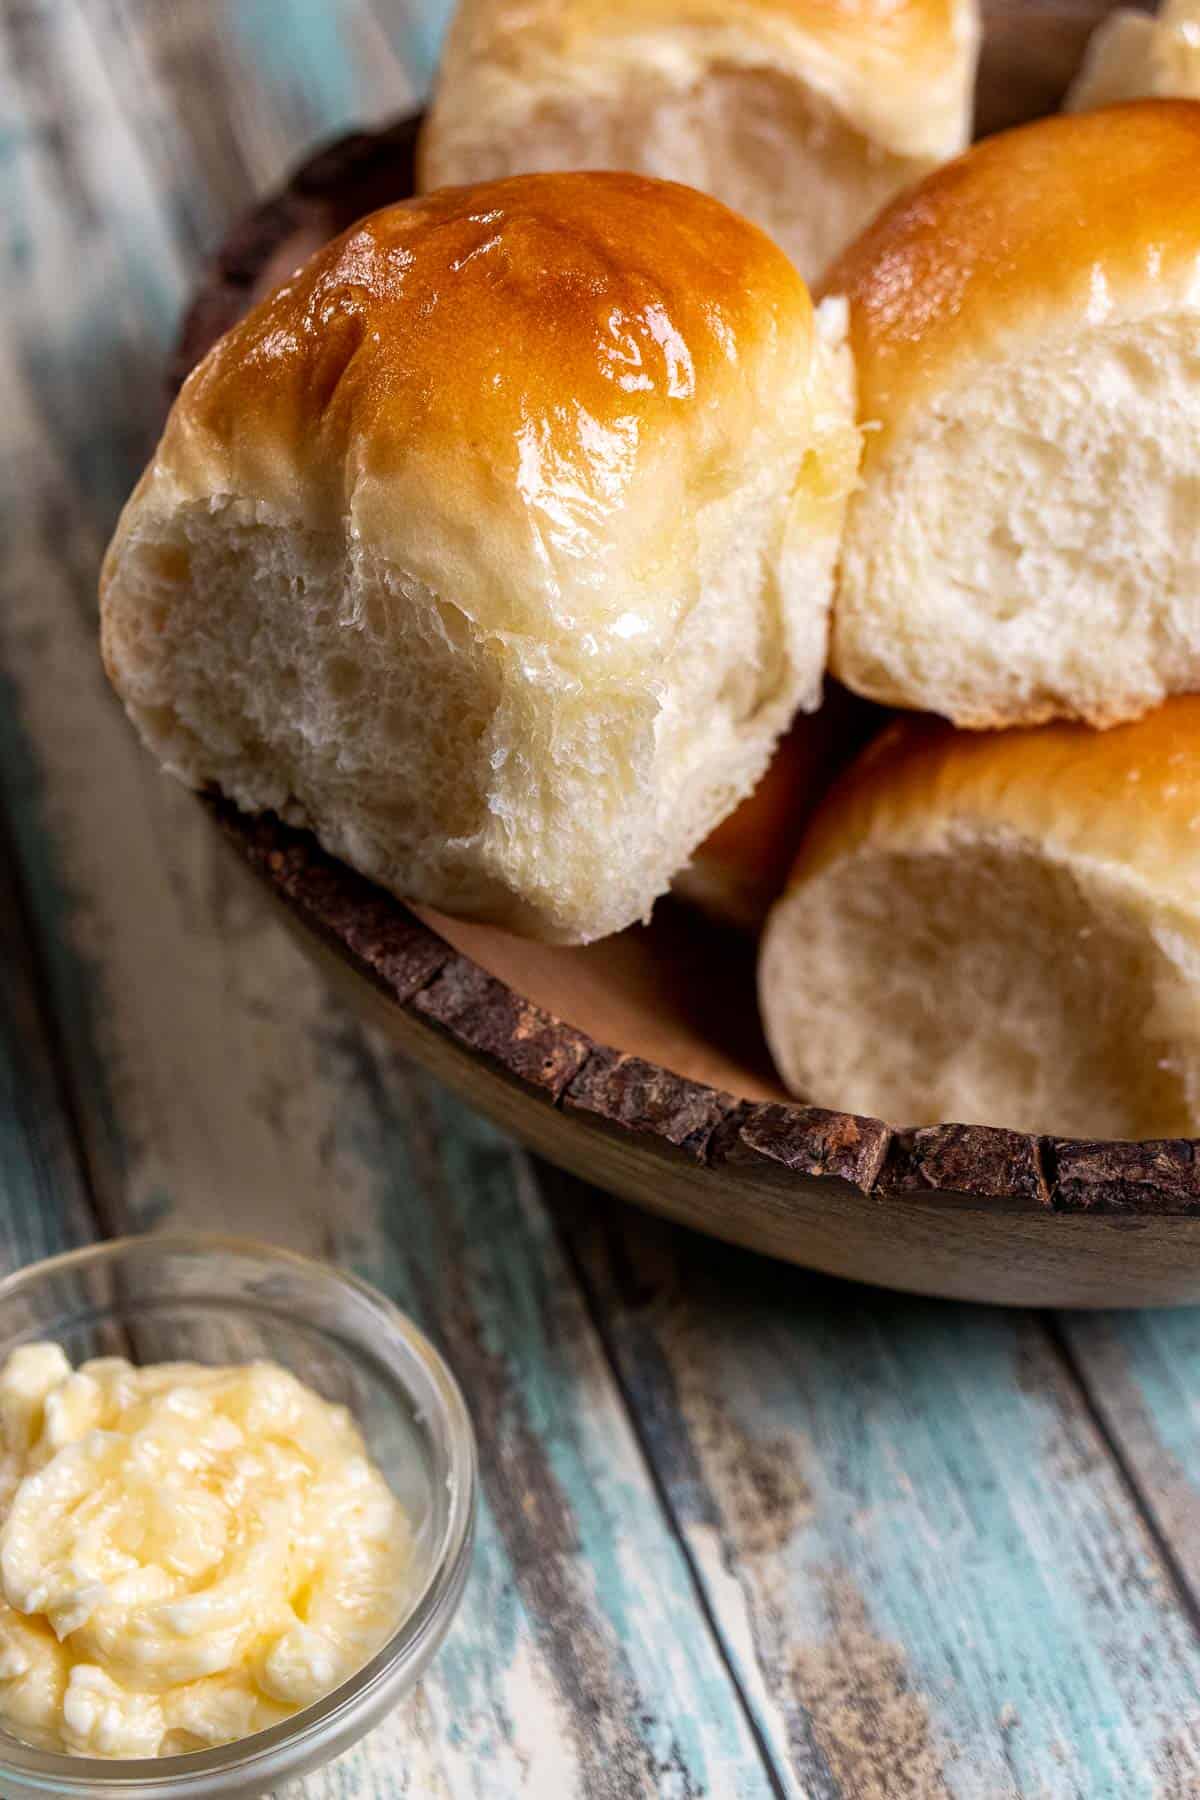
Remove the yeast rolls from the oven when they are finished baking and the tops are golden brown. As soon as you remove them from the oven, use a knife or pastry brush to slather on the honey butter. It will melt and coat all the tops in a wonderful glaze.
Allow them to cool for about 5 minutes and serve with the rest of the honey butter on the side.

🍽 Recommended Equipment
While you can make these yeasted dinner rolls by hand easily enough, here are a few items I recommend for an easier process.
Stand Mixer – A decent stand mixer is a bit of an investment, but if you plan to do much baking at all, I highly recommend one. Kitchen Aid is basically the gold standard for home bakers, and it really does make things easier, especially for hands off kneading.
Baking Pan – Most home cooks probably have a bunch of different baking pans already. If you don’t, I recommend this 13x9 metal baking pan for plenty of sweet and savory uses. I even like them for reheating some foods.
Kitchen Scale – While not a requirement for most home cook needs, an inexpensive digital kitchen scale comes in handy. In addition to making my dinner rolls equal sizes here, I also use it to measure flour in grams much faster and more accurately than scooping with measuring cups.
💭 Frequently Asked Questions
Usually, the problem is adding too much flour when making the dough. The dough should still be slightly tacky after kneading, but not super sticky. If you keep adding flour while kneading, the finished bread can be quite dense.
Alternatively, not giving the dough a proper rise can hurt also. It should double in size before cutting into even pieces for the rolls, then rise a second time. Properly risen, the dough should spring back when you push your finger into it.
Poke test – When you poke the bread with a finger and it springs back, it should be good. If the indent keeps its shape, keep kneading.
Windowpane test – Tear off a small piece of dough and try to stretch it out thin enough to see light through it. If you can see light and it doesn’t tear when trying to stretch it out, it’s ready to rise.
Typically, no, all-purpose flour can be used instead. Bread flour has a higher percentage of protein though, which means more gluten. That extra gluten will make a more airy, chewy bread.
Once made, you can store them at room temperature in an airtight container for 4-5 days. You can also freeze them once cooled completely and stored in an airtight container for up to 3 months.
Yes! There are two methods depending on how far ahead you wish to make them. If making these a day or two ahead of time, do everything up until the second rise. Refrigerate, covered, until the day you need them. Allow them to finish rising and come to room temperature for about 2 hours before baking.
If making further ahead of time, you can freeze the shaped rolls before their second rise. When you’re ready to make them, remove them from the freezer, add to the baking pan and allow to thaw and rise on the counter for 4-5 hours before baking.
❄️How to Store Yeast Dinner Rolls
Once cooled, you can store honey butter dinner rolls in an airtight container at room temperature for 2-3 days. If you have more leftover rolls than you think you can finish in a day or two, I recommend refrigerating them. Placing them in the fridge will dry them a bit faster, but they should last up to a week that way.
If you have a bunch of leftovers or made them well in advance, you can also freeze them. Place them in an airtight freezer container for up to 3 months.
If you want to make these ahead of time, you have a few options as well, as mentioned in the FAQs above. If making the next day, you can prepare them up to the point where they rise a second time. Cover and refrigerate overnight, then remove them 2-3 hours before you need them. Allow them to rise again and then bake as directed.
For making ahead and freezing, you will do the same as above preparing them until ready for a second rise. This time you will place on a sheet tray and set them in the freezer for 1-2 hours. After that you can transfer the frozen dough balls to a freezer safe bag and freeze for up to 3 months. When ready to bake, remove from the freezer and allow them to thaw and rise at room temperature for 4-5 hours and then bake as directed.
To reheat these dinner rolls, you can simply pop 1-2 in the microwave for 10-20 seconds depending on if they were at room temperature or refrigerated. If I were to reheat a bunch or to serve them to guests, I would place them in a baking pan in a 350°F / 180°C oven for 8-10 minutes.
📋 Recipe
Honey Butter Yeast Rolls
Ingredients
Honey Butter Rolls:
- 1 cup whole milk, warm
- 2 ¼ teaspoons instant yeast, 1 packet
- 1 teaspoon granulated sugar, or honey
- ¼ cup honey
- 1 large egg, at room temperature
- 1 large egg yolk, at room temperature
- ¼ cup unsalted butter, melted and cooled
- 1 teaspoon kosher salt
- 3 ½ cups bread flour
Honey Butter Topping:
- ¼ cup butter, softened
- 1 tablespoon honey
Directions
Make the Dough & First Rise:
- Begin by melting ¼ cup unsalted butter and proofing the yeast. In a liquid measuring cup, heat 1 cup whole milk until warm (about 100°F / 38°C), add 1 teaspoon granulated sugar (or honey) and 2 ¼ teaspoons (1 packet) yeast and stir together. Set aside to bloom for about 10 minutes. Place the butter in a small bowl and microwave for 20 seconds, and again in 10 second increments until it is just melted. Set aside to cool slightly.
- If the yeast and milk are bubbly and frothy looking after 8-10 minutes, the yeast is good, and you can begin making the dough. In the bowl of a stand mixer, or in a large mixing bowl, add 1 large egg, 1 large egg yolk, ¼ cup honey, and the melted butter. Use a fork and mix until the eggs are nice and scrambled, then add the milk and yeast mixture and stir together again.
- Add most of the 3 ½ cups bread flour, reserving roughly a ½ cup, and place on the stand mixer with the dough hook attachment. Mix for about two minutes at stir speed, scraping down the sides, until a shaggy dough begins to form.
- Toss in 1 teaspoon kosher salt and the rest of the flour and continue mixing at stir speed until combined, then turn to low speed and allow the dough to knead for 8-9 minutes. The dough should be slightly tacky, but not sticky. If it feels too sticky, add more flour a tablespoon at a time until it feels right. Lightly oil a large bowl and add the dough, turning to coat. Cover with plastic wrap or a damp towel and place in a draft-free, warm environment. Let it rise for 1-2 hours, until doubled in size.
Second Rise & Baking:
- Once doubled in size, punch down the dough and turn out onto a lightly floured surface. Tear off pieces of dough to form 15 equal pieces. If using a kitchen scale, my dough was just under 900 grams, so it was about 60 grams (or 2 ounces) for each roll. Take each piece of dough and push your fingers under the dough towards you until a smooth top forms and pinch the bottom together. Place it on the floured surface and cup your hand over the ball and gently roll back and forth to seal the bottom and make a tight ball.
- Place all 15 dough balls into a nonstick 9x13 baking dish and cover again for a second dough rise. This should take around 45-60 minutes. In the meantime, set aside a ¼ cup of butter to soften. When the second rise is almost over, preheat your oven to 350°F / 180°C.
- Once the dough has risen a second time (they should be puffed up and touching each other), set on the middle rack of the oven and bake for 18-20 minutes. While baking, place the softened butter in a small bowl and add 1 tablespoon honey to it. Use a fork to mix the honey into the butter until fully combined.
- Remove the yeast rolls from the oven when they are finished baking and the tops are golden brown. As soon as you remove them from the oven, use a knife or pastry brush to slather on the honey butter. It will melt and coat all the tops in a wonderful glaze.
- Allow them to cool for about 5 minutes and serve with the rest of the honey butter on the side.


Heidi says
These are the best!