
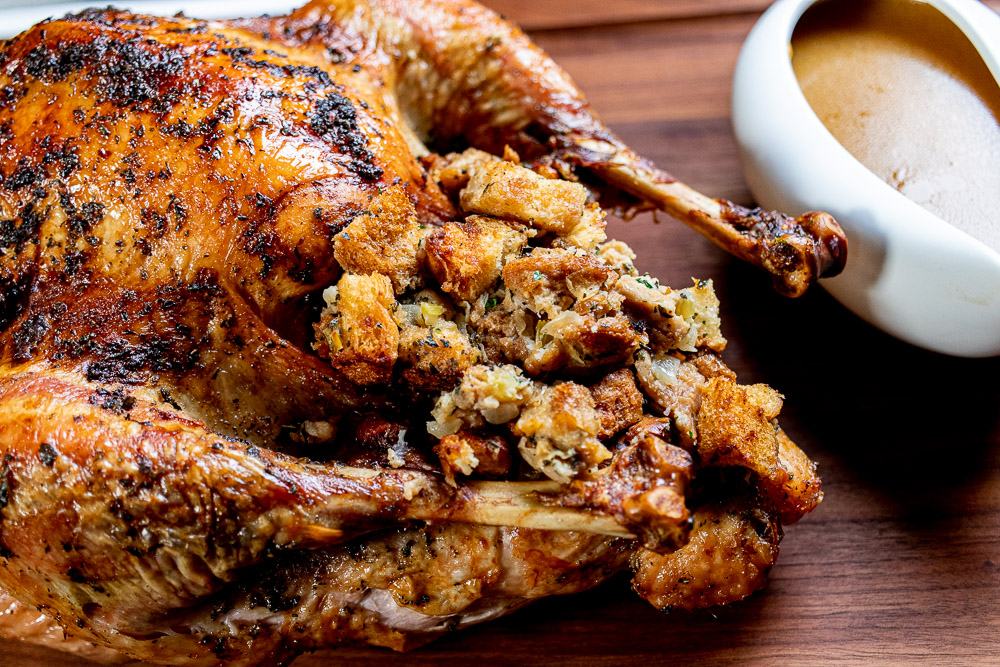
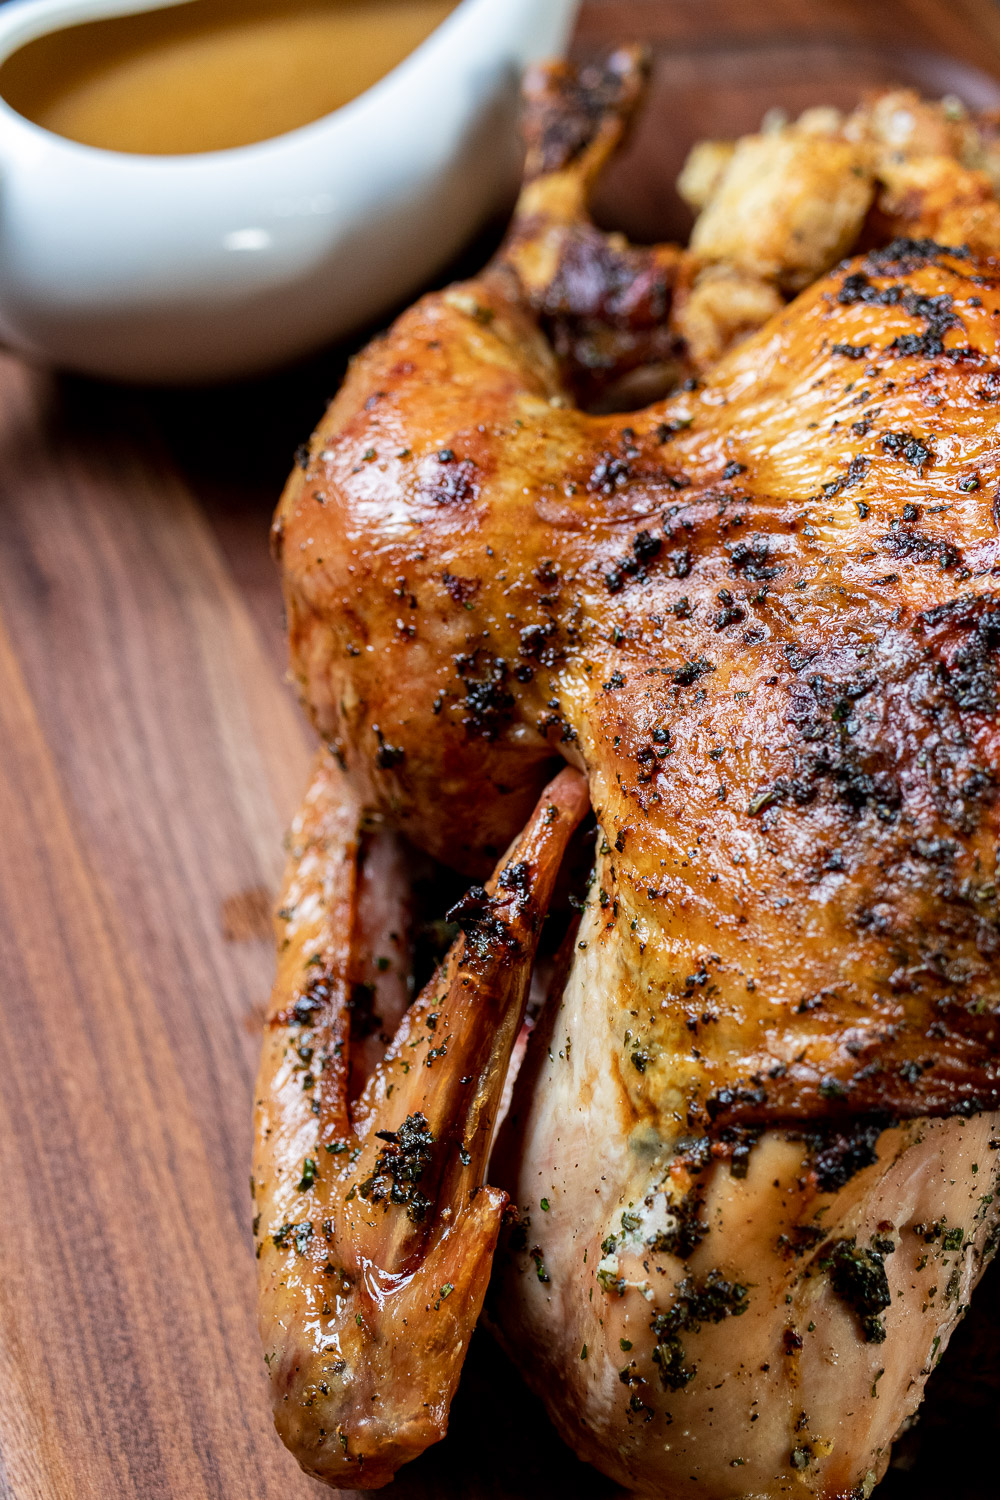
With all the ways to cook a turkey, roasting in the oven tends to still be the most common method. Just thawing and tossing it into the oven with maybe some butter is boring though, especially when you can make an herb-roasted turkey and gravy without a lot of extra steps. The flavor these fresh herbs add really makes a difference to the standard turkey.
This recipe can take a basic turkey on Thanksgiving and turn it into a real showstopper, or any time of the year you’d like to roast a turkey. The turkey will come out with a golden-brown sheen and the smell is incredible. If you’re making the gravy at the same time, it comes out with an amazing flavor that compliments the bird perfectly as well.
A few years ago, I wanted to show my parents the difference in a totally scratch-made Thanksgiving compared to just making all the standard recipes from the back of packages. This turkey was one of the items that I made them. It went over well enough, I usually do it every year now, or at least every other year. I do like switching things up at times. So, if you’re looking for a new recipe to try this Thanksgiving, give an herb-roasted turkey and gravy a go.
To Brine, or Not to Brine?
This is totally a personal preference, and if you prefer to brine your turkey, go for it. Personally, I usually do not. I could go into the whole science behind brining and how to do a brine, but that’s a little beyond the scope of this recipe. If you normally brine your bird, feel free to do so and just reduce the amount of salt used in the rub before cooking.
What I will say about brining is this: it DOES make your turkey taste moister, but it’s a watery moisture and not a turkey-flavored moisture. Also, it’s a huge hassle. You need a huge bucket or Cambro (restaurant term), or a big cooler that you can fill with not only the turkey, but a few gallons of water. Oh, and it also needs to stay cold for 24-48 hours, so unless you have an extra refrigerator in a garage, most people just don’t have the space for doing a wet brine in their home.
If you do have enough space in a fridge to fit a turkey on a baking sheet though, I do recommend trying a dry brine. It’s basically salting the turkey and leaving it uncovered in a fridge for 24-48 hours to do its thing. Again though, with everything else you might be cooking and storing, on top of other food and condiments, most people just don’t have the space for brining.
Herb-Roasted Turkey Gravy
This gravy is made on the stovetop while the turkey cooks in the oven. After you get it going, it’s a lot of hands-off work. If you don’t feel like making it, feel free to skip the ingredients and directions for the gravy. The flavor makes use of both the turkey neck, turkey drippings after it’s cooked, and the giblets and other organs in that bag we all toss out from inside the turkey (if you want to use those, I do not).
While it’s not a lot of extra work, if you’re going to be too busy on the big day, there’s nothing wrong with using a store-bought gravy instead. This recipe should make about 3 cups of gravy after it’s all cooked. You can also make it in advance and add the drippings after you cook the turkey.
Ingredients for Herb-Roasted Turkey and Gravy

Turkey – Obviously. This recipe should be good for a 10-14lb turkey. If you’re going to do a bigger turkey, slightly increase the ingredients. If you’re doing an 18-22lb turkey, I would double everything.
Salt & Pepper – You’ll want both kosher salt and table salt here, as well as some black pepper. You will rub the turkey down in a mixture of kosher salt and black pepper before adding the herb butter, and you will add table salt and black pepper to the gravy if making.
Butter – I use 12 tablespoons of butter for the recipe (1 ½ sticks). You’ll need 1 stick for the turkey and the other 4 tablespoons will go with the gravy.
Fresh Herbs – I use a mixture of flat-leaf parsley, rosemary, thyme, and sage for this recipe. Unlike my stuffing recipes, I do not suggest substituting dry herbs or poultry seasoning here, it will not taste the same at all. If you want to save money, look for a poultry herb blend that will have everything but the parsley, and get the parsley separately.
Garlic – This will go into the butter with the herbs. You only need 2-3 cloves to add flavor. Don’t go overboard with the garlic or the flavor will overpower the herbs and probably just burn as the turkey cooks.
Oil – Use a few tablespoons of a neutral, high-heat oil to cook the vegetables that will be added to the gravy.
Mirepoix – Like most soups and stocks, you’ll want a mirepoix base of onion, carrot, and celery for the gravy. You’re not technically making a whole stock here, just doctoring up the flavor in the stock you use as the base for the gravy. Add 1-2 bay leaves for good measure.
Chicken Stock – Yes, it’s chicken and not turkey, but sometimes we need a cheat, and you’ll be adding the turkey neck and drippings to boost the turkey flavor. I suggest a low-sodium or no salt stock/broth, or homemade chicken stock. If you can actually find a turkey stock, or make your own, definitely use that.
Flour – You only need a ¼ cup of all-purpose flour here. You’ll add it with the reserved butter to make a roux later to thicken the gravy.
How to Cook Herb-Roasted Turkey and Gravy
Before going into directions here, I suggest having a quality instant-read thermometer. You want to be able to get super quick temperature readings without taking the whole turkey out to check or leaving the oven door open for too long.
Move your oven rack to the lowest position and remove any other racks. If you have a baking stone or steel, place it in the middle of the rack. Preheat your oven to 500°F/260°C for at least 30 minutes to an hour before cooking.
Prepare the turkey by removing any plastic pieces holding the legs together and remove the neck and bag with any organs that might be included in the cavity. Clean out any debris in the cavity and using paper towels, pat all the skin dry inside and out of the turkey. Now trim any excess skin coming out of the cavity and from the neck, reserve any of the trimmings for later. Loosen the skin from the breasts enough that you can get your fingers underneath without tearing it.
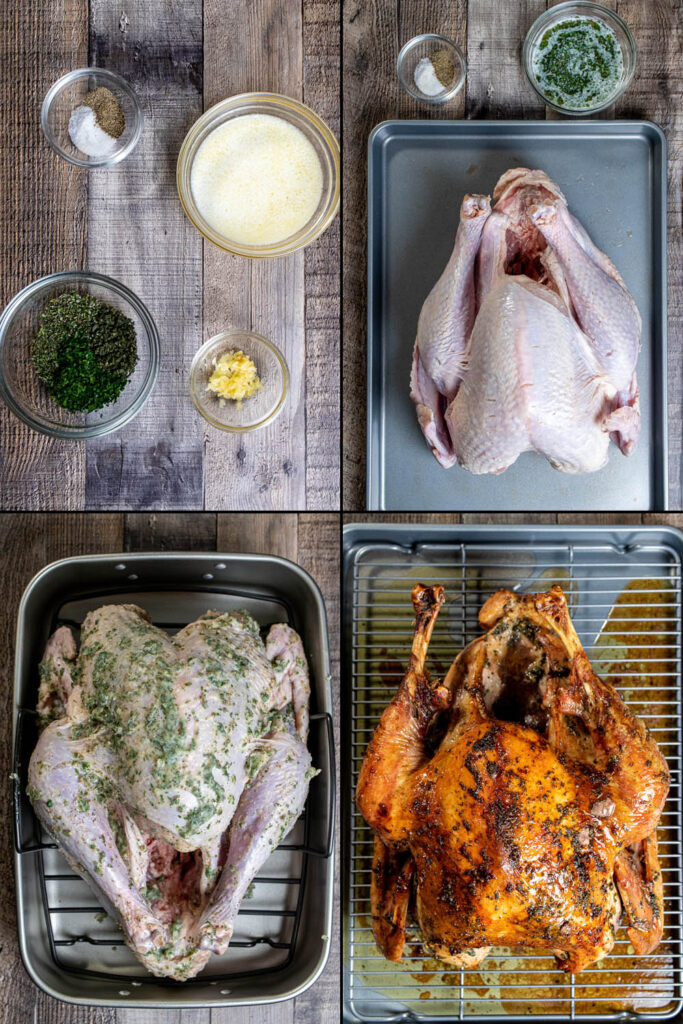
Melt one stick of unsalted butter and mix in the chopped herbs and minced garlic, set aside to cool. Mix some kosher salt and black pepper together and rub it all over the turkey, inside and out, and under the loosened skin. Now take your cooled herb-butter and rub it all over the turkey just like you did with the salt and pepper.
Place the turkey breast side up in a rack set into your roasting pan and place the roasting pan into the oven on top of the baking stone if using. Close the oven and turn the temperature down to 325°F/165°C. This initial blast of heat will help start browning the turkey skin and drying it out to become crispy. The high heat will also take awhile to reduce to 325, boosting the cooking process.
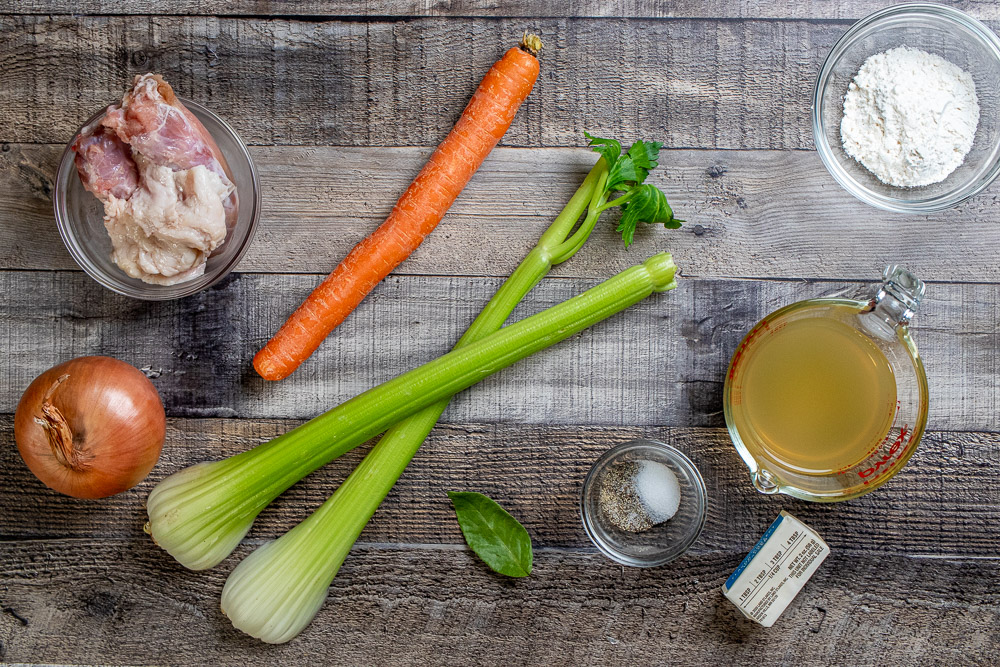
While the turkey is cooking, begin working on the gravy. Since the vegetables are mostly there for flavoring, you only need to roughly chop them instead of a small dice. Heat some oil in a large saucepan or pot over medium-high heat. Add the onion, carrot, celery, turkey neck, and any trimmings you cut from the turkey, a few pinches of salt and pepper, and cook, stirring occasionally until the vegetables begin to brown, 10-12 minutes.
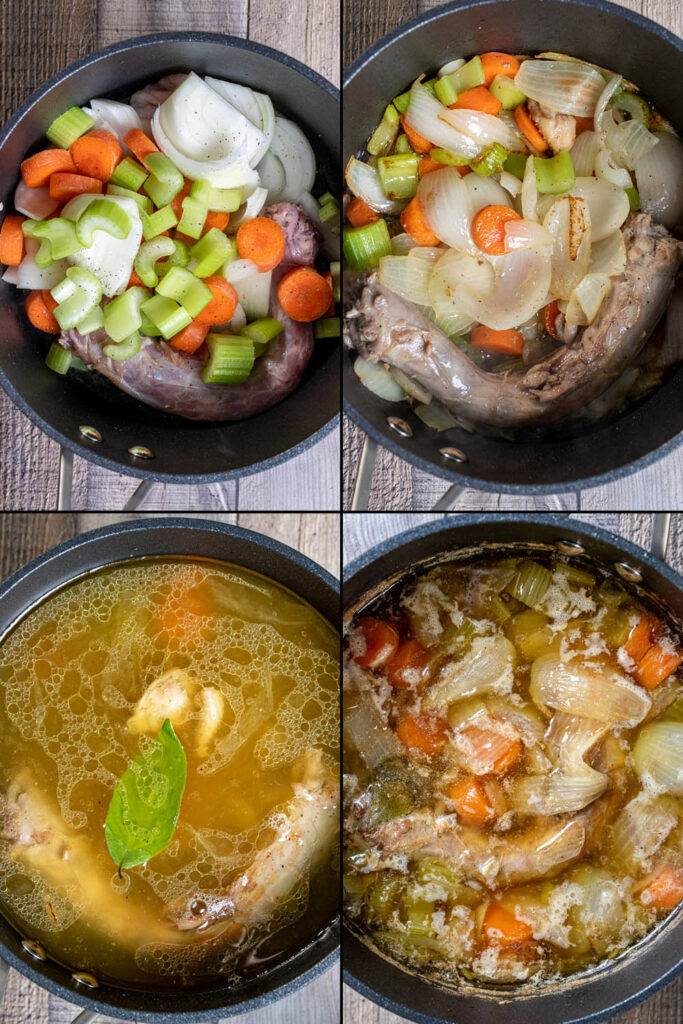
Add 6 cups of stock to the pot along with a bay leaf or two, remove the trimmings you added, and bring to a boil. Once boiling, reduce to a simmer and let reduce for about an hour, skimming any fat or scum from the top. After an hour or so, remove from the heat and pour through a fine mesh strainer into a large measuring cup or bowl, toss the solids out. The stock should have reduced to about 4 cups, if not, return to the pot and continue to reduce. If you reduced it too much, add some more stock so that it equals 4 cups.
In the meantime, check on your turkey at least once an hour, spooning any butter drippings over the top of the turkey. Depending on the size of your turkey, you’ll want to start checking on the temperature at about the two-hour mark. Check both the breast and the thigh for temperature readings. Insert an instant-read thermometer into the deepest part of the breast and into the thigh on the inside of the drumstick (leg). Remove the turkey when the breast registers around 155°F/68°C and the thigh is about 165°F/74°C. If the turkey is getting a little too dark and not close to being done, tent with foil.
After you remove the turkey from the oven, transfer to baking sheet with a wire rack and pour most of the melted butter from the roasting pan over the turkey, then cover with foil. The temperature will continue to rise from carry-over cooking, and you’ll want to let the turkey rest for at least 30-40 minutes before carving.
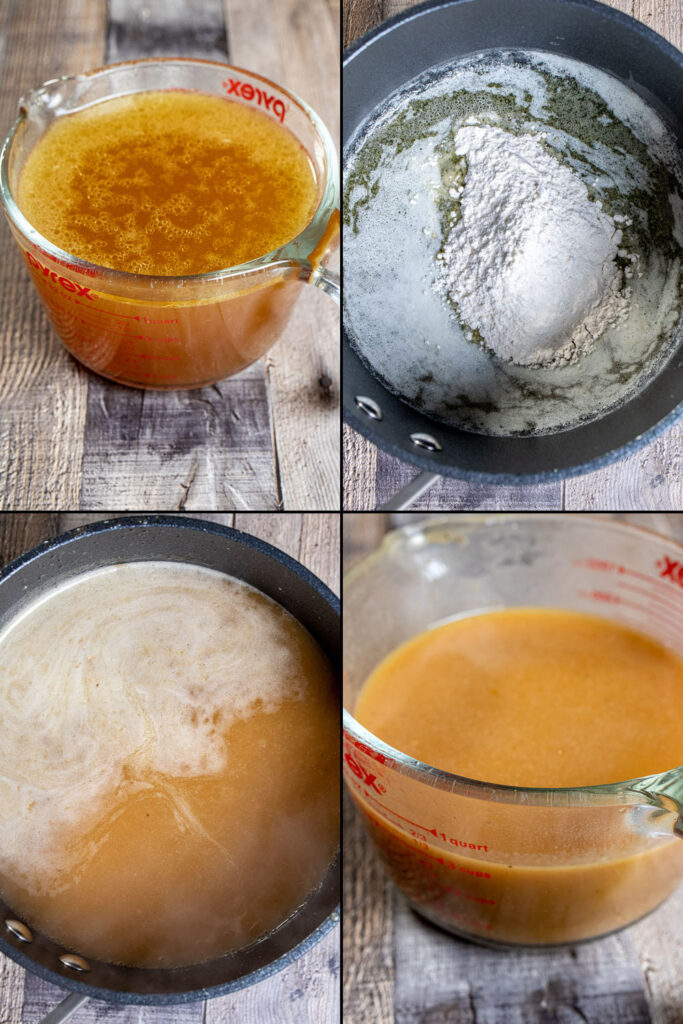
While the turkey rests, finish making the gravy. Pour at least half of the stock you made into the roasting pan and use a wooden spoon or spatula to scrape up any fond left behind on the bottom of the pan. Pour it back into the large measuring cup or bowl through a fine mesh strainer again.
Set a medium sized saucepan or pot on the stove on medium-high heat. Add the reserved 4 tablespoons of butter and melt. If you’re using the giblets and organs, finely chop them and add them to the butter. Once melted, add the flour and whisk constantly to create a roux. Cook until the roux is a light golden-brown color, about 3-4 minutes. Now, slowly pour the stock into the roux, whisking constantly. Once all the stock is incorporated, bring the mix to a boil and then reduce to a simmer until slightly thickened and reduced to about 3 cups. The gravy will thicken more as it starts to cool as well. Season with more salt and pepper to taste and set aside.
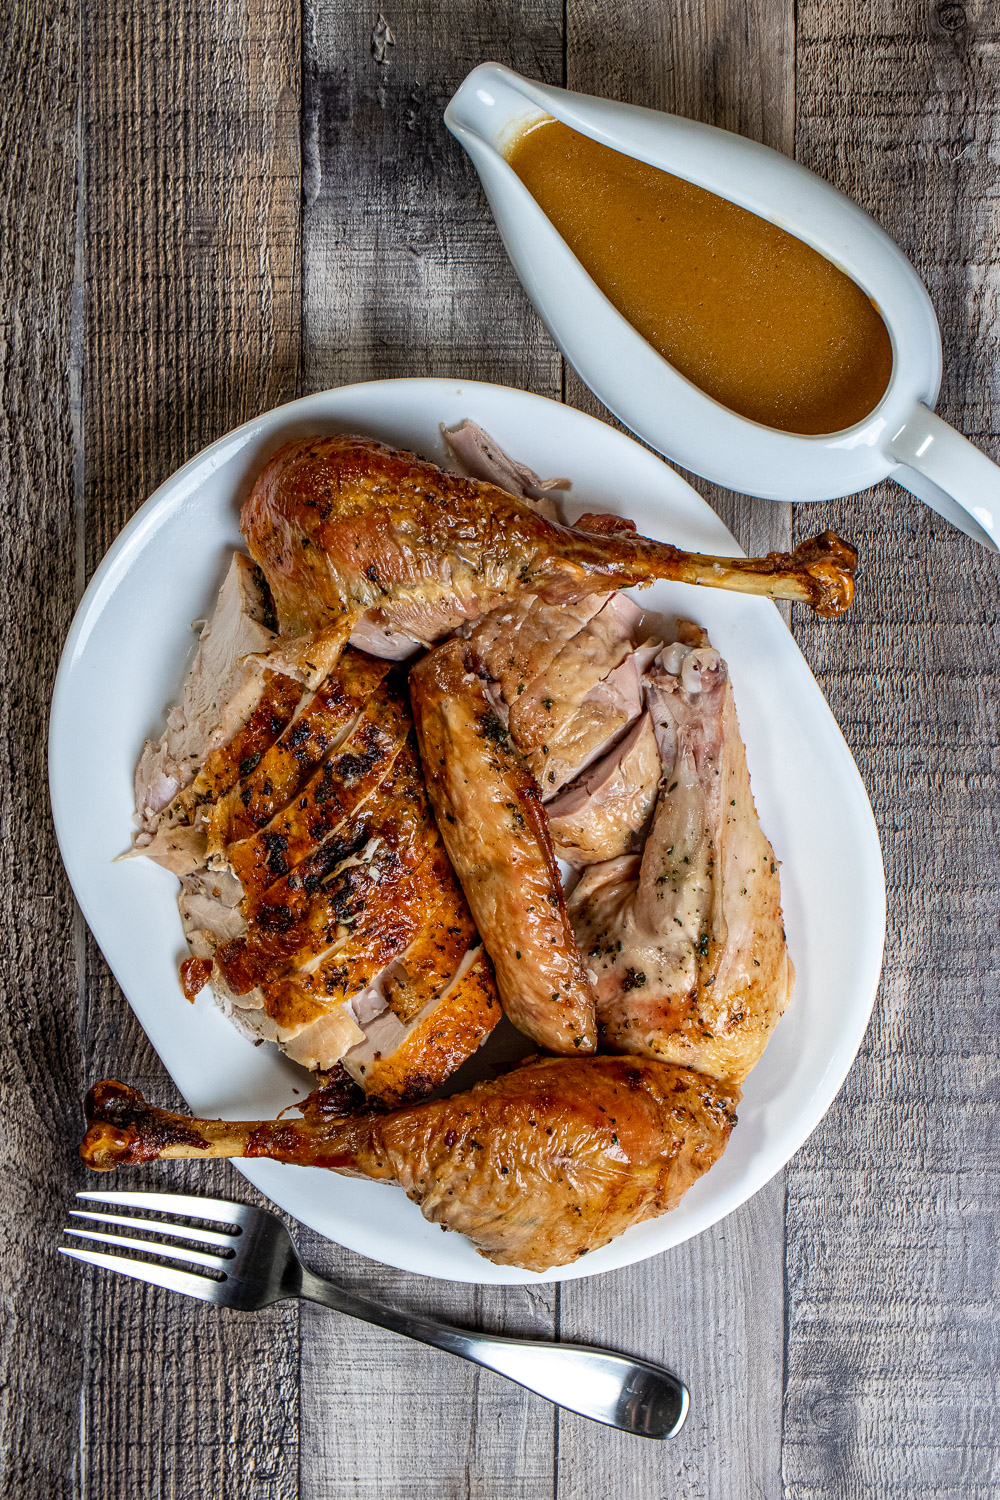
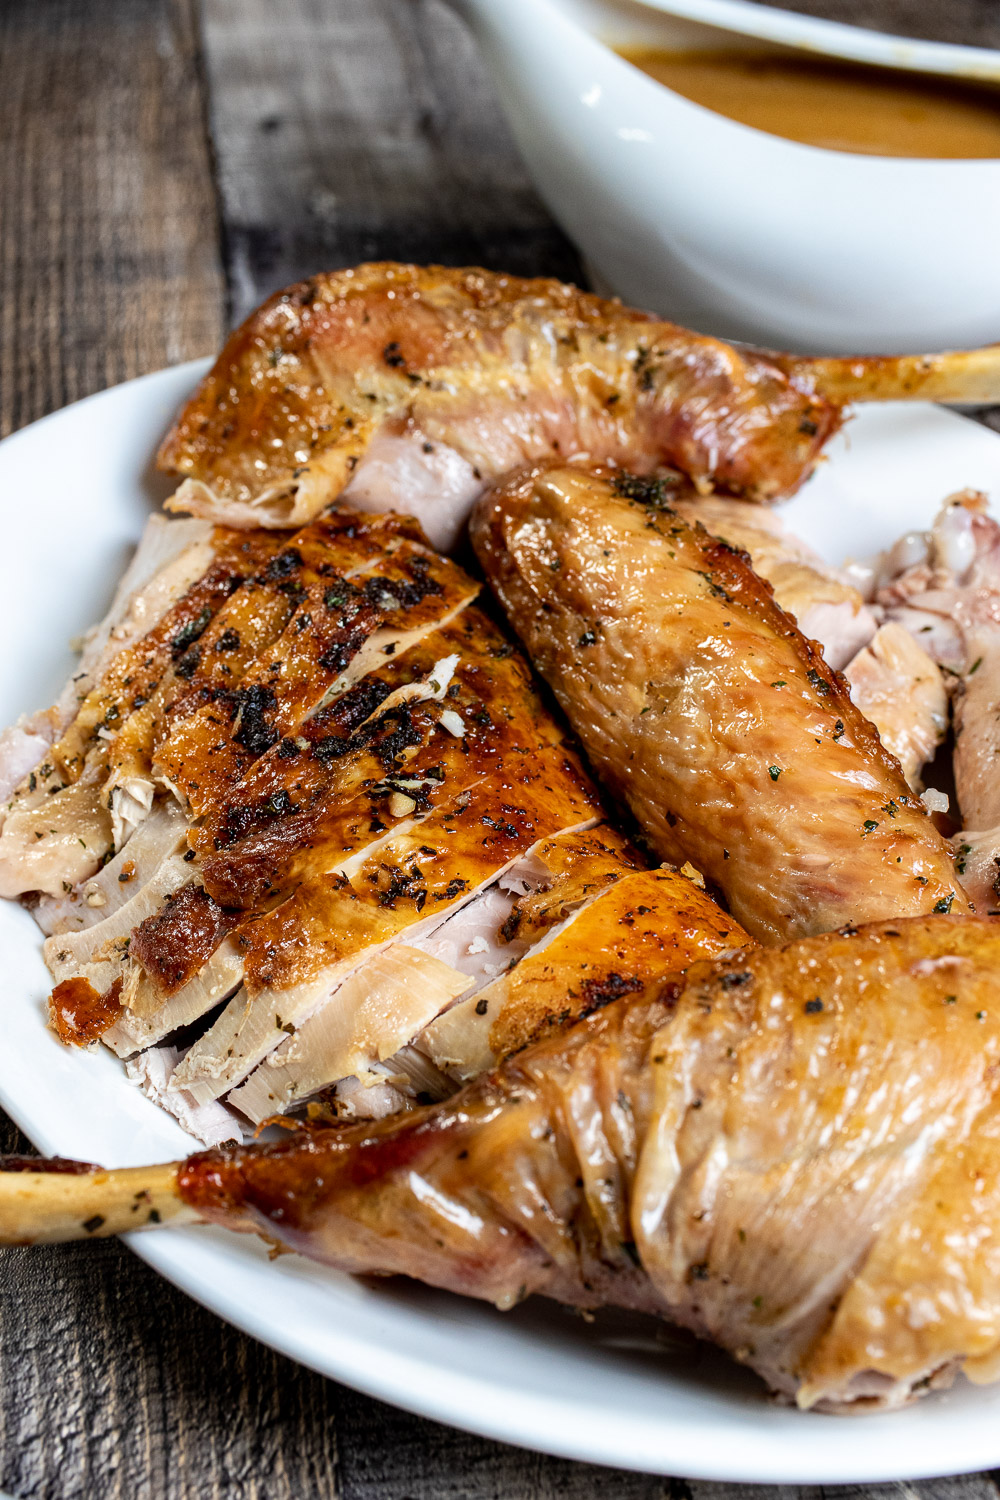
Once the turkey has rested, serve with the gravy how you’d like. You can add some stuffing and serve the whole turkey table side or carve the turkey and serve on a platter.
Herb-Roasted Turkey Stuffed or Not Stuffed?
Here's the main issue with cooking stuffing inside the bird: even if you cook the stuffing ahead of time, raw turkey juices will drip in and contaminate it, so the stuffing must reach 165°F to be considered safe to eat. Adding stuffing to the turkey helps to shield the breast meat from the inside, keeping moisture intact, which is good, but it also means the turkey will take slightly longer to cook and the stuffing is being shielded from the heat even more. By the time the turkey is done, the stuffing might need a lot more cooking time, and by the time the stuffing is done, the turkey may be overcooked and dry.
If you really want to cook the stuffing inside the turkey, its best to bring the stuffing to a high temperature before adding it. Line the body cavity with cheesecloth and add your stuffing but don’t pack it in too densely. Now remove the cheesecloth and stuffing and microwave it until it reaches about 180°F and place it back inside the turkey. This ensures that the stuffing will maintain a safe temperature while cooking the turkey. The cheesecloth is semi-permeable so that you’ll still get the dripping flavors while making it easy to remove after cooking.
While this should be a foolproof way to cook stuffing inside the turkey, you do so at your own risk. One last thing about cooking stuffing inside your turkey: stuff the turkey immediately before cooking. Never stuff the bird the night before or early in the morning, only right before you place it into the oven.
Personally, I just make the stuffing/dressing separately to make things easier, and you can do it ahead of time.
What to Serve with Herb-Roasted Turkey and Gravy
Obviously, this is always going to be a biased list since every family has their own traditions on what they like to serve on Thanksgiving, or another holiday, or you’re just making a big turkey.
Here’s a few popular choices though:
- Classic Stuffing
- Sausage and Sage Stuffing
- Corn Bread Dressing
- Cranberry Sauce
- Mashed Potatoes
- Baked Mac and Cheese
- Corn Pudding
- Green Bean Casserole
- Broccoli Casserole
- Parker House Rolls
- Honey-Butter Yeast Rolls
- Skillet Corn Bread
- Jalapeno Cheddar Corn Bread
And let’s not forget a few good options for dessert:
- Pumpkin Pie
- Pecan Pie
- Apple Pie
- Cranberry-Pear Crumble
Storing Herb-Roasted Turkey and Gravy
Once cooled, you can save leftover turkey in an airtight container in the fridge for 3-4 days. The gravy, however, should be used within 1-2 days, so be sure to store them separately unless you plan on finishing it all in the next day or two.
If you want to store leftovers longer, store in an airtight container and freeze for 2-3 months. Both the turkey and the gravy should be good for the same 2–3-month timeframe.
📋 Recipe

Herb-Roasted Turkey and Gravy
Ingredients
- 1 10–14-pound turkey
- Kosher salt and black pepper
- 12 tablespoons unsalted butter, (1 ½ sticks, divided)
- ½ cup chopped fresh parsley
- 1 tablespoon chopped fresh rosemary
- 1 tablespoon chopped fresh thyme
- 1 tablespoon chopped fresh sage
- 2-3 cloves garlic, minced
- 2 tablespoons neutral oil
- 1 large onion, chopped
- 1 large carrot, chopped
- 3 ribs celery, chopped
- 6 cups low-sodium chicken stock
- 1-2 bay leaves
- ¼ cup all-purpose flour
- Table salt and pepper to taste
Directions
- Move your oven rack to the lowest position and remove any other racks. If you have a baking stone or steel, place it in the middle of the rack. Preheat your oven to 500°F/260°C for at least 30 minutes to an hour before cooking.
- Prepare the turkey by removing any plastic pieces holding the legs together and remove the neck and bag with any organs that might be included in the cavity. Clean out any debris in the cavity and using paper towels, pat all the skin dry inside and out of the turkey. Now trim any excess skin coming out of the cavity and from the neck, reserve any of the trimmings for later. Loosen the skin from the breasts enough that you can get your fingers underneath without tearing it.
- Melt one stick of unsalted butter and mix in the chopped herbs and minced garlic, set aside to cool. Mix some kosher salt and black pepper together and rub it all over the turkey, inside and out, and under the loosened skin. Now take your cooled herb-butter and rub it all over the turkey just like you did with the salt and pepper.
- Place the turkey breast side up in a rack set into your roasting pan and place the roasting pan into the oven on top of the baking stone if using. Close the oven and turn the temperature down to 325°F/165°C. This initial blast of heat will help start browning the turkey skin and drying it out to become crispy. The high heat will also take awhile to reduce to 325, boosting the cooking process.
- While the turkey is cooking, begin working on the gravy. Since the vegetables are mostly there for flavoring, you only need to roughly chop them instead of a small dice. Heat some oil in a large saucepan or pot over medium-high heat. Add the onion, carrot, celery, turkey neck, and any trimmings you cut from the turkey, a few pinches of salt and pepper, and cook, stirring occasionally until the vegetables begin to brown, 10-12 minutes.
- Add 6 cups of stock to the pot along with a bay leaf or two, remove the trimmings you added, and bring to a boil. Once boiling, reduce to a simmer and let reduce for about an hour, skimming any fat or scum from the top. After an hour or so, remove from the heat and pour through a fine mesh strainer into a large measuring cup or bowl, toss the solids out. The stock should have reduced to about 4 cups, if not, return to the pot and continue to reduce. If you reduced it too much, add some more stock so that it equals 4 cups.
- In the meantime, check on your turkey at least once an hour, spooning any butter drippings over the top of the turkey. Depending on the size of your turkey, you’ll want to start checking on the temperature at about the two-hour mark. Check both the breast and the thigh for temperature readings. Insert an instant-read thermometer into the deepest part of the breast and into the thigh on the inside of the drumstick (leg). Remove the turkey when the breast registers around 155°F/68°C and the thigh is about 165°F/74°C. If the turkey is getting a little too dark and not close to being done, tent with foil.
- After you remove the turkey from the oven, transfer to baking sheet with a wire rack and pour most of the melted butter from the roasting pan over the turkey, then cover with foil. The temperature will continue to rise from carry-over cooking, and you’ll want to let the turkey rest for at least 30-40 minutes before carving.
- While the turkey rests, finish making the gravy. Pour at least half of the stock you made into the roasting pan and use a wooden spoon or spatula to scrape up any fond left behind on the bottom of the pan. Pour it back into the large measuring cup or bowl through a fine mesh strainer again.
- Set a medium sized saucepan or pot on the stove on medium-high heat. Add the reserved 4 tablespoons of butter and melt. If you’re using the giblets and organs, finely chop them and add them to the butter. Once melted, add the flour and whisk constantly to create a roux. Cook until the roux is a light golden-brown color, about 3-4 minutes. Now, slowly pour the stock into the roux, whisking constantly. Once all the stock is incorporated, bring the mix to a boil and then reduce to a simmer until slightly thickened and reduced to about 3 cups. The gravy will thicken more as it starts to cool as well. Season with more salt and pepper to taste and set aside.
- Once the turkey has rested, serve with the gravy how you’d like. You can add some stuffing and serve the whole turkey table side or carve the turkey and serve on a platter.
Notes
Nutrition


Heidi says
I love gravy!