

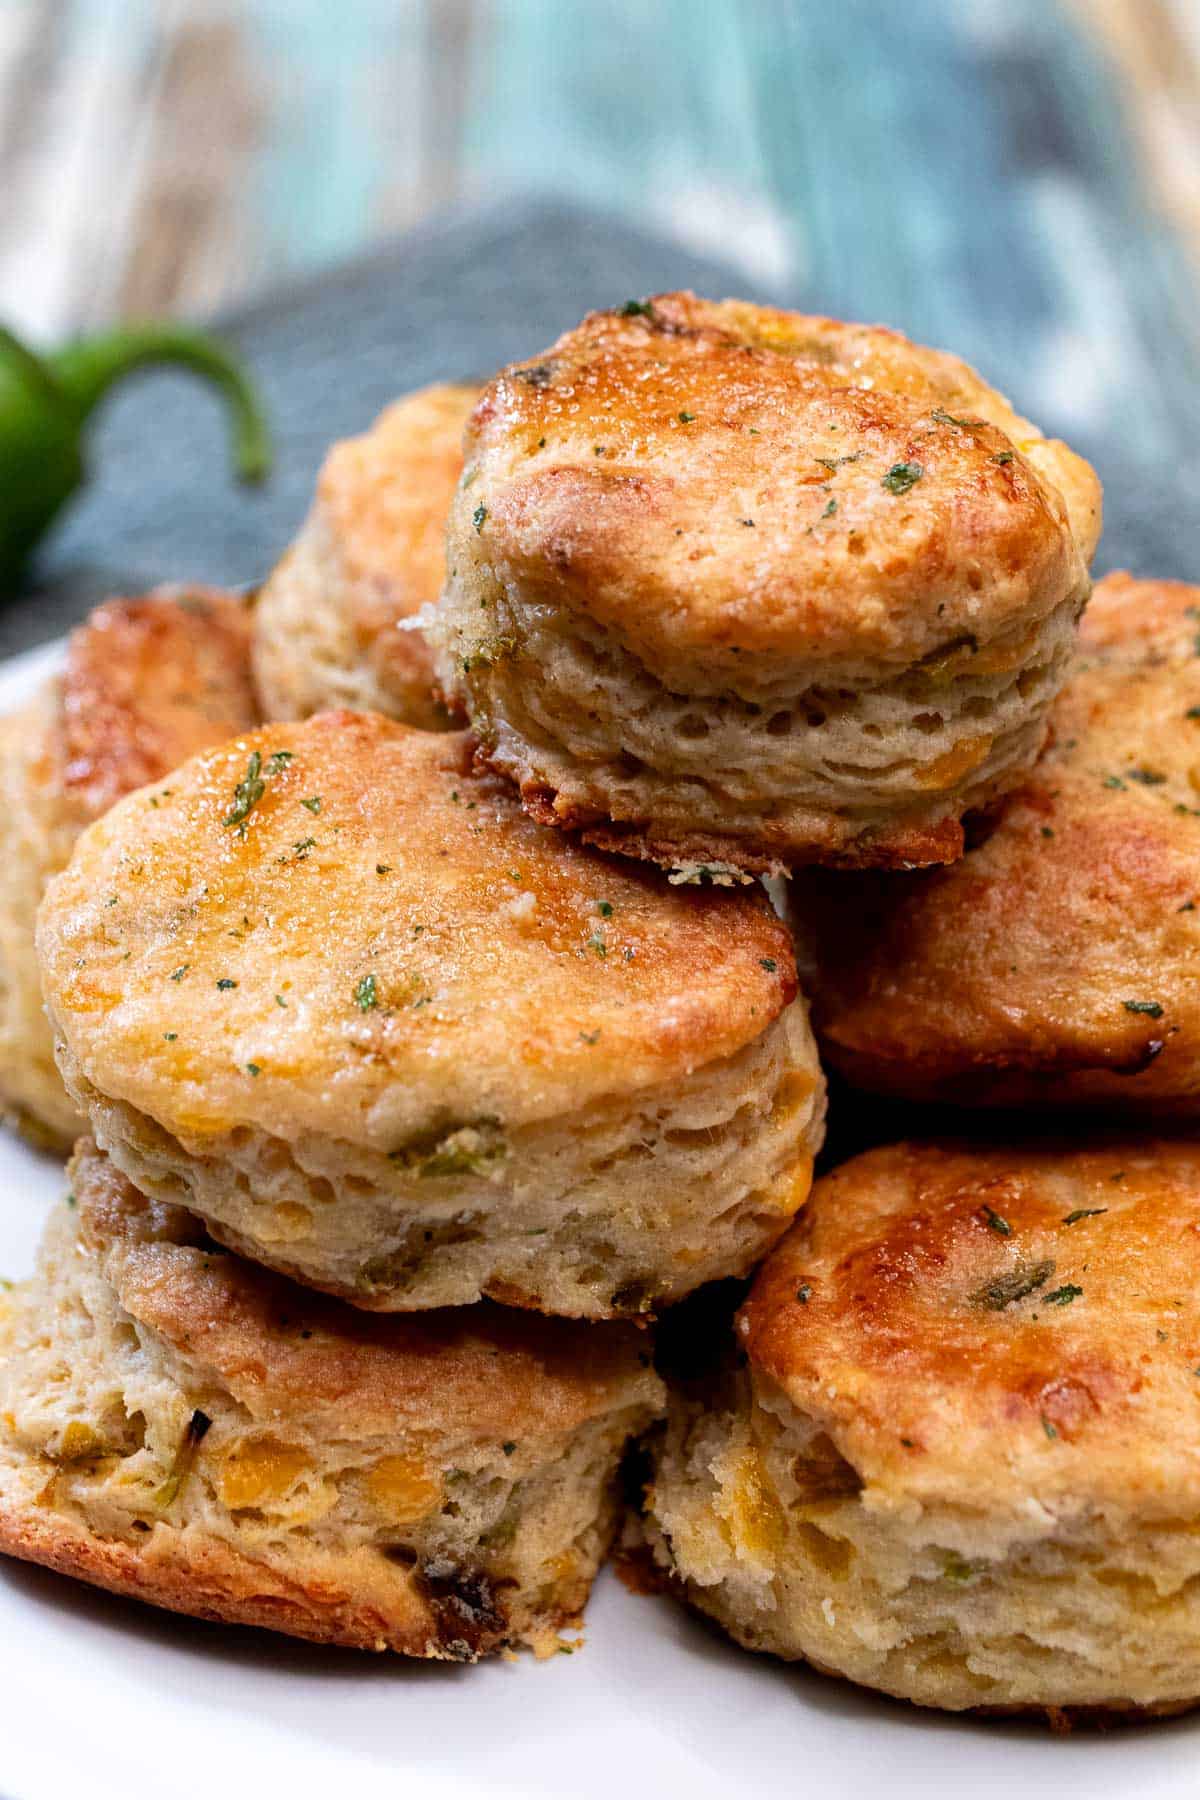
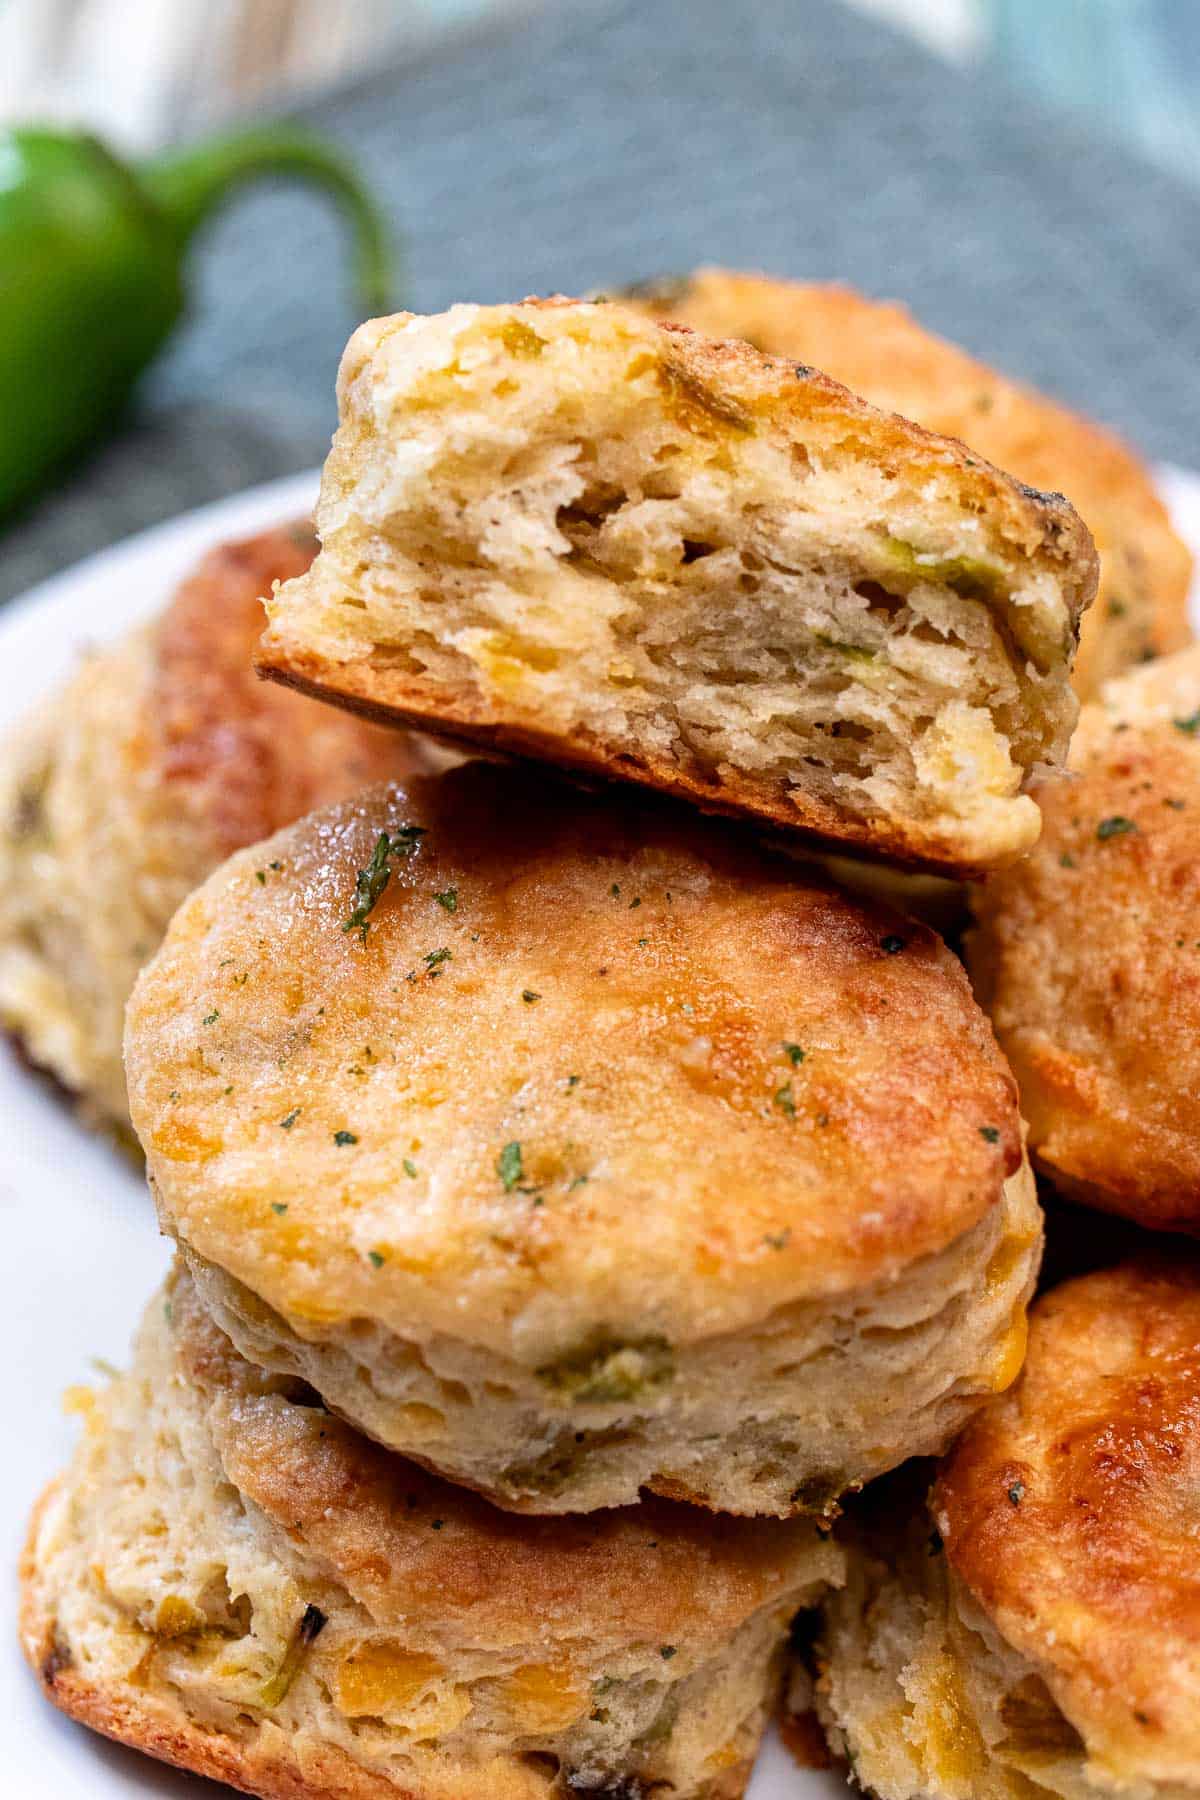
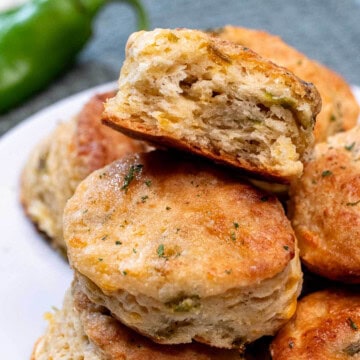
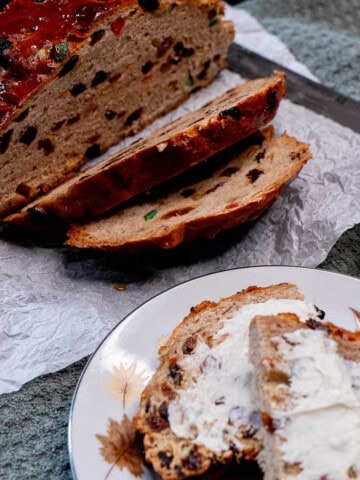
These Hatch green chile cheddar biscuits combine a great soft, fluffy biscuit with the earthy, smokey flavor of Hatch chiles and gooey cheesy goodness. Mildly spicy, they’re also cheesy and garlicky for an amazingly savory biscuit that pairs well with many entrees.
I have spent a few years trying to perfect this recipe with fresh Hatch chiles every August. The biggest trick has been to keep adjusting the amount of chiles with the rest of the ingredients so that they don’t become too dense or wet and not rising properly. Now I’m finally comfortable with sharing this recipe with everyone.
People that know me know that I love Hatch chiles and I always pick up fresh chiles in August when they’re available at one grocery store near me. Every year I get a bunch of them to work on new recipes, while also making my Hatch chile and sausage quiche as well, because it really is that good.
While I love using fresh Hatch chiles, you can also easily make this recipe with canned or jarred Hatch chiles that are available year-round. Alternatively, you can also make this recipe with canned green chiles or other options like Poblano, jalapeno, or serrano chiles.
Jump to:
🥘 Ingredients for Green Chile Cheddar Biscuits
Considering the base of the recipe is a buttermilk biscuit, you probably have most of the ingredients on hand already. You may need to pick up buttermilk (or make an alternative version), some Hatch chiles, and some cheese.
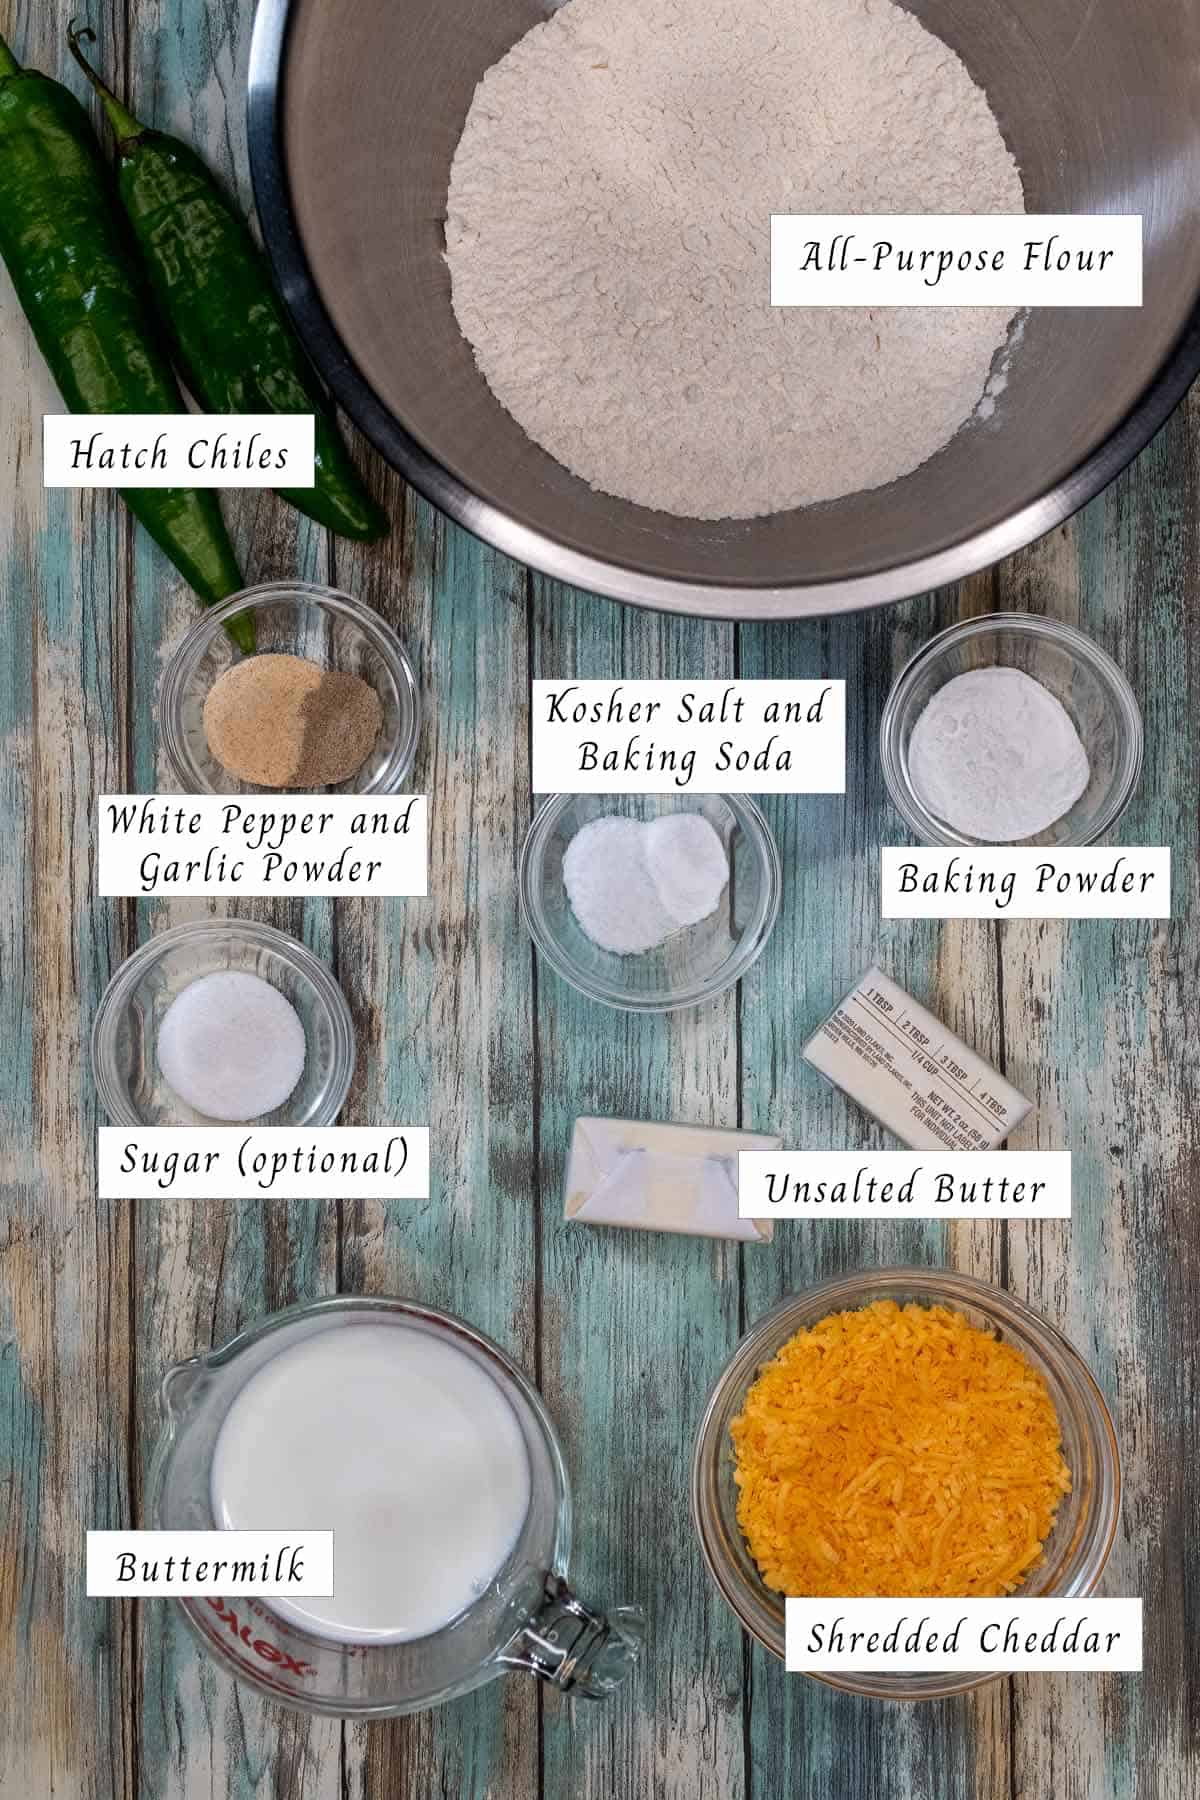
Hatch Chiles – As mentioned above, I prefer to make these biscuits with fresh Hatch chiles, but you can always get some canned or jarred (preferably) as well. If you can’t find any of these options for some reason, you can replace them with chiles/peppers such as Poblanos, jalapenos, and/or serrano.
Flour – I use all-purpose flour here which gives the biscuits a light and fluffy texture with just the right amount of gluten.
Leavener – Use a combination of plenty of baking powder with just a bit of baking soda. Because biscuits use a large amount of baking powder, I highly recommend using aluminum-free baking powder to avoid an off, metallic flavor.
Sugar – This is optional, but I use just a small amount of white sugar to help offset some of the heat from the Hatch chiles. Feel free to omit if you prefer.
Butter – I use unsalted butter here. If you use salted butter, omit the added salt in the recipe card. I also prefer to freeze the butter for a while before using, then grate it directly into the flour mixture. I also melt a bit of butter to brush on top as soon as they come out of the oven.
Buttermilk – Buttermilk is great in biscuits for a bit of added tang in their flavor, it also helps to active the baking soda. If you don’t have buttermilk, you can add a teaspoon of vinegar to a measuring cup and add milk to the 1 cup line instead. Let it sit for 5 minutes before using. Use some more buttermilk to brush on the biscuits before they go into the oven to help brown.
Cheese – I usually make these with a sharp cheddar cheese for the flavor, but you could also swap in cheeses like Colby Jack, Monterey Jack, pepper Jack, or smoked Gouda.
Seasoning – Other than salt, I keep things simple with a bit of black or white pepper and garlic powder. I also use a bit more garlic powder and some fresh or dried parsley to add to the melted butter I brush once baked.
🔪 How to Make Hatch Chile Cheddar Biscuits
Roasting Fresh Hatch Chiles
While working with the Hatch chiles, place the butter you’ll be using in the freezer. If you’re not using fresh chiles, place it in the freezer 10-15 minutes before starting.
Start with the Hatch chiles if you are using fresh ones, otherwise you can skip ahead. Preheat the broiler in your oven and move the oven rack to highest or second highest position. Line a baking sheet with aluminum foil and set aside.
Depending on their size, you’ll need 2-3 Hatch chiles. Spritz or brush with a bit of oil and place on the baking sheet. Roast the chiles under the broiler for a few minutes on each side, until they’re well charred all around.
While hot, place the Hatch chiles in a zipper lock bag or a mixing bowl covered with plastic wrap. Allow them to steam for 10 minutes or until cool enough to handle. Once steamed, peel off the roasted skin from the flesh and remove the core and seeds. Chop into small chunks and set aside to cool completely.
Make Biscuit Dough
In a large mixing bowl, add the flour, baking powder, baking soda, salt, pepper, garlic powder, and sugar (if using). Whisk together until fully combined.
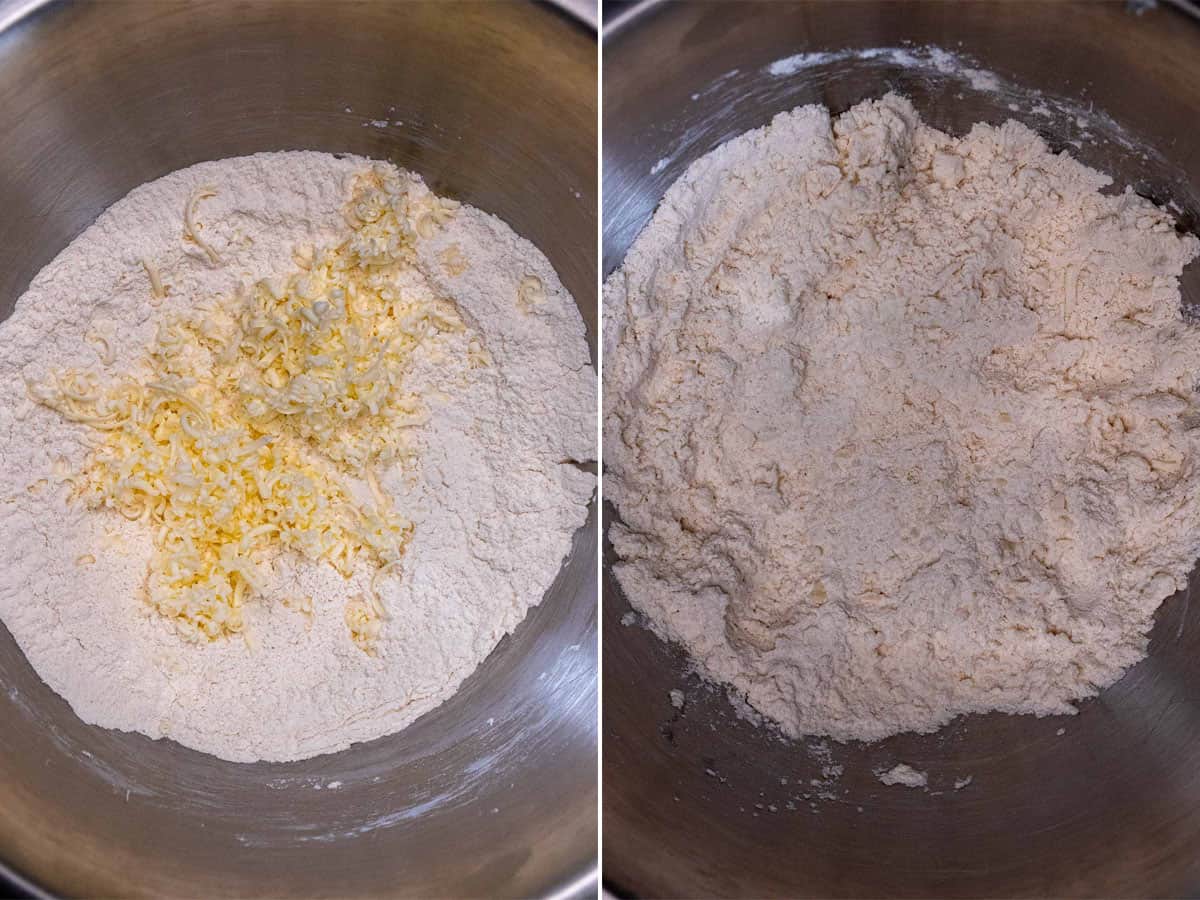
Remove the butter from the freezer and grate it directly into the flour mixture and mix into the flour with your fingers or a fork. Alternatively, you can cut the butter into the flour with a pastry blender or cut it into small pieces and mix in a food processor until you have a sandy looking mixture.
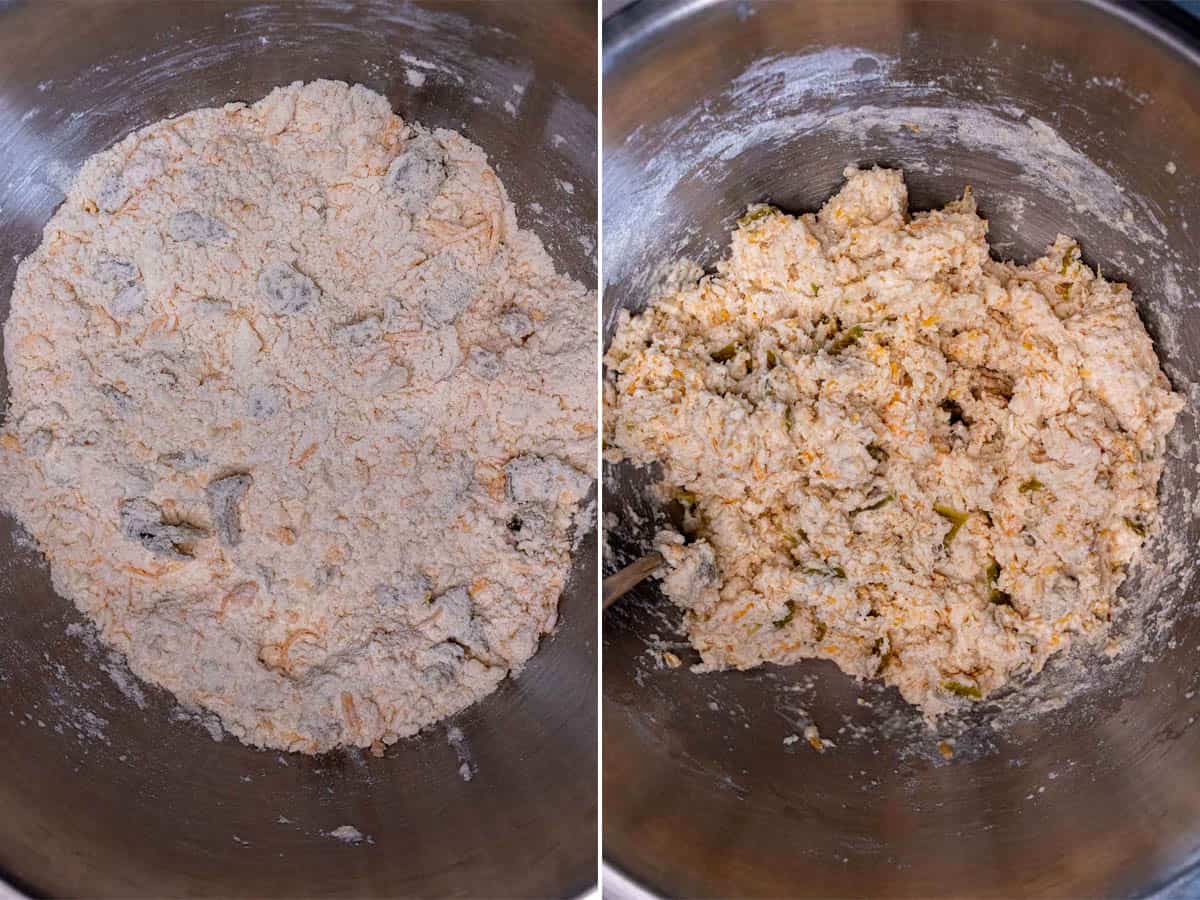
Add the chopped Hatch chiles and shredded cheese to the butter and flour mixture and mix until uniformly distributed.
Begin adding the buttermilk a little bit at a time and mixing into the flour with each addition. The dough should still be slightly dry and crumbly, so you may not need all the milk.
Fold Dough and Cut into Biscuits
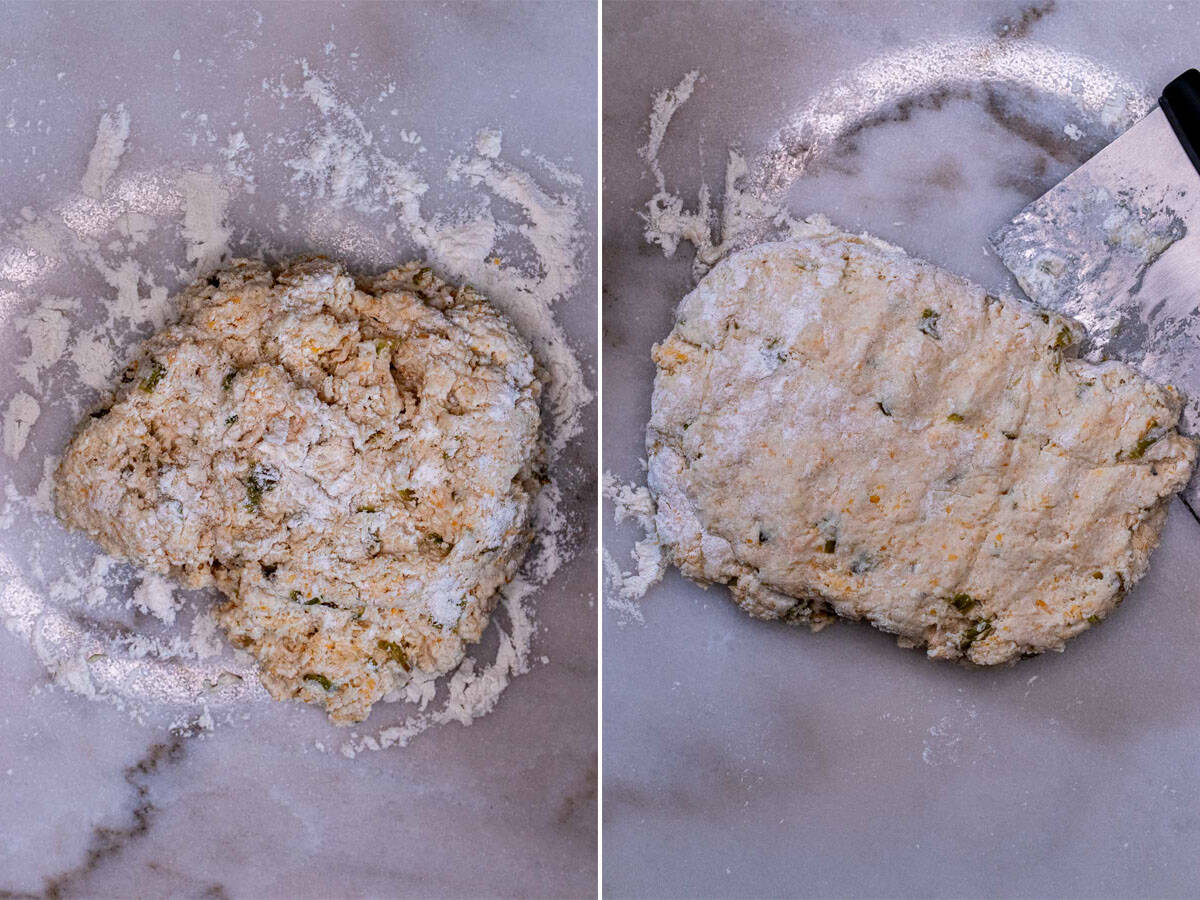
Lightly flour your work surface and your hands and pour the biscuit dough out of the mixing bowl. Using your hands, work the dough into a ball, pressing crumbly pieces into it until a soft dough forms. Press the dough into a rough rectangle.
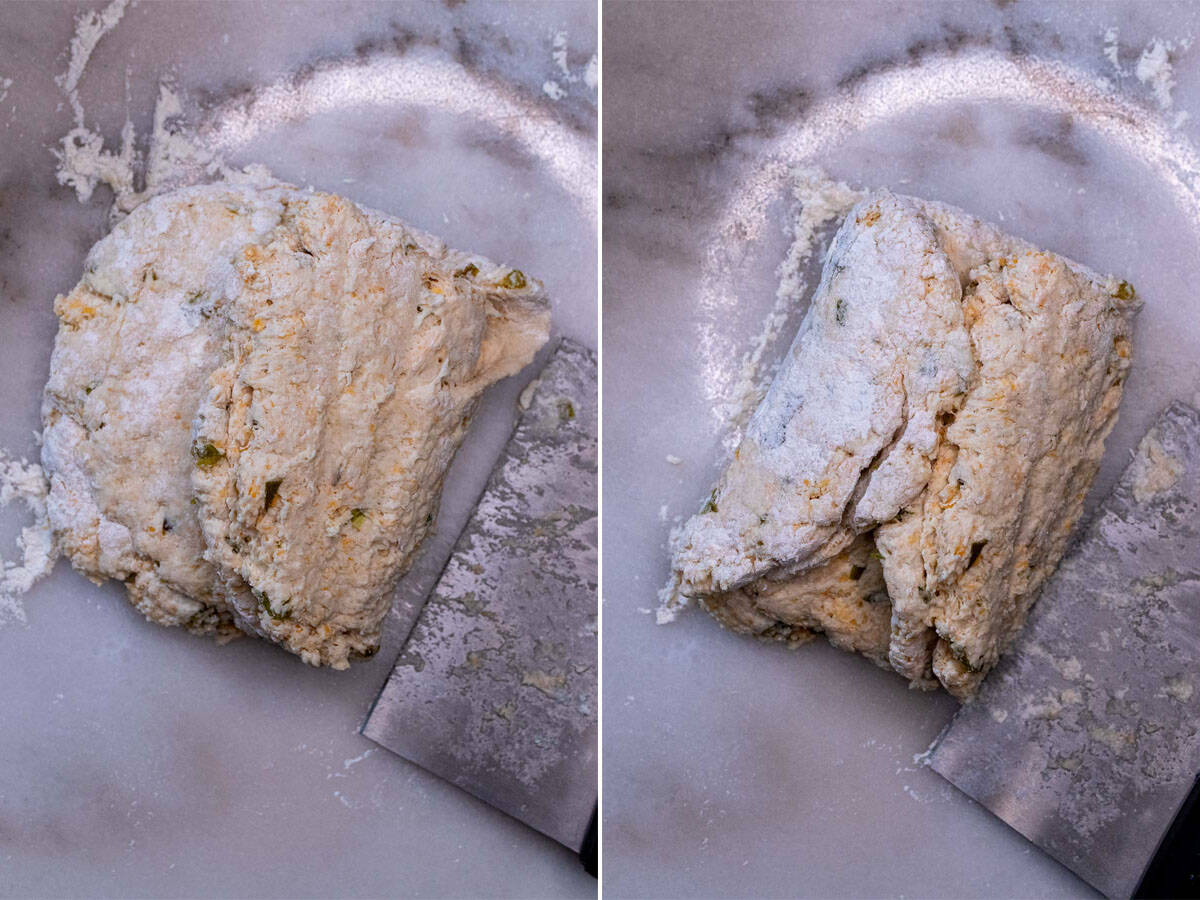
Now, fold one side towards the center, then fold the other side into the center. Turn the dough 90°, flatten into a rectangle again, and repeat this process 2-3 more times.
If at any point while folding the dough it starts to look wet, or your hands feel greasy, then the butter is getting too warm. Simply move the dough into the refrigerator for 10 minutes and then continue.
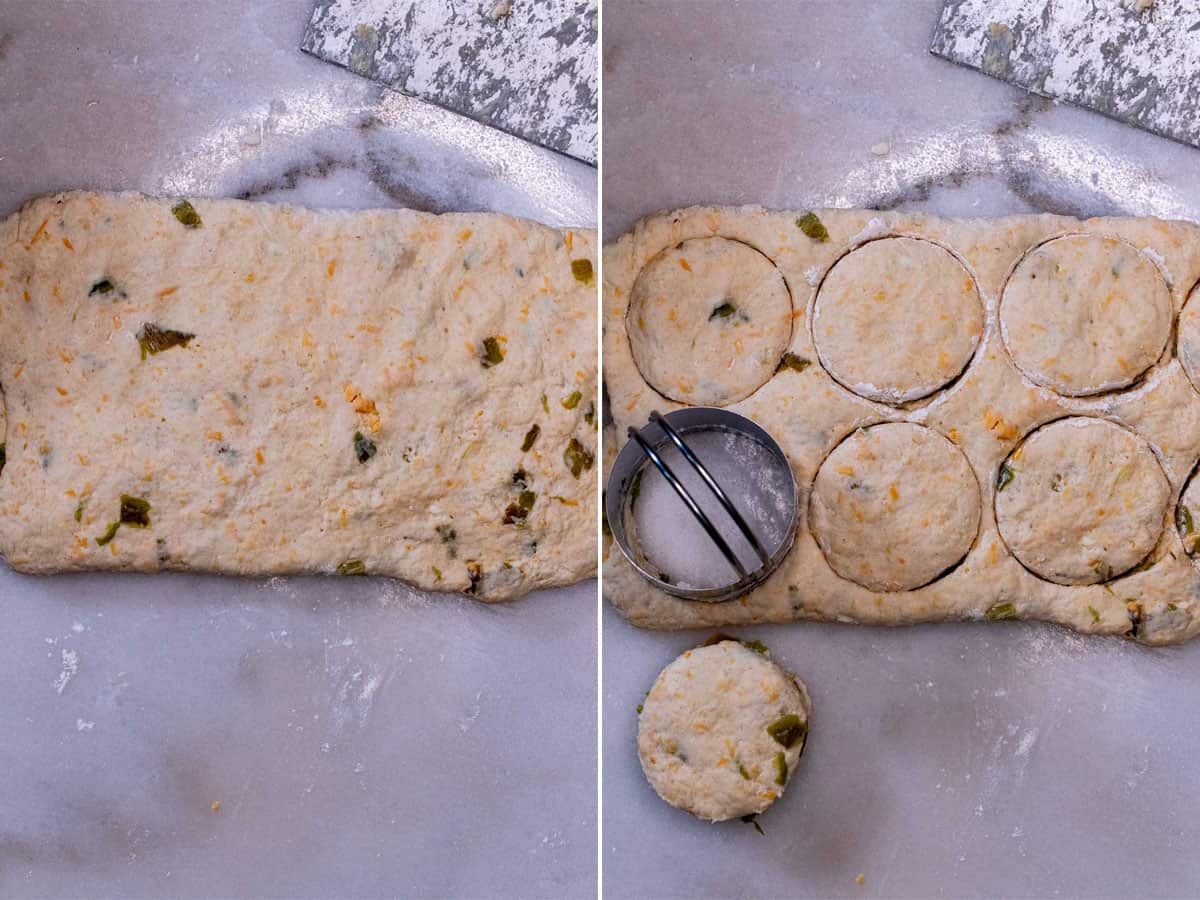
Use your hands to flatten the dough into a large rectangle around ¾” – 1” thick. Use a (roughly) 2 ½” biscuit cutter to punch out as many biscuits as you can. Flatten the dough scraps into another square or rectangle and cut more out until you’re out of usable dough. If you have enough scraps left, you can form a last biscuit with your hands as well.
Baking the Biscuits
Once you have the biscuits cut, I recommend placing them on a large plate or small tray and refrigerating them before baking.
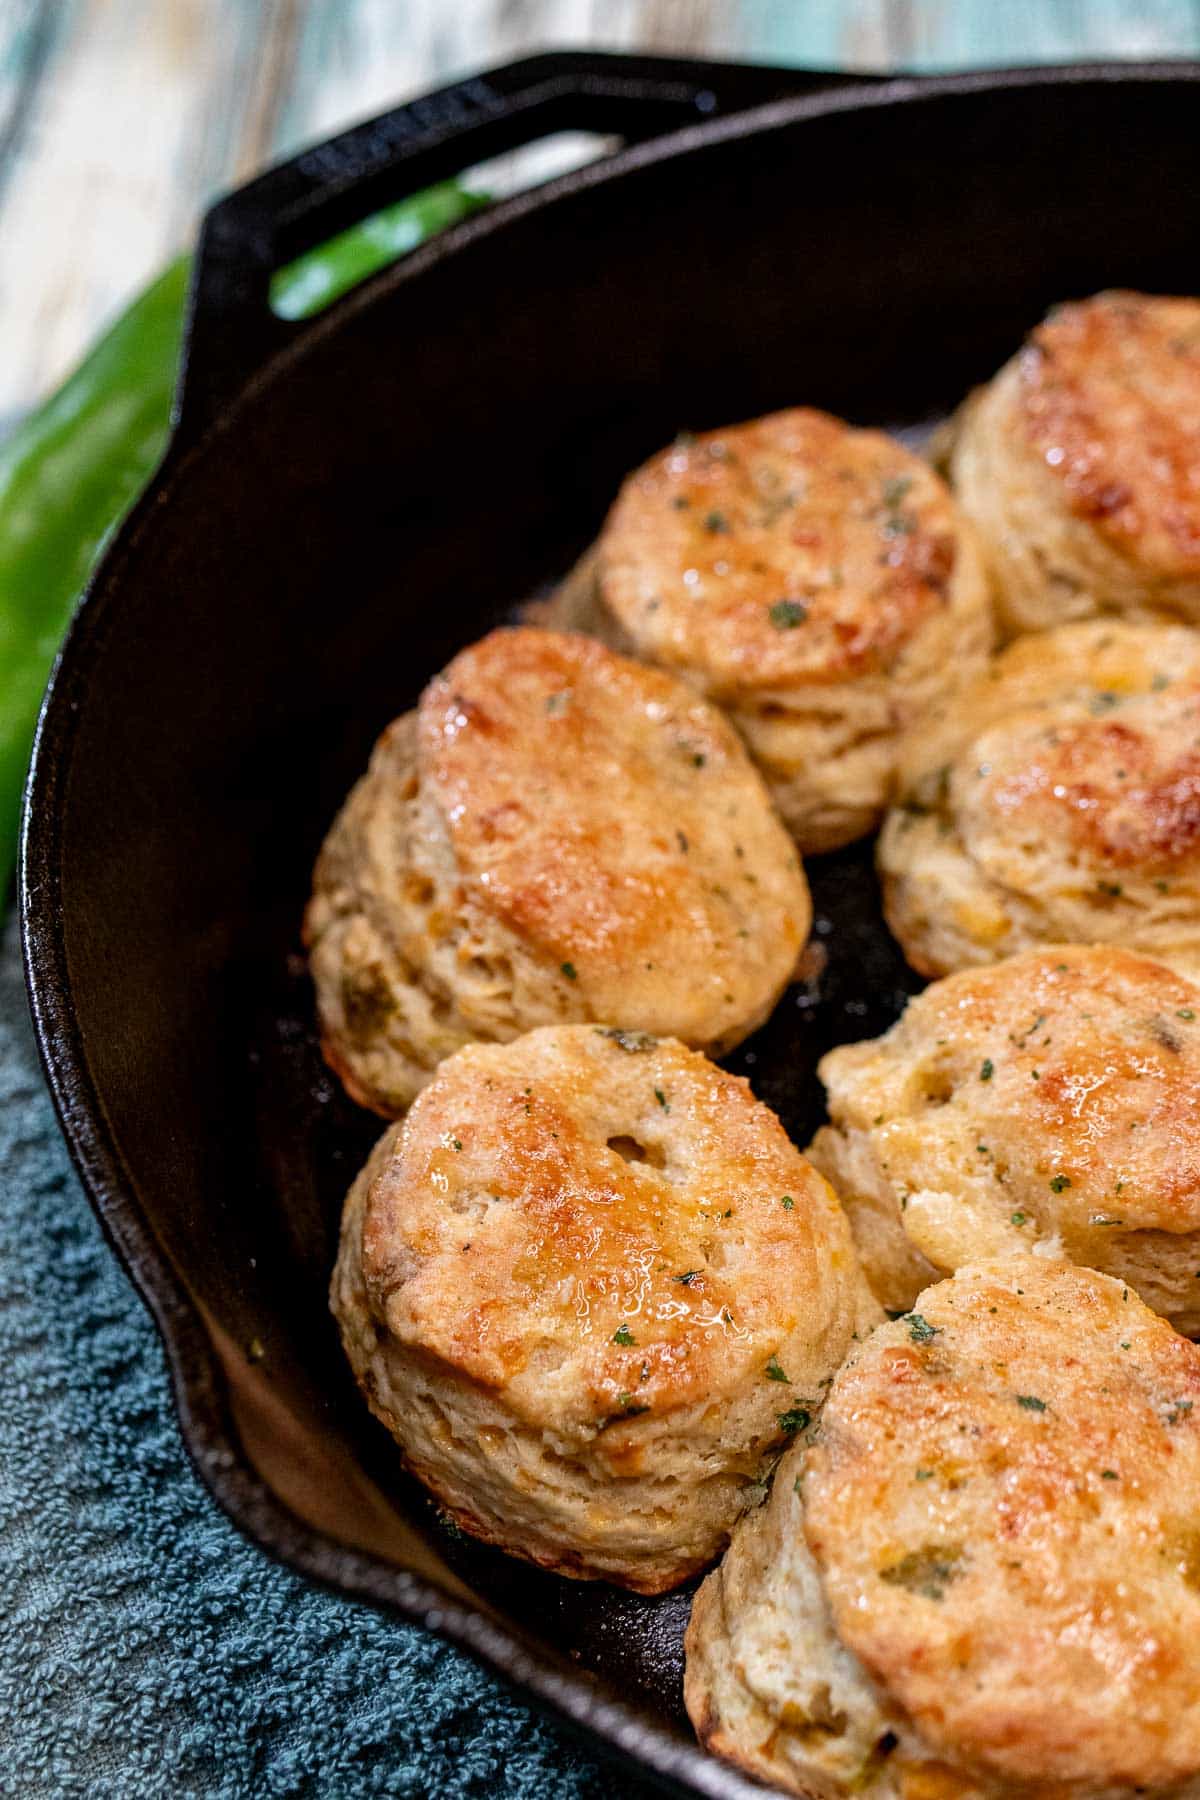
While the biscuits chill, preheat your oven to 425°F / 220°C. Now, you can bake these on a baking sheet slightly spread apart for crispier sides, or in a cast iron skillet with the biscuits crowded next to each other for a taller rise. I used a cast iron skillet here with a bit of oil in it. Use a paper towel to spread the oil thinly and evenly across the bottom and sides of the cast iron.
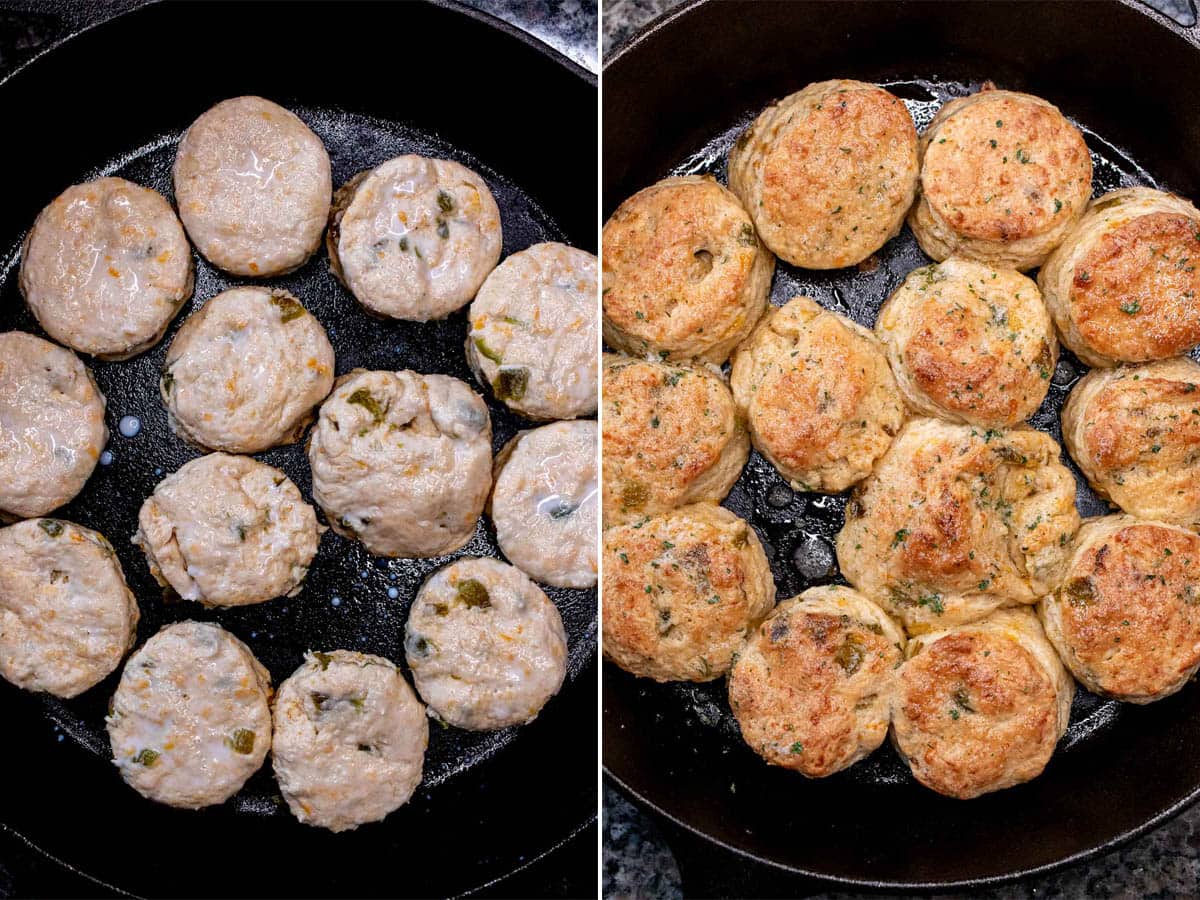
Move the biscuits onto your baking sheet or a cast iron skillet and brush the tops with a bit of buttermilk. Bake on the center rack for 15-18 minutes, until the tops are golden brown.
While the Hatch biscuits are baking, melt some butter and mix in some garlic powder and dried parsley (optional). When the biscuits are done, remove from the oven and while still hot, brush the tops with the melted butter mixture.
Serve hot and fresh or remove from skillet to cool to room temperature before storing.
💭 Tips for Biscuit Making
Biscuit making is almost as much art as science. Typical flaky, buttermilk biscuits have similar base recipes, but the results can still vary a lot from person to person. Hopefully these tips can help you with making better biscuits at home.
Keep Everything Cold. I recommend freezing the butter and grating it into the flour, but at the very least, keep the butter and buttermilk refrigerated right up until you need them. Before baking, refrigerate or freeze the biscuits for 10-20 minutes as well to keep the butter cold before it hits the oven heat.
Baking Powder. Because you’re using a large amount of baking powder in biscuits, be sure to use aluminum-free baking powder to avoid a metallic taste. Also be sure that your baking powder is fresh, so if it’s been sitting in your cabinet for a year since you opened it, you might want to replace it.
Don’t Overmix. Mix the dough just until it comes together in your mixing bowl. When you dump it out on a work surface, it may still be dry and crumbly, but it will quickly come together as you press and fold it.
Press and Fold. During the folding of the dough to laminate the butter, I suggest using a bench scraper while folding it to avoid melting the butter from the warmth of your hands. When pressing and flattening the dough, using your hands is better than a rolling pin if you want those uneven, craggy biscuit tops.
Don’t Twist the Cutter. When using a biscuit cutter, be sure not to twist the cutter. Doing so can seal the edges and make them rise unevenly. Additionally, dip the cutter in flour between cuts to keep the dough from sticking to it.
Biscuit Size and Yield. A standard size for biscuits uses a 2 ½” - 3” biscuit cutter while the dough is rolled to ¾” – 1” in thickness. If you want tall, large biscuits go with a 3” cutter and a 1” thickness and bake them almost touching for lots of height. Smaller cutters and less thickness will yield more, but less tall biscuits. These variations can change the yield in a recipe anywhere from 6-14 biscuits from the same recipe, so keep that in mind.
🍽 Recommended Equipment
You can make biscuits without fancy equipment, and you can even cut them into squares with a knife if you don’t have a cutter. Here’s a few tools I recommend though if you do like making lots of biscuits.
Cheese Grater – While you can use a box grater if you plan to grate frozen butter into your flour, this ends up being a huge hassle. As you grate, the butter starts melting in your hand and it becomes difficult and dangerous to grate it to the end. I use a good rotary cheese grater like this one to easily grate butter hands-free, and it’s great for shredding blocks of cheese.
Danish Dough Whisk – You don’t really need this for plain buttermilk biscuits, but a good Danish dough whisk is great for folding in ingredients without overworking a dough. Whether it’s chocolate chips or nuts, or Hatch chiles and shredded cheese, this is a great tool, and much easier to clean than a balloon whisk.
Biscuit Cutter – Having a good biscuit cutter really helps for shaping biscuits or cut-out cookies. Sets can vary a lot, but I suggest finding ones with the closest measurements to 2, 2.5, and 3” rounds at least, with a small cutter around 1” as well (1” and 3” are great for homemade doughnuts).
❄️ How to Store Hatch Chile Biscuits
Once cooled completely, if you plan on finishing the biscuits within a few days, you can store them in an airtight container at room temperature for 2-3 days.
If you don’t think you’ll eat the rest in a few days, I recommend storing them in an airtight container in the refrigerator instead. They should last about a week when refrigerated.
To reheat, you can wrap them in a paper towel and microwave for 12-20 seconds depending on how hot you want them. Alternatively, you can heat in the oven at 350°F for 8-12 minutes.
For longer storage, you can freeze Hatch cheddar biscuits in a freezer bag or airtight container for up to 2 months. Leave out at room temperature for 15-20 minutes and reheat as above.
Alternatively, you can make the biscuits up until baking and freeze them there. Place uncooked biscuits on a small sheet tray or plate and place them in the freezer for about 1 hour. Remove and transfer them to a freezer bag or airtight container for up to 2 months. Bake as directed straight from the freeze, adding a few minutes to the total time.
📋 Recipe
Hatch Green Chile Cheddar Biscuits
Ingredients
Hatch Biscuits:
- 2-3 Hatch chiles, roasted & peeled, about ⅓ cup diced
- 2 ¼ cups all-purpose flour, plus more for working with
- 1 tablespoon baking powder, aluminum-free
- ½ teaspoon baking soda
- 1 teaspoon kosher salt
- 1 teaspoon garlic powder
- ½ teaspoon ground white pepper, or black pepper
- 2 teaspoons white sugar, optional
- 6 tablespoons unsalted butter, ice cold
- 1 cup shredded cheddar cheese, see note
- 1 cup buttermilk, kept cold, see note
Topping:
- Buttermilk for brushing, before baking
- 2 tablespoons butter, melted
- ¼ teaspoon garlic powder
- ½ teaspoon dried parsley, optional
Directions
Roasting Fresh Hatch Chiles:
- While working with the Hatch chiles, place the 6 tablespoons of unsalted butter you’ll be using in the freezer. If you’re not using fresh chiles, place it in the freezer 10-15 minutes before starting.
- Start with the Hatch chiles if you are using fresh ones, otherwise you can skip ahead. Preheat the broiler in your oven and move the oven rack to highest or second highest position. Line a baking sheet with aluminum foil and set aside.
- Depending on their size, you’ll need 2-3 Hatch chiles. Spritz or brush with a bit of oil and place on the baking sheet. Roast the chiles under the broiler for a few minutes on each side, until they’re well charred all around.
- While hot, place the Hatch chiles in a zipper lock bag or a mixing bowl covered with plastic wrap. Allow them to steam for 10 minutes or until cool enough to handle. Once steamed, peel off the roasted skin from the flesh and remove the core and seeds. Chop into small chunks and set aside to cool completely.
Make Biscuit Dough:
- In a large mixing bowl, add 2 ¼ cups all-purpose flour, 1 tablespoon baking powder, ½ teaspoon baking soda, 1 teaspoon kosher salt, 1 teaspoon garlic powder, ½ white or black ground pepper, and 2 teaspoons white sugar (if using). Whisk together until fully combined.
- Remove the butter from the freezer and grate it directly into the flour mixture and mix into the flour with your fingers or a fork. Alternatively, you can cut the butter into the flour with a pastry blender or cut it into small pieces and mix in a food processor until you have a sandy looking mixture.
- Add ⅓ cup chopped Hatch chiles and 1 cup shredded sharp cheddar cheese to the butter and flour mixture and mix until uniformly distributed.
- Begin adding 1 cup of buttermilk a little bit at a time and mixing into the flour with each addition. The dough should still be slightly dry and crumbly, so you may not need all the milk.
Fold Dough and Cut into Biscuits:
- Lightly flour your work surface and your hands and pour the biscuit dough out of the mixing bowl. Using your hands, work the dough into a ball, pressing crumbly pieces into it until a soft dough forms. Press the dough into a rough rectangle.
- Now, fold one side towards the center, then fold the other side into the center. Turn the dough 90°, flatten into a rectangle again, and repeat this process 2-3 more times.
- If at any point while folding the dough it starts to look wet, or your hands feel greasy, then the butter is getting too warm. Simply move the dough into the refrigerator for 10 minutes and then continue.
- Use your hands to flatten the dough into a large rectangle around ¾” – 1” thick. Use a (roughly) 2 ½” biscuit cutter to punch out as many biscuits as you can. Flatten the dough scraps into another square or rectangle and cut more out until you’re out of usable dough. If you have enough scraps left, you can form a last biscuit with your hands as well.
Baking the Biscuits:
- Once you have the biscuits cut, I recommend placing them on a large plate or small tray and refrigerating them before baking.
- While the biscuits chill, preheat your oven to 425°F / 220°C. Now, you can bake these on a baking sheet slightly spread apart for crispier sides, or in a cast iron skillet with the biscuits crowded next to each other for a taller rise. I used a cast iron skillet here with a bit of oil in it. Use a paper towel to spread the oil thinly and evenly across the bottom and sides of the cast iron.
- Move the biscuits onto your baking sheet or a cast iron skillet and brush the tops with a bit of buttermilk. Bake on the center rack for 15-18 minutes, until the tops are golden brown.
- While the Hatch biscuits are baking, melt 2 tablespoons of butter and mix in ¼ teaspoon garlic powder and ½ teaspoon dried parsley (optional). When the biscuits are done, remove from the oven and while still hot, brush the tops with the melted butter mixture.
- Serve hot and fresh or remove from skillet to cool to room temperature before storing.


Comments
No Comments