

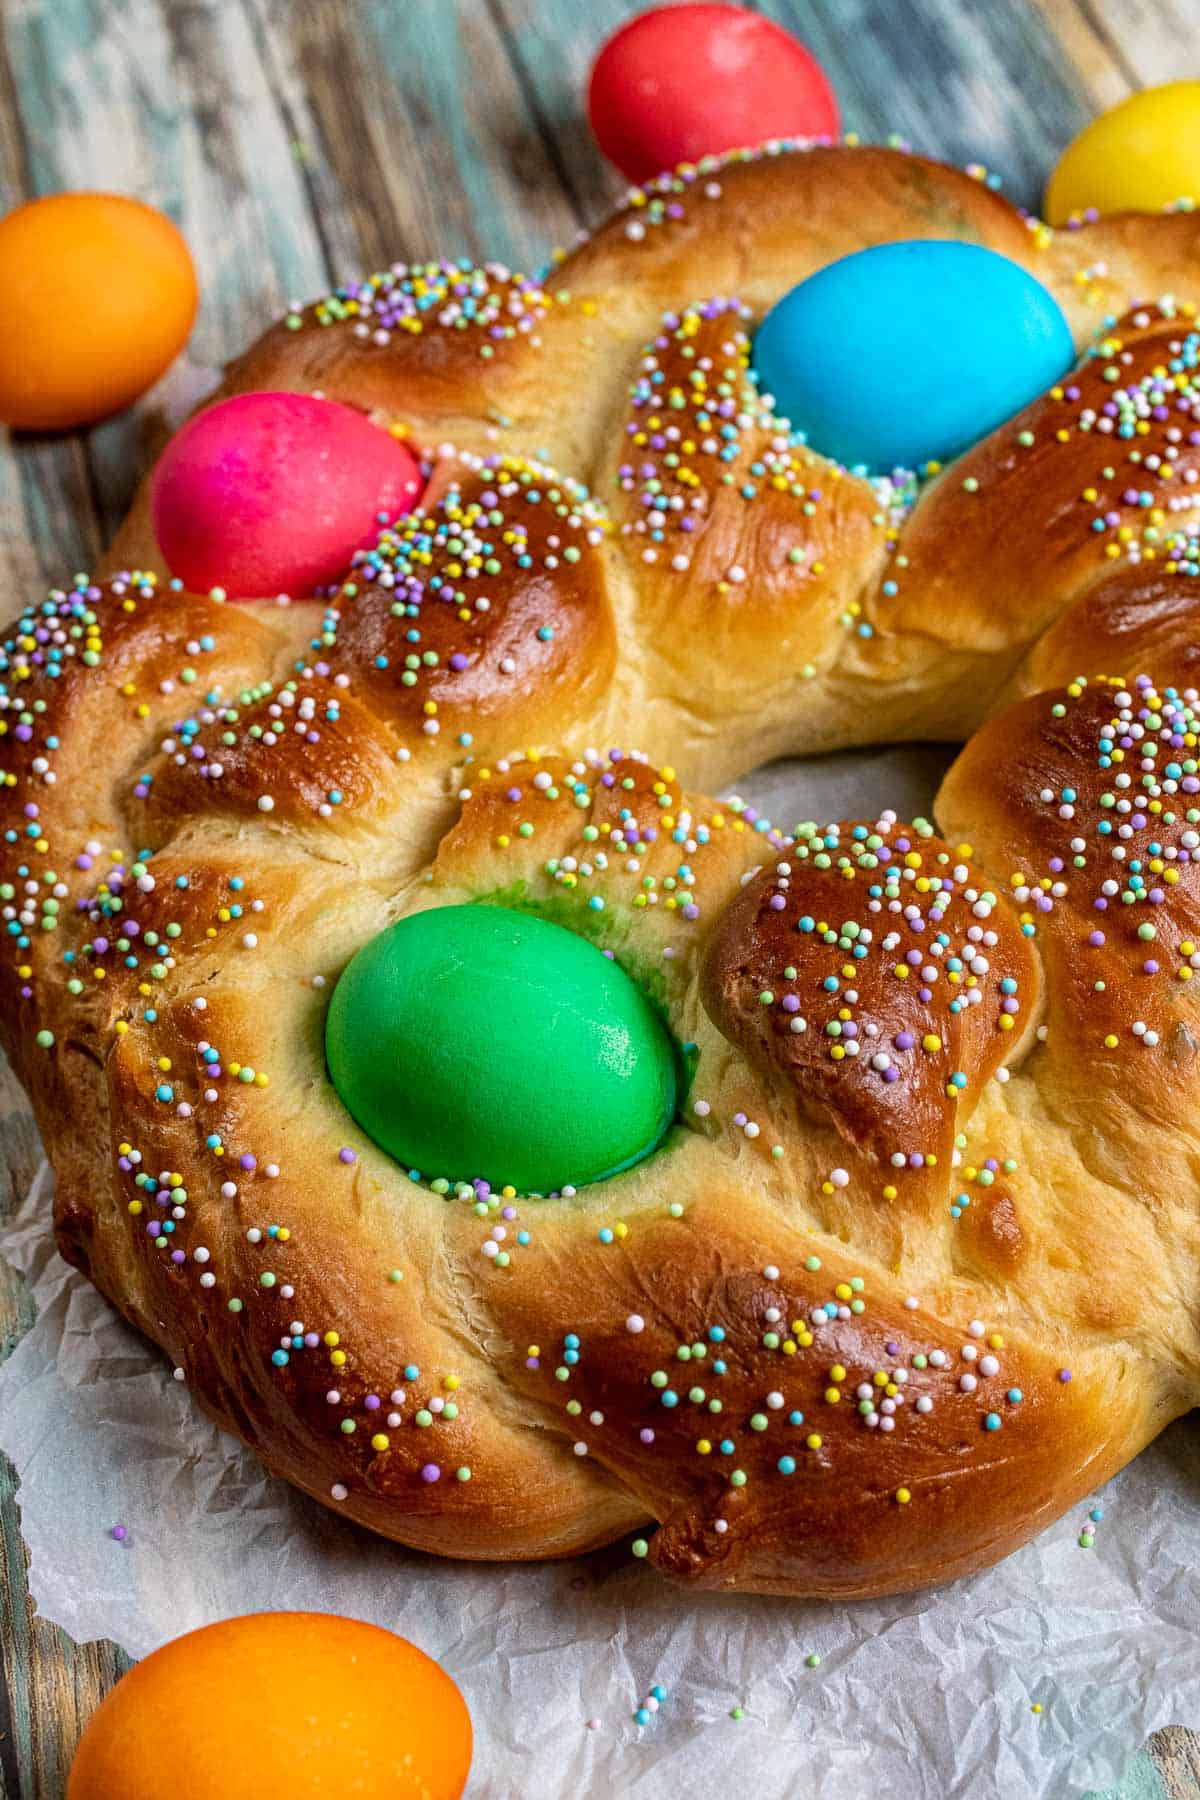
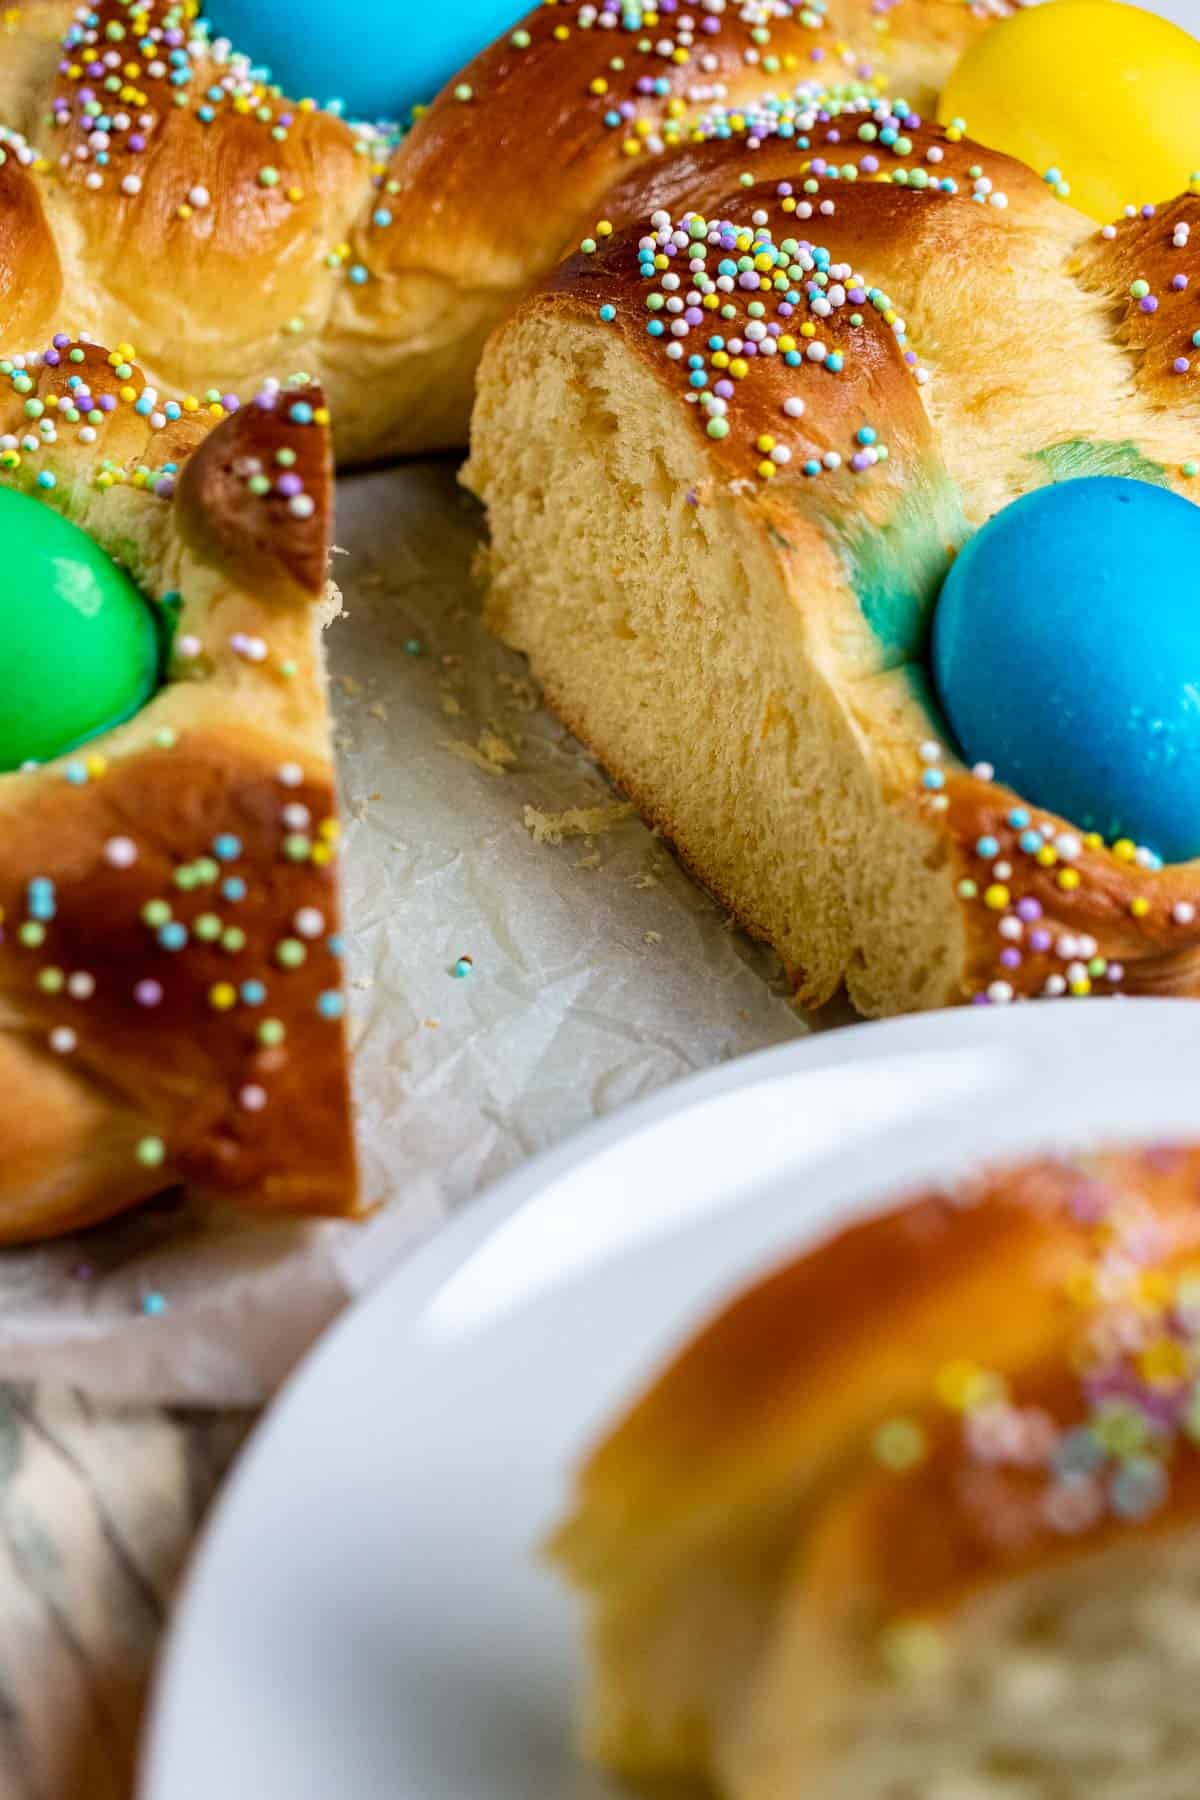
Italian Easter bread is a rich, lightly sweet bread that is so soft it tastes like eating a fluffy cloud. Pane di Pasqua has a long history and traditions throughout Italy with many variations but is always an enjoyable Easter experience.
Italian Easter bread is an enriched, eggy bread like brioche or challah, usually flavored with citrus and anise. This pillowy soft bread is an Easter tradition in Italy and for many Italian American families as well.
Pane di Pasqua literally translates to “bread of Easter.” While it has a lot of roots and symbolism from Christianity, you don’t need to be a practicing Catholic to enjoy this holiday bread, or even Italian.
This baked bread has many variations depending on where in Italy you find it or how your family may have made it. This makes finding a traditional Italian Easter bread recipe almost impossible, but that also leaves room for you to create your own family version.
This recipe is based on some of my own Italian relatives’ recipes. Like many recipes that are over 100 years old and passed down through memory until someone wrote it on an index card, I had to decipher and use my own experience to create this version. I mean seriously, one recipe used 9 eggs and 10 cups of flour, while another calls for a dozen eggs and 3 heaping soup cups of flour with 3 cups of sugar. How much bread was this meant to make, and what kind of measurement is that?!?
For more Easter breads, check out my hot cross bun recipe. Or for Easter dinner rolls, try my honey butter yeast rolls or my sweet potato dinner rolls.
Jump to:
🥘 Ingredients in Italian Easter Bread
While some ingredients are considered traditional, especially depending on the region, you can omit certain ones. If you're not a fan of anise flavor, you can omit it and use more vanilla or even some cinnamon instead. You don't have to dye eggs or use them either if you don't want to eat them or waste them.
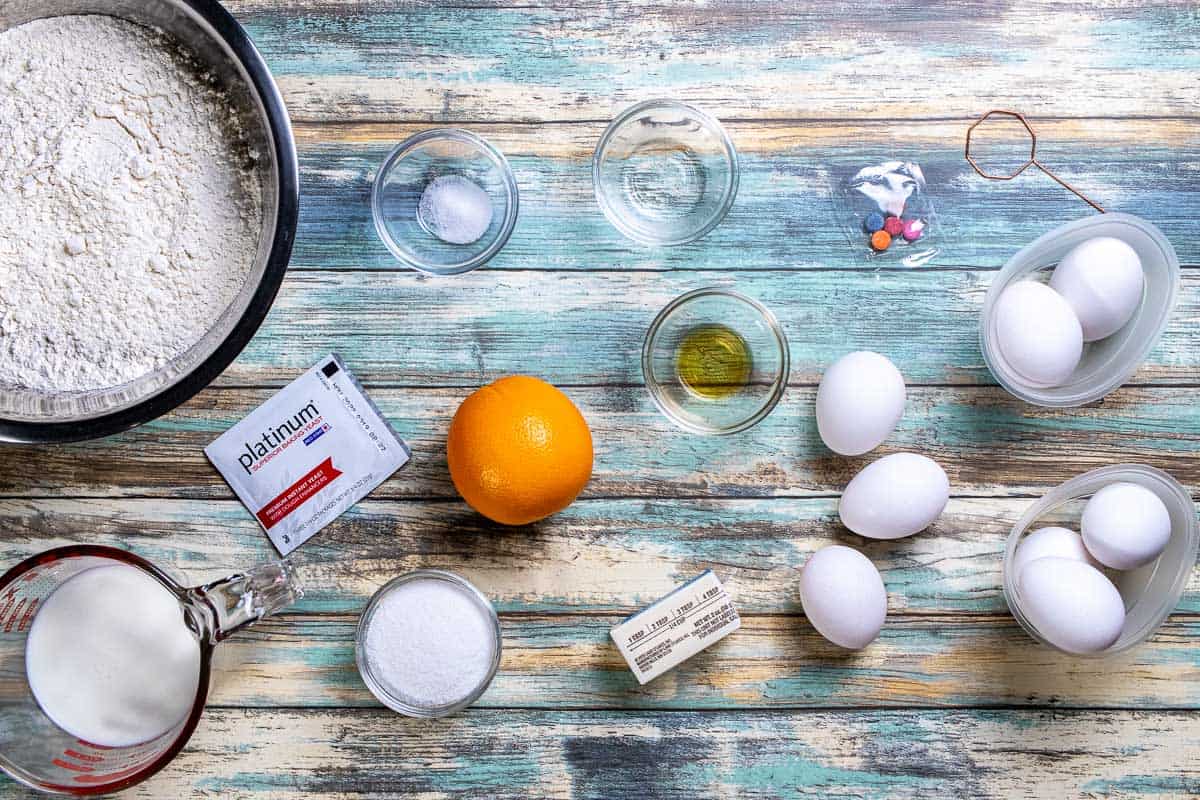
Flour – Regular, all-purpose flour works well here to keep things light and soft.
Milk – Whole milk is best here for flavor, but almost any milk will work. Warm milk will activate the yeast and add richness to the bread.
Yeast – Since the dough is basically a brioche bread, you’ll use yeast as the rising agent. You can use active dry yeast or instant yeast in the recipe, even though I bloom it in the instructions. I always recommend blooming yeast to be certain it’s still good before spending more time and money to find out the hard way that it’s not working.
Sugar – White, granulated sugar is fine here. As sweet as the bread tastes, the recipe only uses ¼ cup for the entire loaf. Add a spoonful to the yeast and milk as well while it blooms.
Orange – Recipes vary between lemon zest and orange zest. I prefer orange here, and I use a little of the juice for added flavor. I find it pairs well with the anise flavor. After zesting an entire orange, I cut it in half and juice it for roughly a ¼ cup of juice.
Eggs – Eggs help to enrich the dough, along with the milk and butter. If you’re adding dyed eggs, you’ll need about 9 large eggs in total. 3 for the bread, 1 for the egg wash before baking, and 4-6 eggs for dying depending on how you shape the bread.
Butter – Some recipes use butter, some use oil. I prefer the taste of butter added to the bread. Use a ¼ cup of unsalted butter, melted and cooled slightly.
Anise – Recipes vary here so anise is optional. It adds a subtle flavor, so if you’re not a fan of anise, I’d still recommend trying it, or you can substitute cinnamon. You can use anise seed, ground anise seed, or anise extract. My relatives used the extract so that’s what I went with here as well. I find the extract lends a subtle flavor that permeates the entire loaf where anise seed can sometimes leave pockets of strong flavor randomly through the bread.
Vanilla – Also optional, I like to use a small amount of vanilla extract to balance some of the citrus and licorice flavor the orange and anise give the bread.
Sprinkles – An optional but cute addition are nonpareils. I used spring-colored nonpareils here, but any color sprinkle type of topping will work. Add them after the egg wash before baking, unless you do an icing topping, then add after icing instead.
📜 History of Pane di Pasqua
It’s impossible to pin down a specific history behind pane di Pasqua, but it seems to have grown and evolved over time into what we eat now. Many claims to the origin or prototype of the Italian Easter bread tend to point to Lombardy in Northern Italy in either the 6th or 12th century. This bread, called colomba Pasquale, or “Easter dove,” was a sweetened bread shaped like a dove and is still popular today.
One legend dates the bread to 572, when King Alboin conquered Pavia after a three-year siege. One of the maidens that were part of his tribute created a sweet bread in the shape of a dove, a symbol of peace. The king was so charmed that he set her free, spared Pavia from destruction and made it his capital. The other claim dates to 1176, when the bread was made to commemorate the Lombardian victory over Holy Roman Emperor Frederick Barbarossa. According to legend, two doves appeared on the battle standards during the final battle.
As for the eggs, Italians had been dyeing eggs since the 9th century, and in the 12th century Italians would bring painted eggs to church for a blessing ritual called benedictio ovorum (literally the “blessing of the eggs”). The blessed eggs would be given to servants and children. So, the base bread is out there, and the eggs are being made, but when did they come together? Probably not for a few more hundred years.
The most common belief associates the bringing of egg and bread together probably happened in the 16th century. At this point there were a lot of communities in Northern Italy with Sephardic Jews, and they had recipes with eggs baked into puff pastry. This is likely the inspiration for someone to try the same thing with colomba Pasquale, and the modern pane di Pasqua came to life.

✝️ Symbolism in Italian Easter Bread
As mentioned, there’s also plenty of symbolism behind Italian Easter bread. Bread itself is a symbol of life, but the eggs and shapes also have meanings behind them.
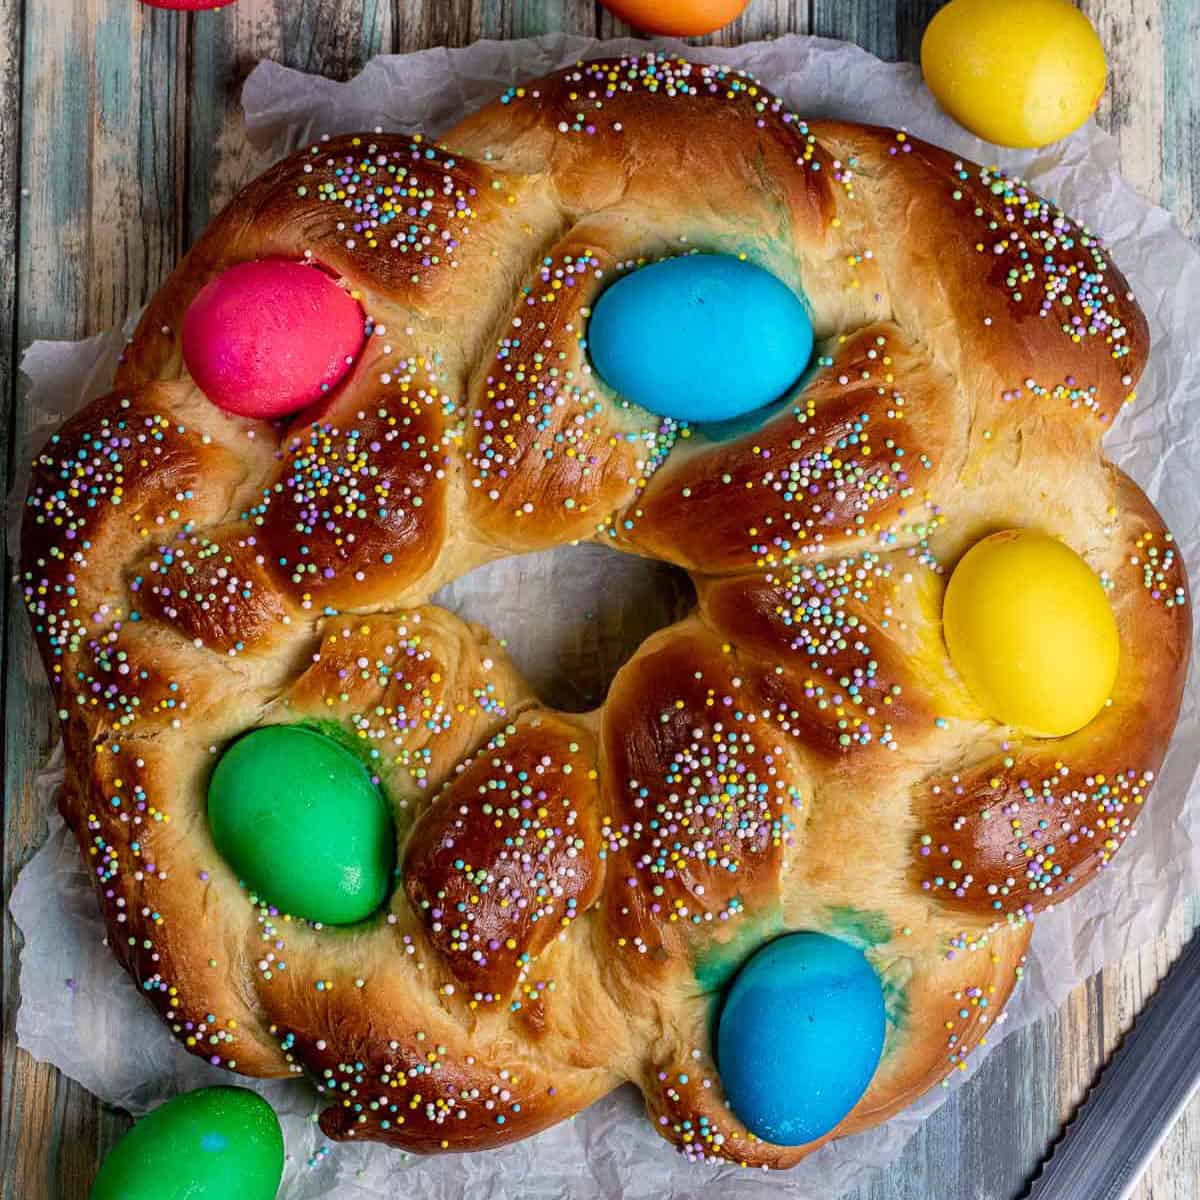
Even before Christianity, eggs were already a symbol of new life and rebirth, and they’re considered a stand-in for Christ’s empty tomb after he was resurrected. The bread being shaped into a braided circle is meant to symbolize the crown of thorns Jesus wore, and when made in a 3-braid, it symbolizes the Holy Trinity.
With that said, there’s still plenty of variations in recipes. Some decorate with dyed eggs, plain eggs, or no eggs. The bread can be a large, triple braided wreath, small double twisted wreaths, or a straight, braided loaf. Feel free to make this how you enjoy it best.
🔪 How to Make Pane di Pasqua
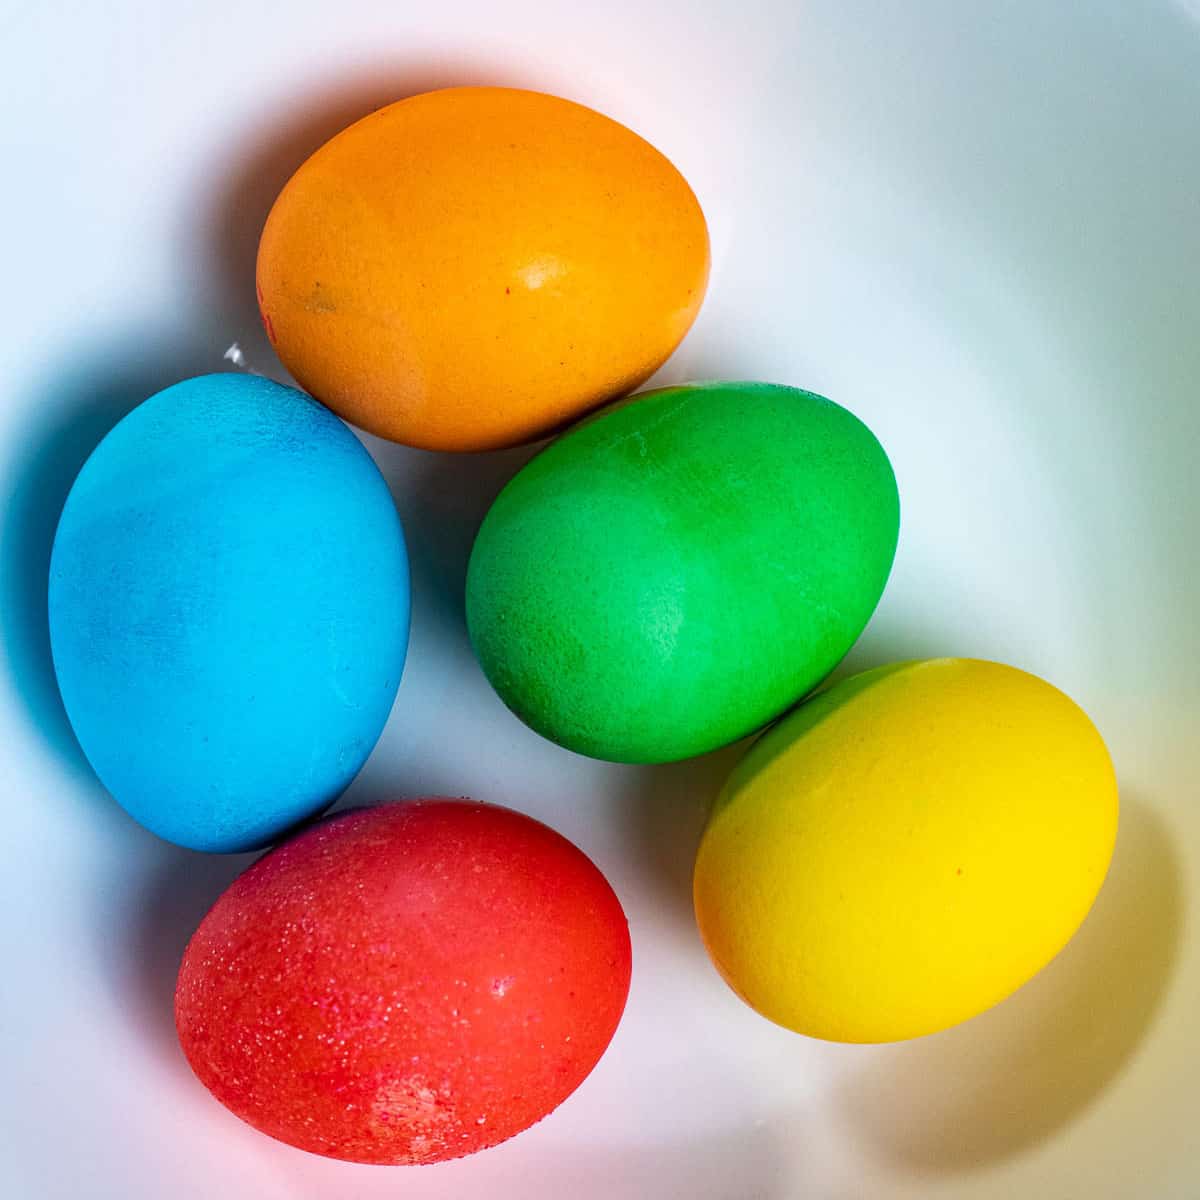
If using colored eggs, dye the eggs first so that they can fully dry. The easiest and cheapest option is to use one of those Easter egg dying kits that cost $1-2. Otherwise, use a coffee cup or something of similar size and depth. Add about a tablespoon of white vinegar and enough water to cover an egg, then add 10-20 drops of food coloring to it (the more you use, the darker the coloring). Add the egg and submerge for about 5 minutes, then set aside to dry.
Make the Dough & First Rise
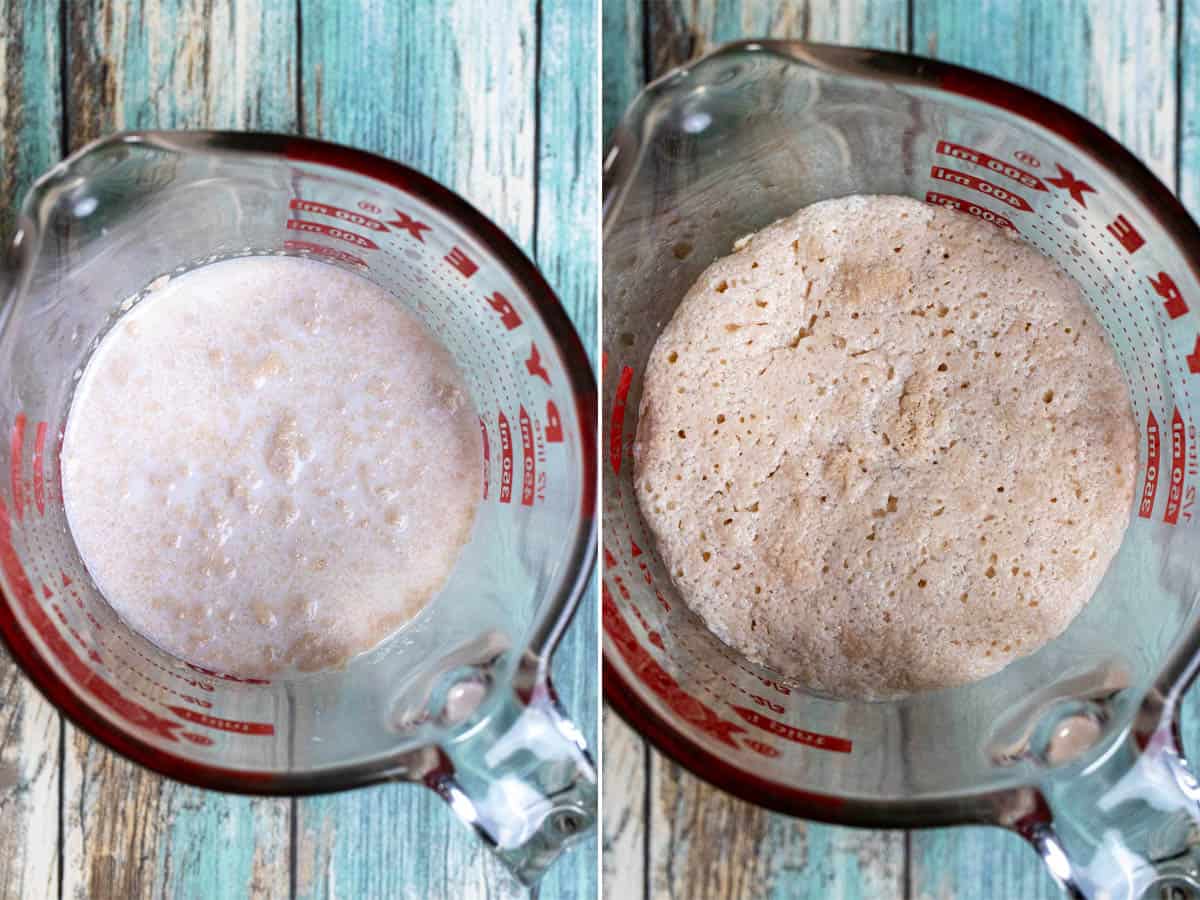
Start the bread by heating the whole milk to around 100°F / 38°C. Stir in a spoonful of sugar from the ¼ cup of sugar and then add the yeast. Set aside for 5-10 minutes until bubbly and frothy (if it doesn’t bloom, toss out and start again with fresher yeast). Melt the butter and set aside to cool slightly.
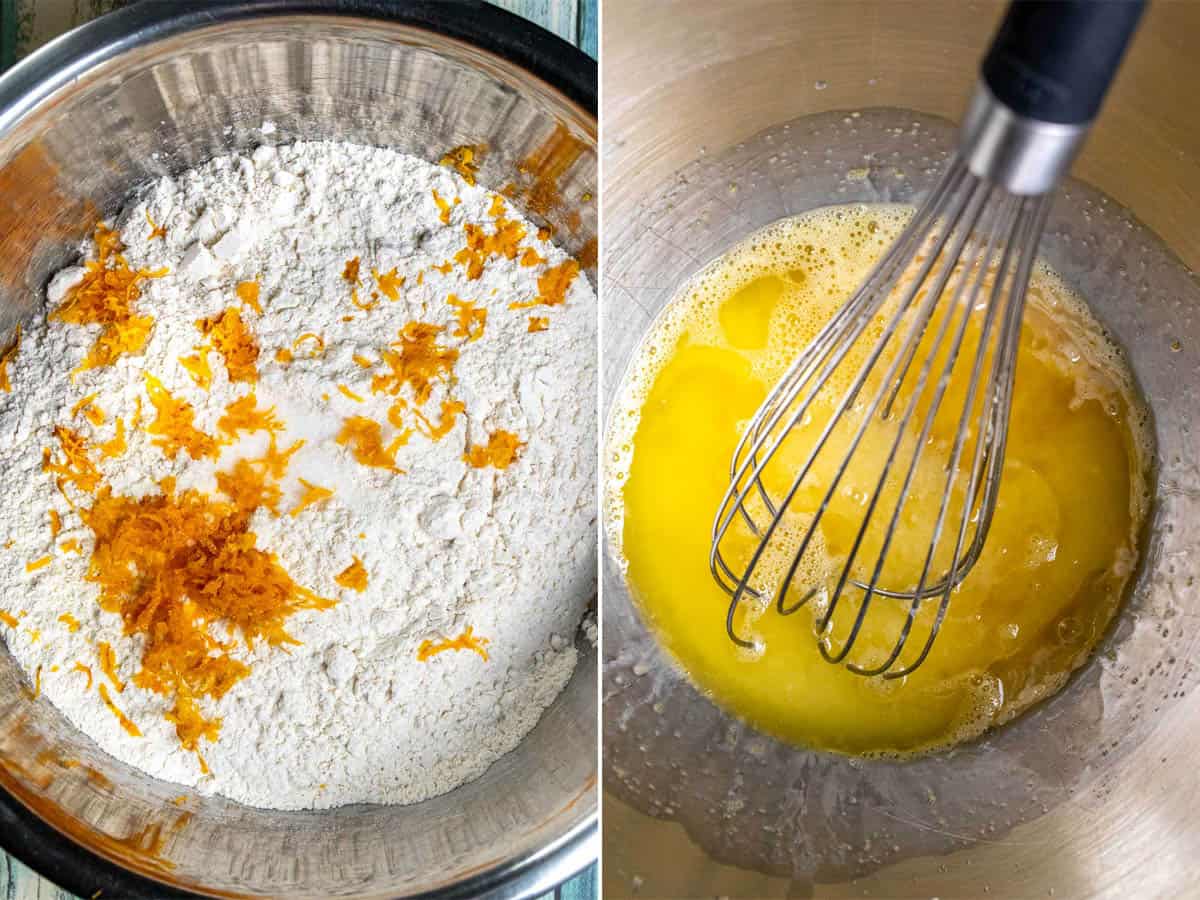
In a mixing bowl, combine the flour, salt, and orange zest. Whisk well to combine and set aside.
In the bowl of a stand mixer, or in a large mixing bowl, add the eggs and remaining sugar. Whisk for a minute or two until the eggs are fully mixed and the sugar has been dissolved and combined. Squeeze in about ¼ cup of juice from the orange, add the melted butter, anise extract, and vanilla extract and whisk again to combine.

Pour in the bloomed yeast mixture and whisk together again. If using a stand mixer, switch to the dough hook attachment and add in all but about ½ cup or so of the flour mixture. Mix at low speed until the flour has mixed and a shaggy dough has formed. Stop and scrape down the sides of the bowl and add the remaining flour mixture. Start low again, scrape down the sides one more time, and increase to speed setting 2. Let the dough knead for another 6-7 minutes or so.
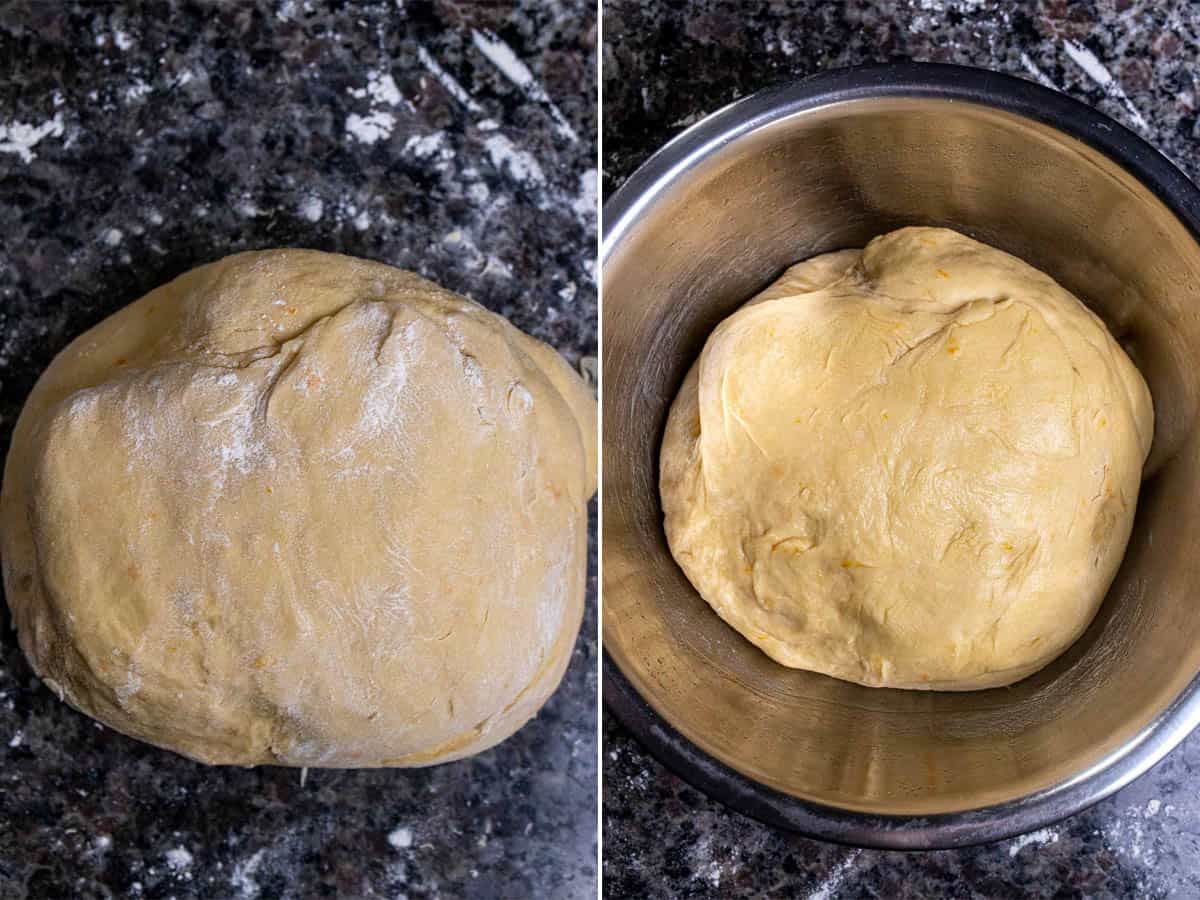
The dough will still be very sticky at this point. Turn the dough out onto a generously floured surface and cover the top with more flour. Finish kneading the dough by hand for 2-3 minutes until it feels smoother and barely sticky anymore, then form into a ball. Lightly oil a mixing bowl and add the dough, turning to coat in the oil. Cover with plastic wrap or a damp kitchen towel and place in a warm, draft free place for 1.5 - 2 hours until the dough rises and is about doubled in size.
Shaping the Bread
After the first rise and the dough has doubled, punch down the dough and turn out onto a lightly floured surface. Weigh the dough and cut into 3 equal amounts or roll into a fat cylinder and estimate and cut into 3 equal pieces. Begin rolling and stretching each piece into a long, thick rope, staying as even as possible in thickness. If the dough feels like it is resisting this process, let the dough rest for 5-10 minutes and try again (this allows the gluten protein to relax some).
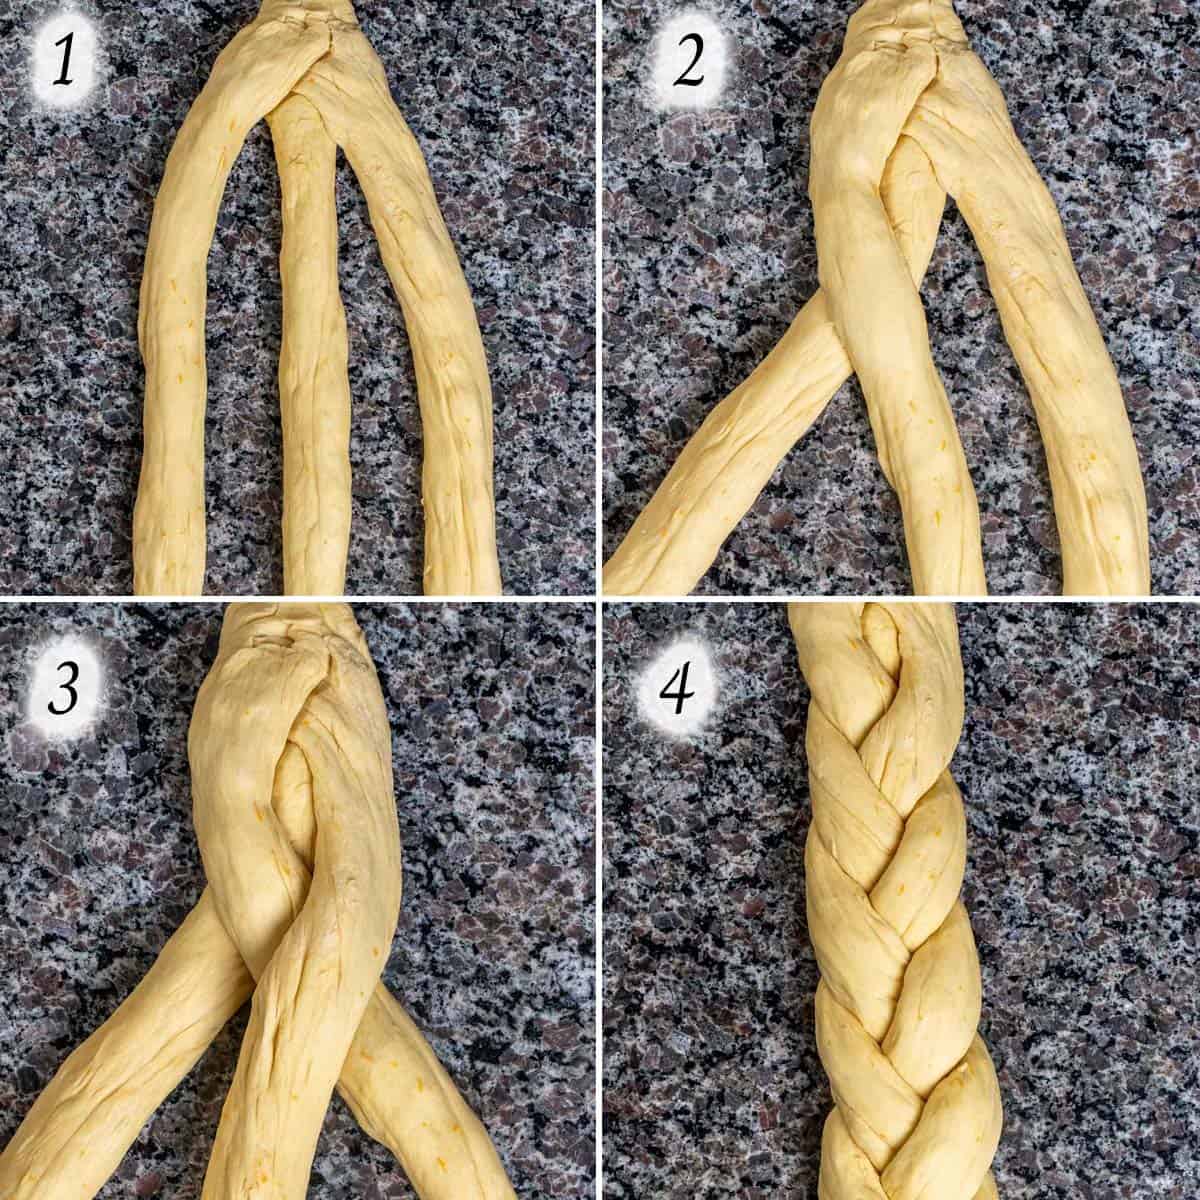
Roll each strand about 22-24” long. Set the ends together on one side and pinch together. When making a 3-strand braid, begin with the left-most strand and cross it over the middle strand, then take the right-most strand and cross it over the new middle strand. Continue this process until you run out of room. Keep the braids somewhat loose so you can easily push the eggs between the braids later.
Line a baking sheet with parchment paper or a silicone bread mat. Gently transfer the braided dough onto the pan and form into a round wreath shape. Pinch the ends of the braid together. Gently pull the braids open slightly and slide a dyed egg in between the braids, making sure to stay towards the middle or inside of the braid so that the egg doesn’t roll off the top during the second bread rise
Second Rise & Baking
For wreath shaped bread, 5 eggs look best. Cover again and allow to rise a second time, about 45 minutes, or until roughly doubled in size. This should also help lock the eggs into the dough.
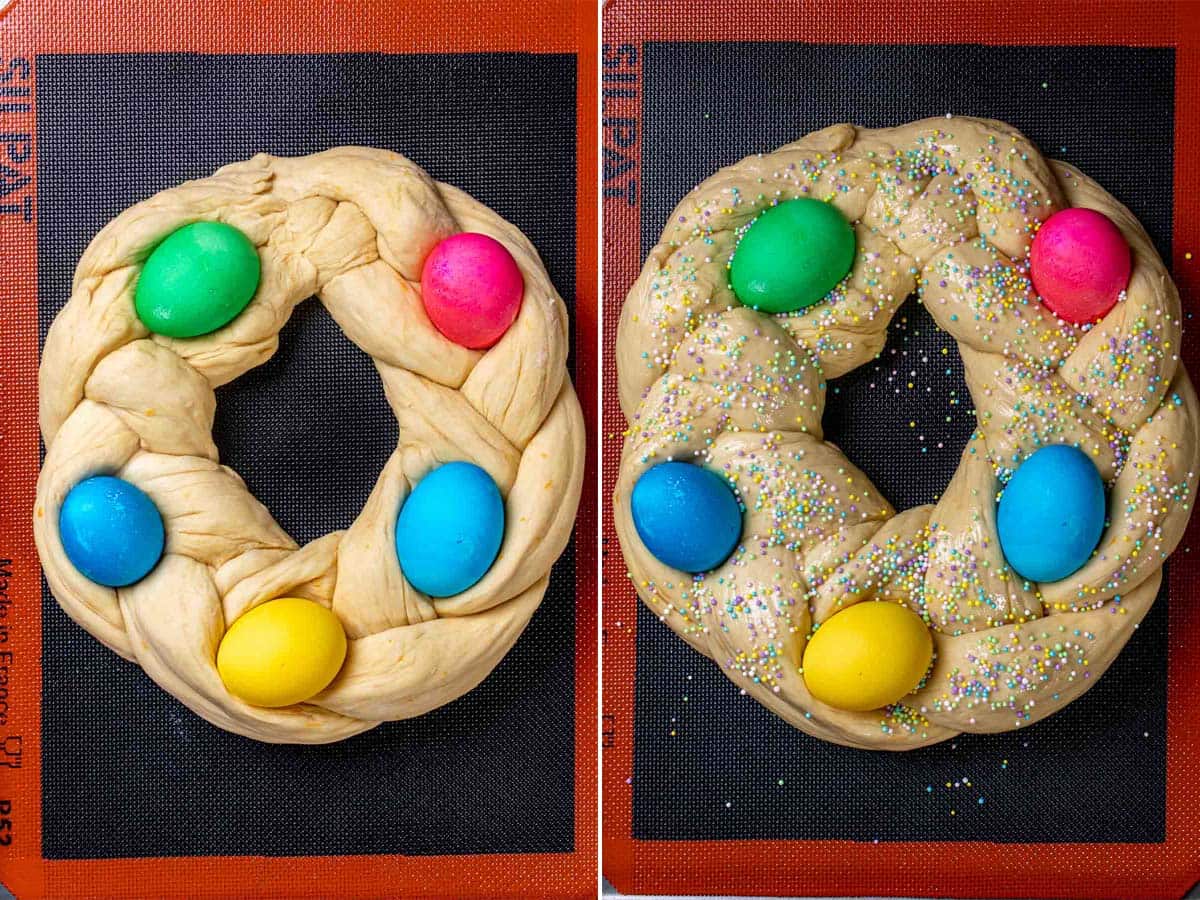
When almost done with a second rise, preheat your oven to 350°F / 180°C. Whisk together one egg with a splash of water for the egg wash and brush onto the dough, being careful not to brush the dyed eggs which can cause the dye to run. Add nonpareils or sprinkles on top of the egg wash if using them.
Place the baking sheet on the middle rack of the oven and cook for 30-35 minutes, until the top is golden brown. Remove it from the oven and allow it to cool in the pan for 5-10 minutes before moving the bread to a cooling rack.
Slice and serve when at room temperature or still slightly warm.
📖 Italian Easter Bread Variations
Anise – Anise seed adds a subtle licorice flavor to baked goods, but the addition here doesn’t make each piece of bread taste like taking a bite of black licorice candy. You could use anise seed, ground anise seed, or anise extract as I do here. If you really hate the flavor of anise seed, you can omit it altogether, or swap it with something else like ground cinnamon.
Eggs – There are many variations on pane di Pasqua, and how you use the eggs is completely a personal choice. Some recipes use dyed eggs, undyed eggs, or no eggs at all. You can use hard boiled eggs, or raw eggs. The raw eggs will be cooked with the bread to roughly a hard cooked consistency and can be eaten, but honestly most people just use them as decorations. Using or not using the eggs has no bearing on the flavor of the finished bread.
If you do wish to eat the eggs, eat them shortly after making the bread, otherwise they need to be removed and refrigerated after the bread has cooled.
Sprinkles – Colorful nonpareils or sprinkles add a festive touch to the bread and a little sweetness to the crust but are completely optional. Some recipes add anise-flavored icing to the cooled bread instead, or in addition to the sprinkles.
Shaping and Braiding – This recipe uses a 3-braid wreath shape, but many other designs are popular as well. One popular option is the mini-wreath shapes. Instead of making 3 large ropes, divide the dough into 8 smaller pieces. Roll the dough into 8-9” strands and twist two together lengthwise, then shape into a small wreath. Place an egg in the center of the wreath and let rise a second time until doubled. This will make 4 smaller wreath shapes. Bake for 25-30 minutes.
Another option is to make a braided, straight loaf. I haven’t tested this personally with this recipe, but you should be able to divide the dough into 6 medium strands and roll them each of them into 12-14” ropes. Do a 3-braid twist and leave them straight instead of turning into a wreath and you’ll have 2 medium-sized loafs. You can add 2-3 eggs into each loaf (odd numbers tend to look best aesthetically). Baking time should be around 30-35 minutes.
💭 Frequently Asked Questions
Pane di Pasqua is the popular Italian Easter bread that translates literally as “bread of Easter”. It is an enriched bread, like brioche, often braided and shaped into wreaths.
No, you can omit anise if you don’t care for the flavor. While traditional in many parts of Italy, you can skip the anise and use things like orange or lemon zest, vanilla, or even cinnamon instead.
No, you can wash and dye raw eggs and they will cook as the bread bakes. Depending on the recipe and cooking time for the bread, raw eggs should cook somewhere between a soft and hard-boiled consistency.
🍽 Recommended Equipment
While you can make pane di Pasqua by hand easily enough, here are a few items I recommend for an easier process.
Stand Mixer – A decent stand mixer is a bit of an investment, but if you plan to do much baking at all, I highly recommend one. Kitchen Aid is basically the gold standard for home bakers, and it really does make things easier, especially for hands off kneading.
Silicone Mat – I love using Silpat mats in a lot of my baking, especially for cookies. They also make a silicone bread mat that is great for free-formed bread making like this recipe (not in a pan). The mats are reusable and washable, and the bread version is more open textured for even browning.
Kitchen Scale – While not a requirement for most home cook needs, an expensive digital kitchen scale comes in handy. In addition to making equal size ropes for braising here, I also use it to measure flour in grams much faster and more accurately than scooping with measuring cups.
❄️ How to Store Easter Bread
Once cooled completely, Italian Easter bread can be transferred to an airtight plastic bag or container and stored at room temperature for 3-4 days. If you bake it with decorative eggs, they need to be eaten or moved to the refrigerator within 2 hours. The eggs need to be kept refrigerated and consumed within 7 days.
If you don’t think you will finish the bread within a few days, you can also store it the same way in the refrigerator for up to a week. Although this extends the storage life, it also tends to dry the bread out faster and changes the texture.
For longer storage, you can also freeze the bread. Be sure to remove the eggs first (do not freeze them) and wrap the loaf or slices in plastic wrap and again in foil. The bread will keep in the freezer for 2-3 months.
To reheat, you can toast individual slices or reheat in a 350°F oven for 10-15 minutes, until warmed and slightly crisp again.
📋 Recipe

Italian Easter Bread (Pane di Pasqua)
Ingredients
Dough:
- ½ cup whole milk, warmed
- 2 ¼ teaspoons instant yeast, 1 packet
- ¼ cup granulated sugar, divided
- 4 ½ cups all-purpose flour
- 1 teaspoon kosher salt
- 3 teaspoons orange zest, see note
- 3 large eggs
- ¼ cup unsalted butter, melted and cooled
- 3 tablespoons orange juice, see note
- 1 teaspoon anise extract
- ½ teaspoon vanilla extract
Decorations:
- 1 large egg, for egg wash
- 5 large eggs, raw, optional
- Nonpareils or sprinkles, optional
Directions
- If using colored eggs, dye the eggs first so that they can fully dry. The easiest and cheapest option is to use one of those Easter egg dying kits that cost $1-2. Otherwise, use a coffee cup or something of similar size and depth. Add about a tablespoon of white vinegar and enough water to cover an egg, then add 10-20 drops of food coloring to it (the more you use, the darker the coloring). Add the egg and submerge for about 5 minutes, then set aside to dry.
Make the Dough & First Rise:
- Start the bread by heating ½ cup whole milk to around 100°F / 38°C. Stir in a spoonful of sugar (about 1 teaspoon) from the ¼ cup of sugar and then add 2 ¼ teaspoons yeast (1 packet). Set aside for 5-10 minutes until bubbly and frothy (if it doesn’t bloom, toss out and start again with fresher yeast). Melt the ¼ cup unsalted butter and set aside to cool slightly.
- In a mixing bowl, combine 4 ½ cups all-purpose flour, 1 teaspoon kosher salt, and 3 teaspoons orange zest. Whisk well to combine and set aside.
- In the bowl of a stand mixer, or in a large mixing bowl, add 3 large eggs and the remaining sugar. Whisk for a minute or two until the eggs are fully mixed and the sugar has been dissolved and combined. Squeeze in about 3-4 tablespoons of juice from the orange, add the reserved melted butter, 1 teaspoon anise extract, and ½ teaspoon vanilla extract and whisk again to combine.
- Pour in the bloomed yeast mixture and whisk together again. If using a stand mixer, switch to the dough hook attachment and add in all but about ½ cup or so of the flour mixture. Mix at low speed until the flour has mixed and a shaggy dough has formed. Stop and scrape down the sides of the bowl and add the remaining flour mixture. Start low again, scrape down the sides one more time, and increase to speed setting 2. Let the dough knead for another 6-7 minutes or so.
- The dough will still be very sticky at this point. Turn the dough out onto a generously floured surface and cover the top with more flour. Finish kneading the dough by hand for 2-3 minutes until it feels smoother and barely sticky anymore, then form into a ball. Lightly oil a mixing bowl and add the dough, turning to coat in the oil. Cover with plastic wrap or a damp kitchen towel and place in a warm, draft free place for 1.5 - 2 hours until the dough rises and is about doubled in size.
Shaping the Bread:
- After the first rise and the dough has doubled, punch down the dough and turn out onto a lightly floured surface. Weigh the dough and cut into 3 equal amounts or roll into a fat cylinder and estimate and cut into 3 equal pieces. Begin rolling and stretching each piece into a long, thick rope, staying as even as possible in thickness. If the dough feels like it is resisting this process, let the dough rest for 5-10 minutes and try again (this allows the gluten protein to relax some).
- Roll each strand about 22-24-inches long. Set the ends together on one side and pinch together. When making a 3-strand braid, begin with the left-most strand and cross it over the middle strand, then take the right-most strand and cross it over the new middle strand. Continue this process until you run out of room. Keep the braids somewhat loose so you can easily push the eggs between the braids later.
- Line a baking sheet with parchment paper or a silicone bread mat. Gently transfer the braided dough onto the pan and form into a round wreath shape. Pinch the ends of the braid together. Gently pull the braids open slightly and slide a dyed egg in between the braids, making sure to stay towards the middle or inside of the braid so that the egg doesn’t roll off the top during the second bread rise
Second Rise & Baking:
- For wreath shaped bread, 5 eggs look best. Cover again and allow to rise a second time, about 45 minutes, or until roughly doubled in size. This should also help lock the eggs into the dough.
- When almost done with a second rise, preheat your oven to 350°F / 180°C. Whisk together one egg with a splash of water for the egg wash and brush onto the dough, being careful not to brush the dyed eggs which can cause the dye to run. Add nonpareils or sprinkles on top of the egg wash if using them.
- Place the baking sheet on the middle rack of the oven and cook for 30-35 minutes, until the top is golden brown. Remove it from the oven and allow it to cool in the pan for 5-10 minutes before moving the bread to a cooling rack.
- Slice and serve when at room temperature or still slightly warm.


Kim P says
I spent many years looking for the right recipe as my Italian Grandmas and Great Grandmother. Thanks this is it!!!
Chris Pezzana says
So glad to hear that, happy Easter!
Susie says
What liquid substitute can you recommend if one didn’t wish to use citrus?
Chris Pezzana says
I would probably just add a touch more milk or another tablespoon of butter honestly. Or just omit it altogether and if the dough seems dry while kneading, add a splash of milk until it comes together.
Susie says
Thank you. I have been using my grandmother’s (1897b) for many years but find it can tend to be a little dry so I searched and found your recipe which is incredibly close to the one I use with a little more liquid and flour. I am going to use your recipe next time I make bread. Thanks again and I’ll let you know how it turns out.
Chris Pezzana says
I know the feeling, I have a lot of old recipes from family written on index cards. Some are hard to decipher, some need modernizing, and some are great cookie recipes, but they make like 200 cookies heh. I hope that you love it if you give it a try, I look forward to hearing how it comes out. 🙂
Mary Caprara says
Want to try this on this Easter weekend. Can you make it the day before and bake on the day of? Maybe do the second rising in the fridge overnight?
Chris Pezzana says
Yes, to pretty much all those options. It lasts for a few days at room temperature (without the eggs), but if you want to bake it fresh the day you serve it, you can. I would let it rise the day before, shape it and add the eggs, then cover and refrigerate overnight.
The next morning pull it from the fridge and let it sit at room temperature for like 2ish hours before adding the egg wash and sprinkles and baking. This gives it time to remove the chill and allow for a slower second rise before baking it.
You could also technically refrigerate it after kneading and let it do its first rise overnight in the fridge, but then you have more work the next day with shaping. I also find it easier to shape the dough when it's already at room temperature as the cold dough may be more resistant to stretching and braiding.
Karen Cerrone Perusse says
Amazing Easter bread!! So light and delicious!!
Chris Pezzana says
So glad you enjoyed it! Thank you for the comment/compliment~