
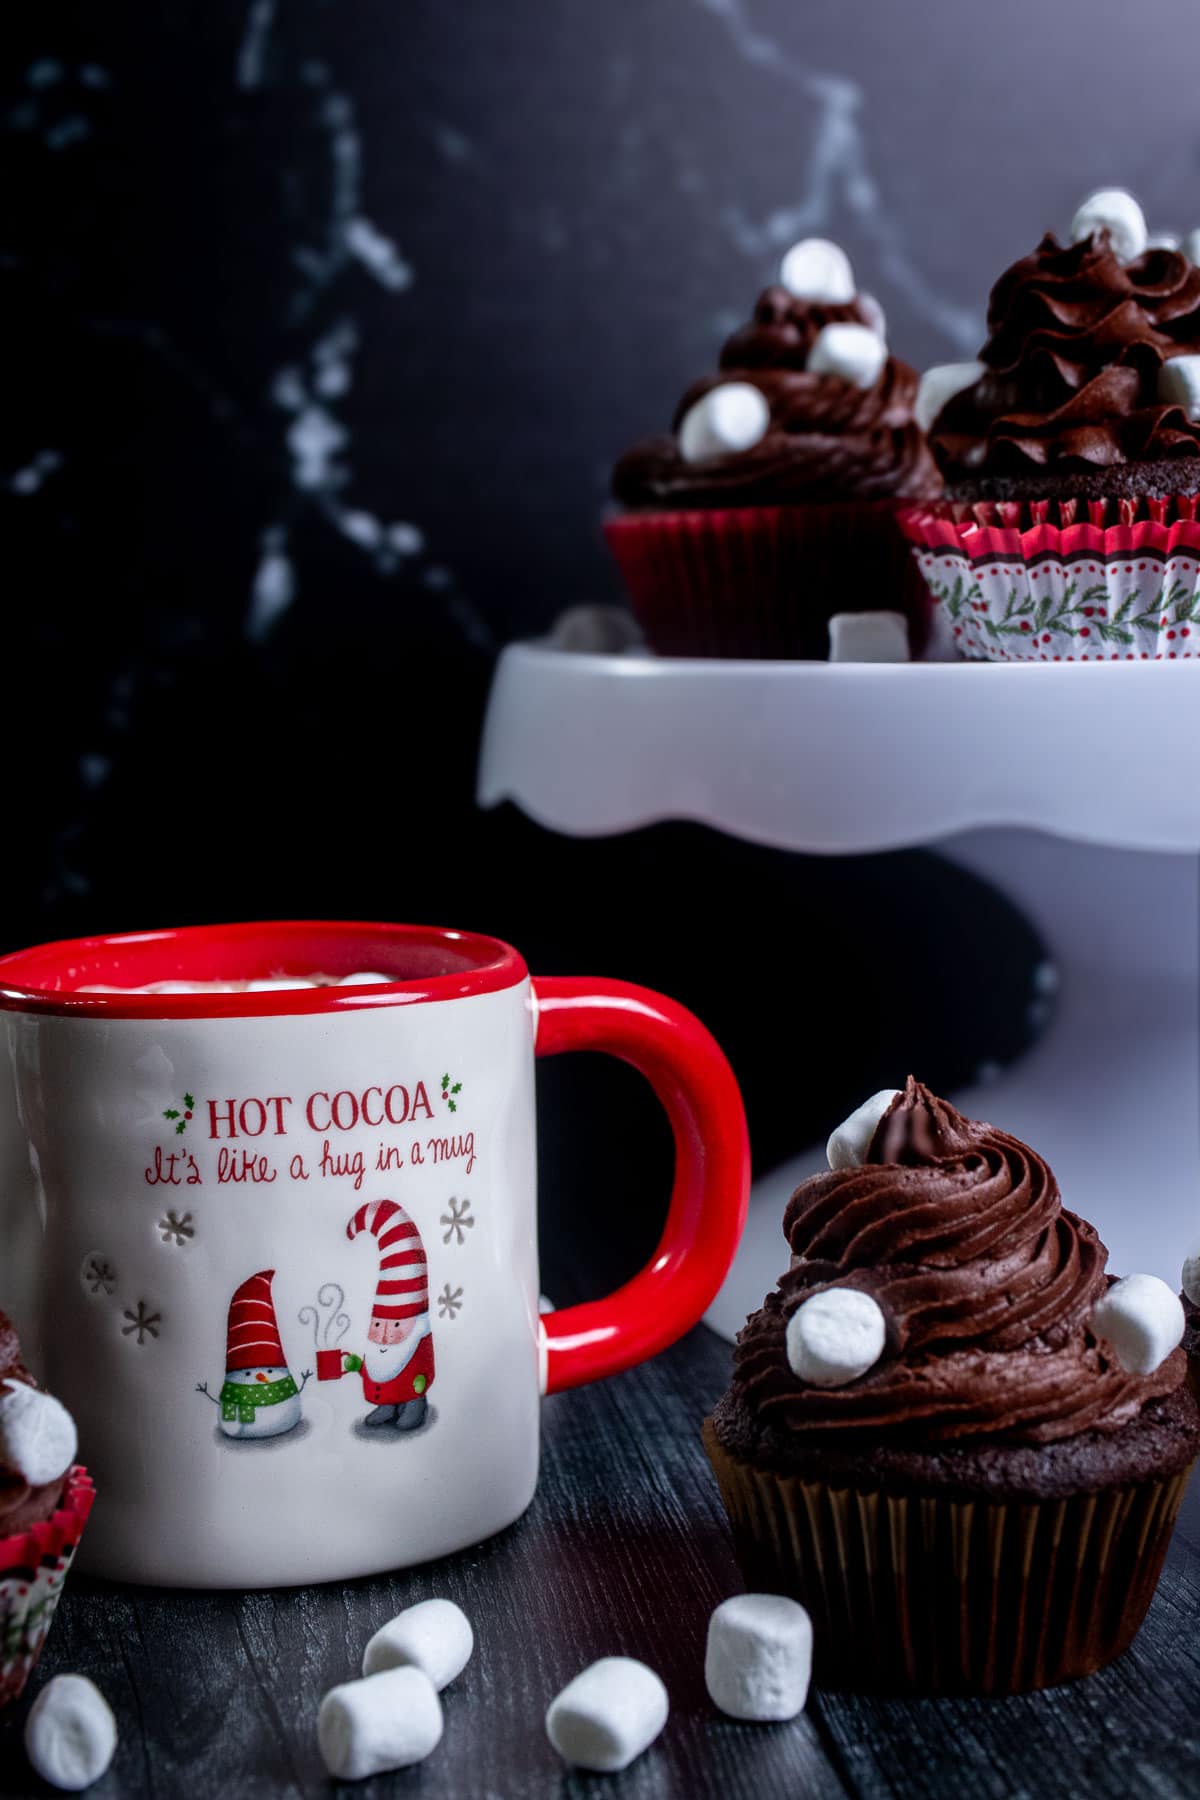
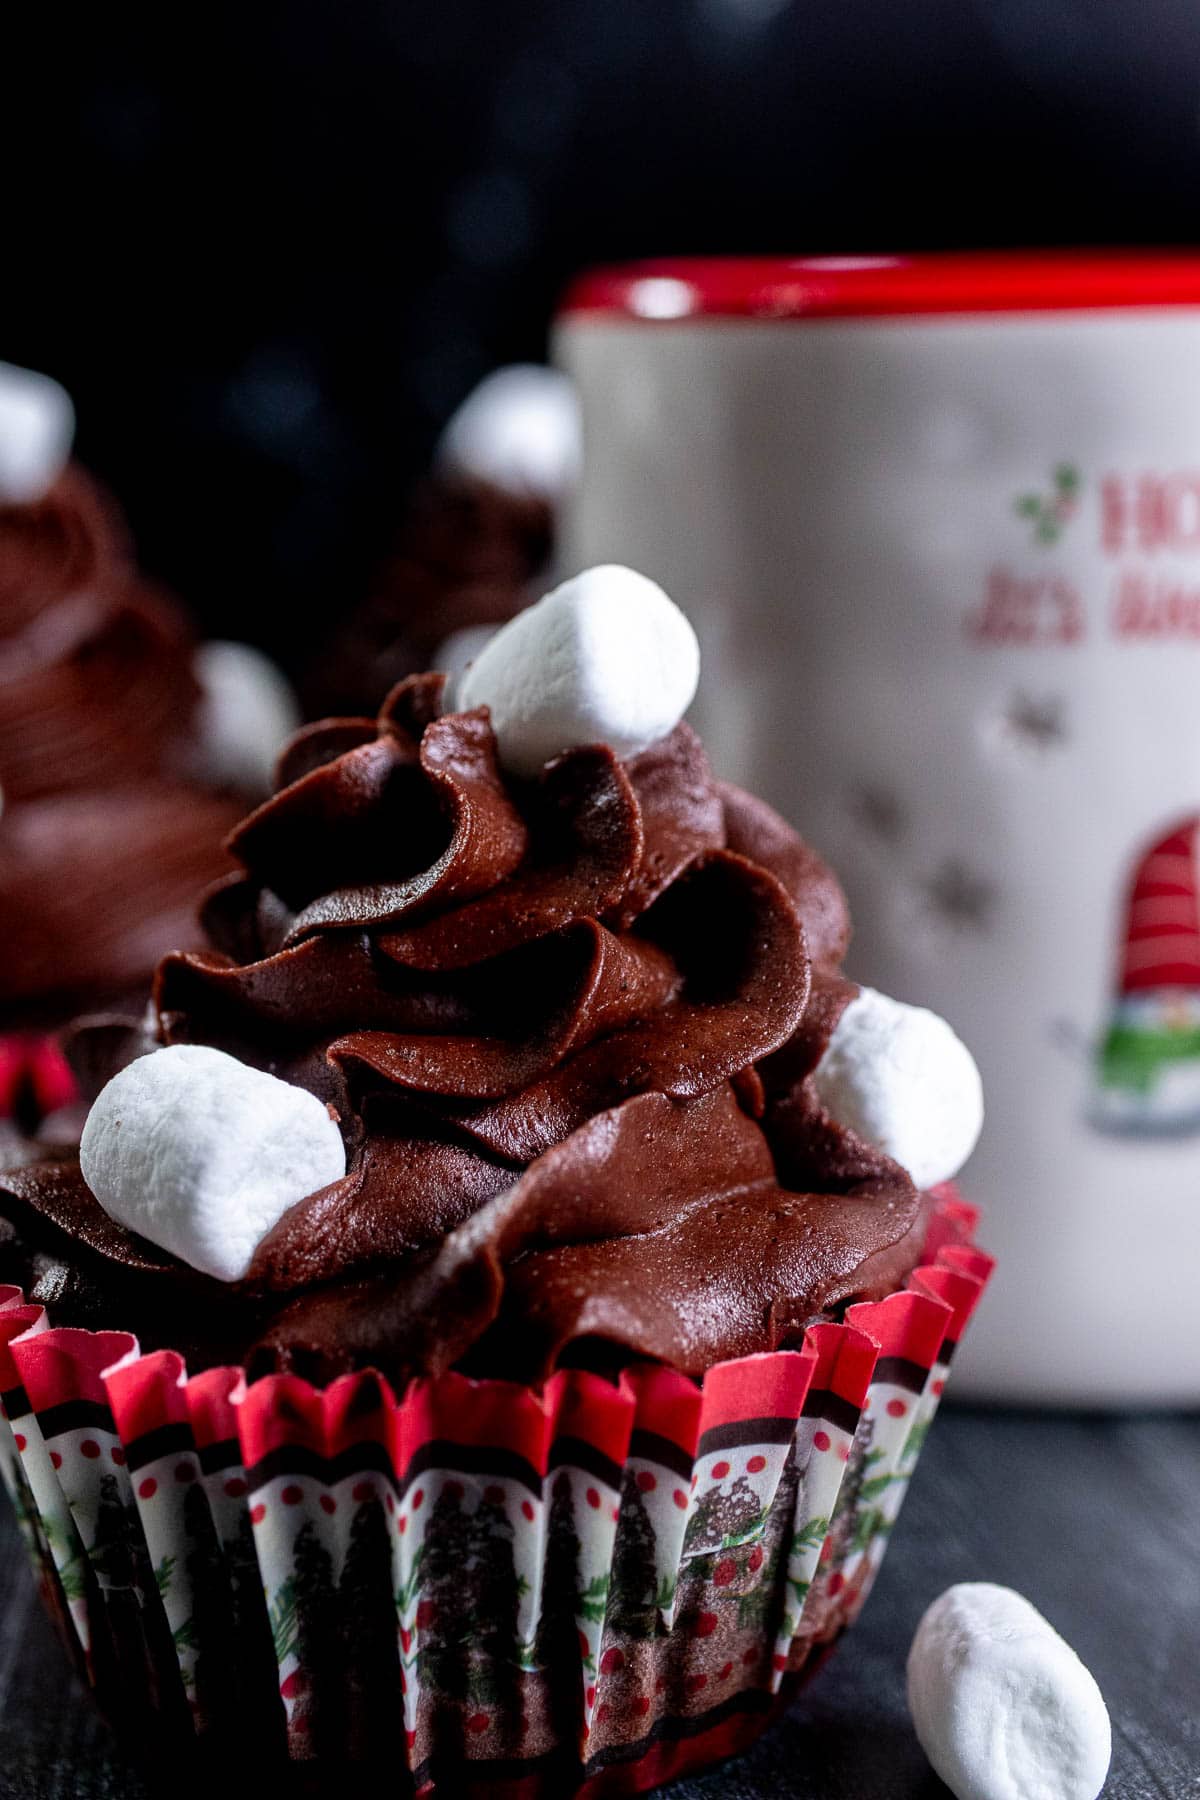
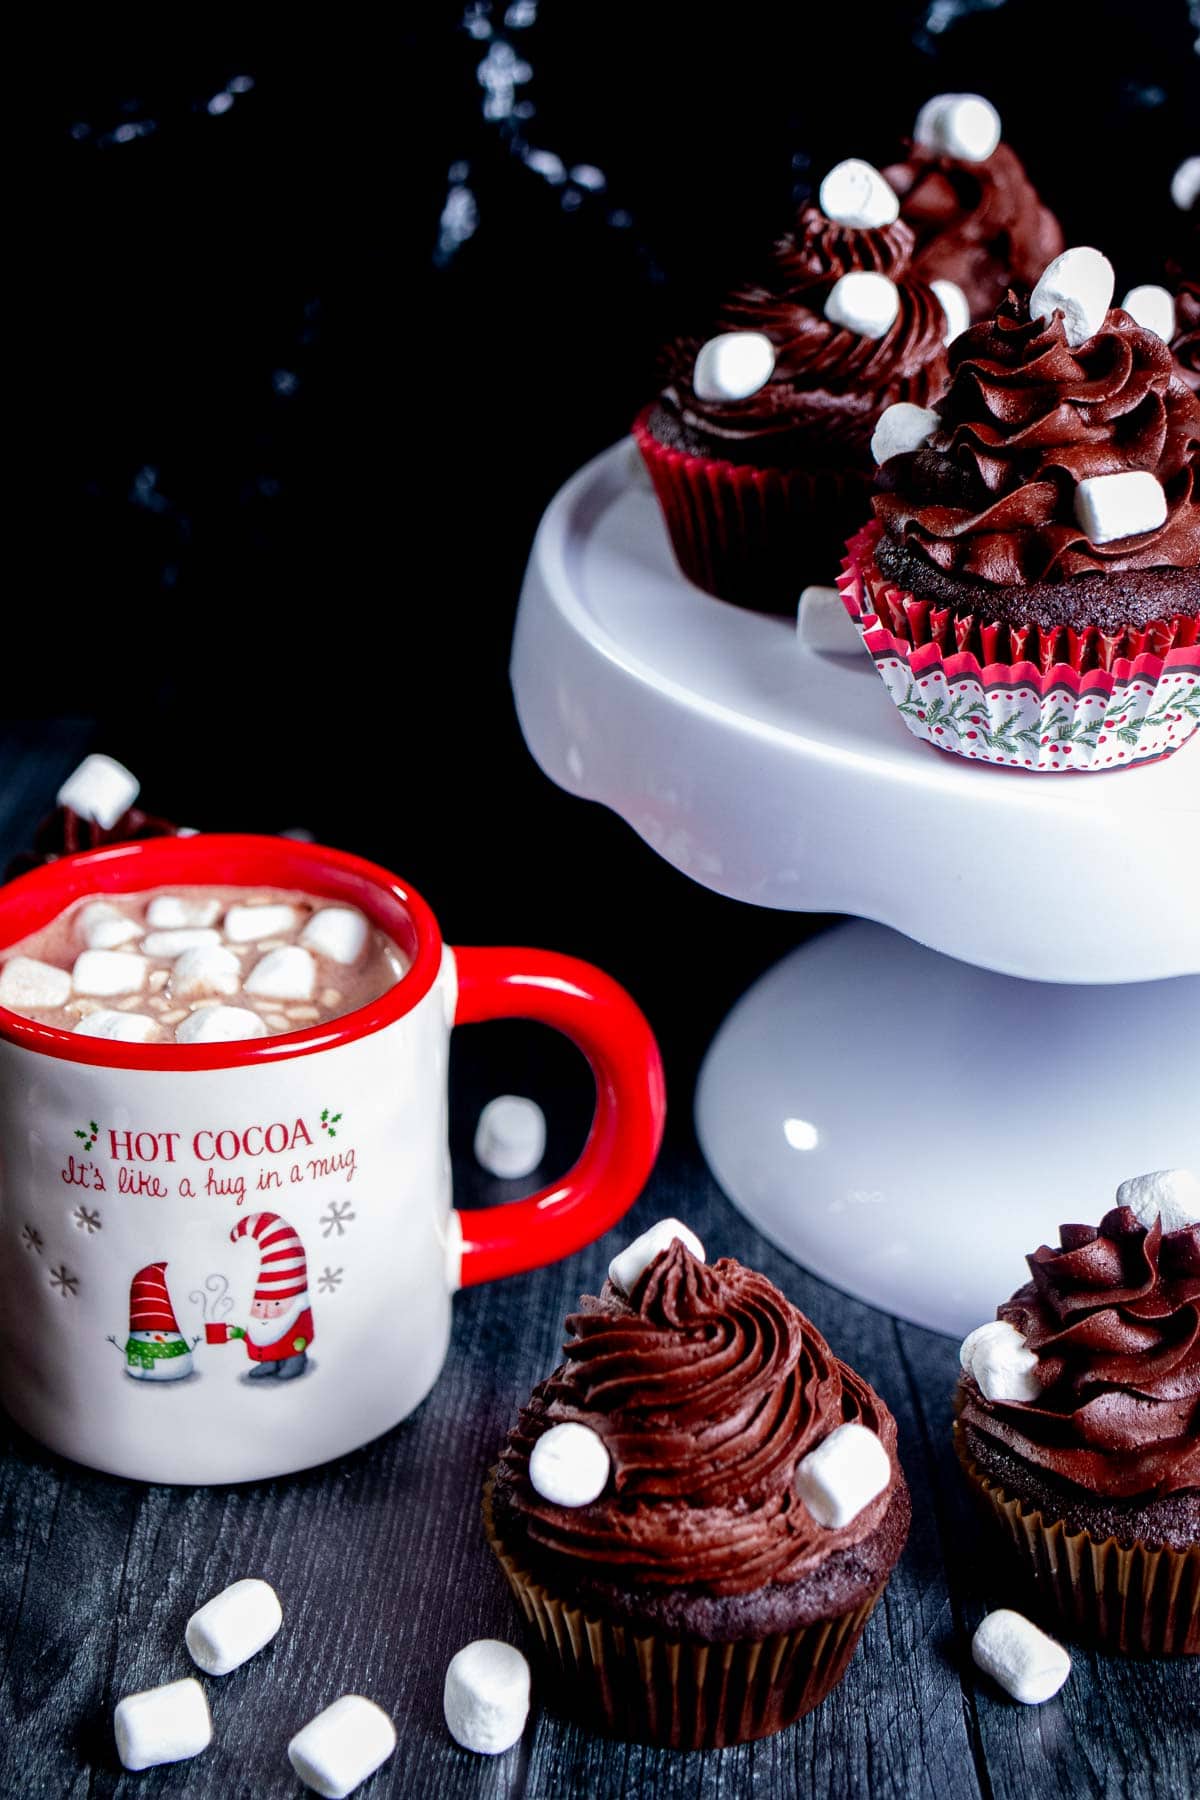
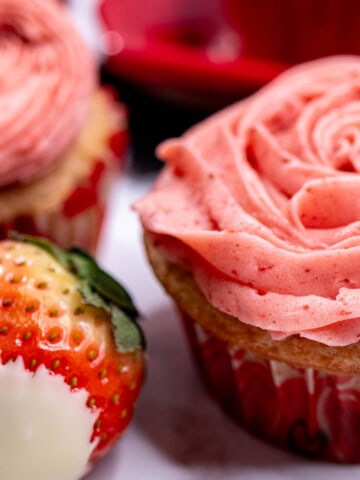
The next best thing to a cup of hot cocoa in the winter? These hot chocolate cupcakes with marshmallow filling. The cupcakes are super chocolaty and moist, filled with marshmallow, and topped with a rich chocolate buttercream. Great as a Christmas cupcake, they’re also perfect all winter long when the weather gets cold.
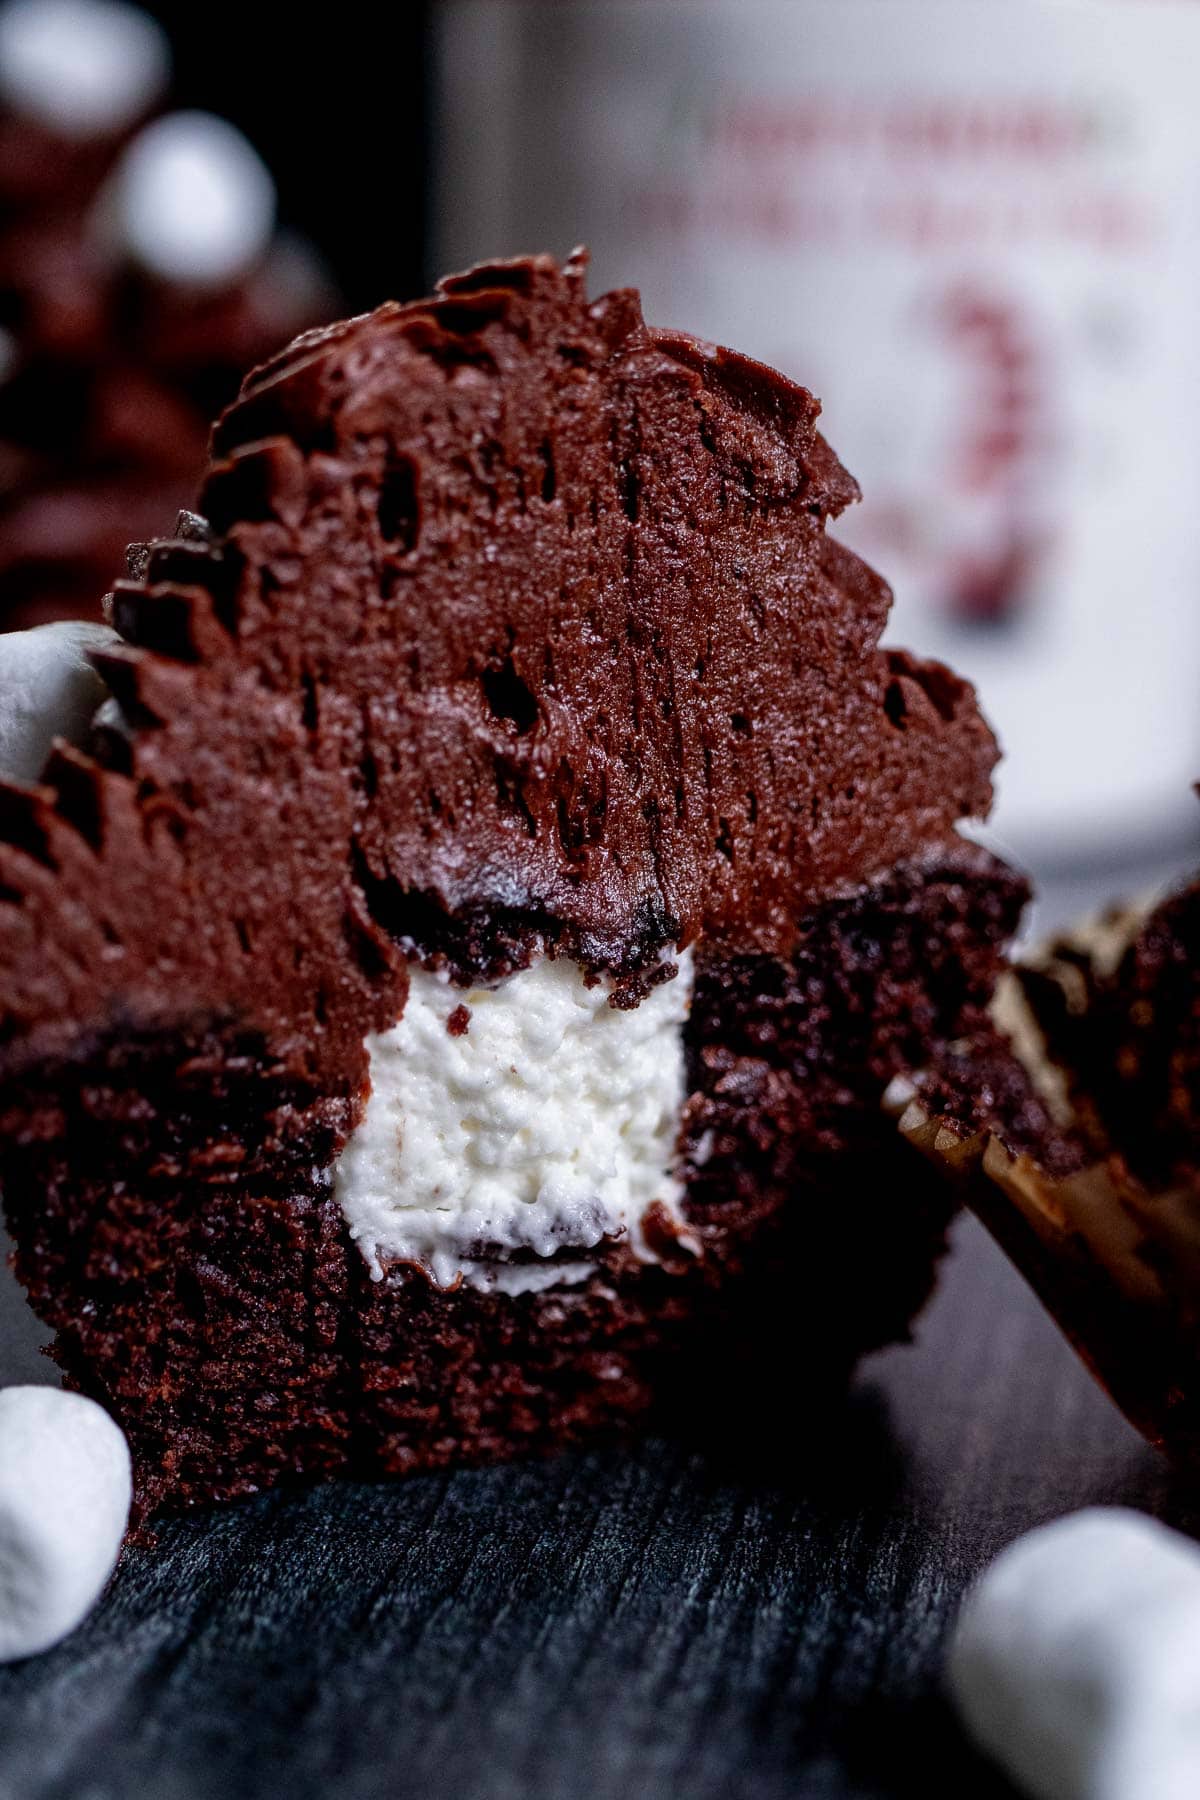
The base is one of the best chocolate cupcakes I’ve had. This makes the rest of the cupcake recipe versatile as far as fillings and toppings are concerned. The marshmallow filling is not only cute but adds some needed creaminess to cut through the richness. You can switch this around though in several ways I’ll mention further down.
These hot cocoa cupcakes are as beautiful as they are tasty. They were so popular over Christmas; I was asked to make them again for a Three Kings Day Christmas party to pair with king cake. I can guarantee these hot chocolate cupcakes will go over big at any party, any time of the year.
If my pina colada cupcakes are perfect for the summer, then these are perfect hot chocolate cupcakes for Christmas and winter. In both recipes, the flavors and the decorations evoke the feelings of their respective seasons.
Jump to:
Unlike a lot of hot chocolate cupcake recipes, I do not use hot cocoa packets here. If you look at the main ingredients in most commercial hot chocolate mixes, the first three items are sugar, corn syrup, and cocoa processed with alkali. That basically means it’s made of Dutch process cocoa powder and lots of sugar. If you think it still makes a difference in flavor though, feel free to replace half the cocoa powder with hot cocoa packets.
🥘 Ingredients for Hot Chocolate Cupcakes
Most of the ingredients for these moist chocolate cupcakes are pantry staples, though you may need a few extra items, especially for the marshmallow filling.
Hot Cocoa Cupcakes
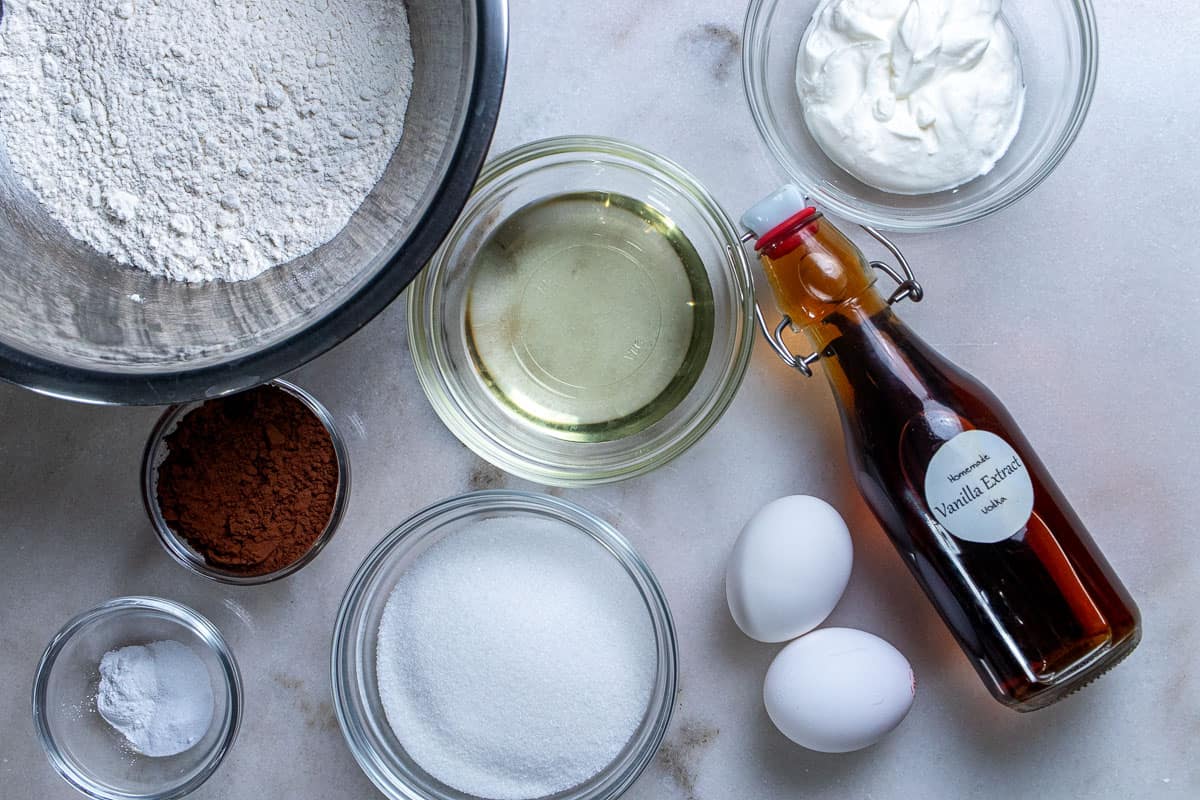
Flour – Normally for cupcakes I prefer using cake flour, but with the amount of cocoa powder in the recipe, I find that to be too crumbly. Use all-purpose flour here instead, as the higher protein gives more structure.
Leaveners – Use both baking powder and baking soda here. Because the recipe calls for Dutch-processed cocoa powder, you need the extra oomph from baking powder.
Cocoa Powder – I prefer to use Dutch-processed cocoa powder here. I find it gives chocolate cupcakes a darker color and fudgier flavor.
Sugar – Use white granulated sugar here.
Fat – Instead of butter and milk, I use oil and sour cream here. The oil adds needed moisture, without giving the flour extra gluten formation. The sour cream adds flavor and richness while being thicker than milk to make up for the lack of butter.
Vanilla – Vanilla extract. as usual, helps to balance the flavors.
Eggs – Use one whole egg and one egg yolk. This adds structure and the extra yolk keeps the cupcake tender and rich.
Marshmallow Filling
The marshmallow filling here is somewhere between marshmallow fluff and marshmallow buttercream. This makes the filling stable enough to take a bite or forkful without pulling it all out, while adding a creaminess that isn’t overly sweet either.
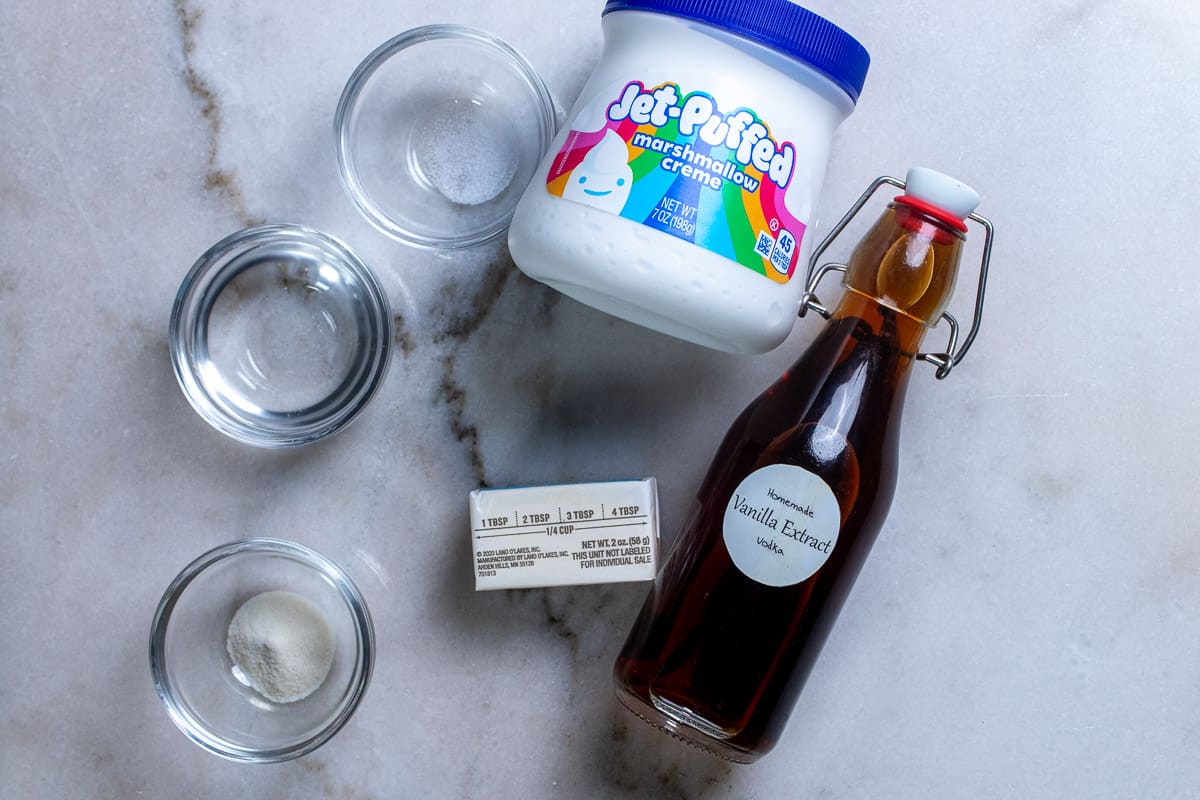
Gelatin – Use some unflavored gelatin and water here. This helps make the marshmallow crème smoother and less tacky to work with.
Butter – Unsalted butter at room temperature adds some flavor and smooths out the crème.
Vanilla – Adds just a bit of flavor to the crème.
Marshmallow Crème – Use a 7oz container of marshmallow crème for the base of this filling.
Hot Cocoa Buttercream
Like the hot cocoa cupcake base, I don’t use packets of hot chocolate in the buttercream either. If you feel it makes a difference though, you can replace half or all the Dutch cocoa powder here with hot chocolate mix.
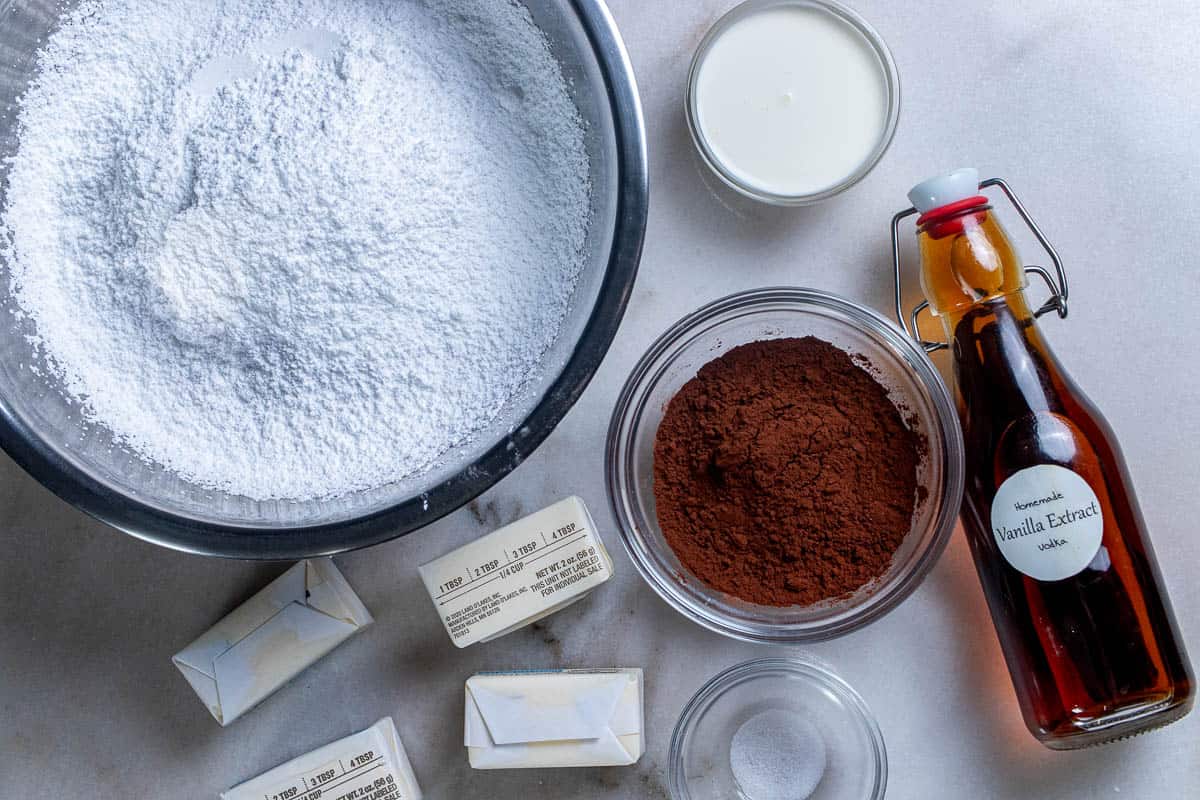
Butter – Use softened, unsalted butter for the base of the buttercream.
Sugar – For the structure, use powdered sugar.
Cocoa – Like the chocolate cupcakes, I use Dutch-processed cocoa powder here. It’s darker and richer than regular unsweetened cocoa powder. As mentioned above, if you feel it makes a difference, you can replace half or all of this with hot chocolate mix. That will make it a bit sweeter as well.
Vanilla – Vanilla extract balances the flavor and enhances the chocolate taste.
Cream – You can use any kind of milk here, but I highly recommend heavy cream in buttercream recipes. It gives the creamiest flavor and smoothest texture. Next best options would be whole milk or half and half, but anything besides skim milk is fine.
🔪 How to Make Hot Cocoa Cupcakes
Making hot chocolate cupcakes is quick and easy. The time-consuming part is waiting for them to cool, making, and chilling the marshmallow filling, making the hot cocoa buttercream, and then filling and decorating the cupcakes. Thankfully, you can cut down the time by making each component one after the next. So, while the cupcakes are cooking, you can make and chill the filling, then start making the buttercream while the filling is setting up and the cupcakes are cooling.
Make the Chocolate Cupcakes
Preheat the oven to 325°F / 165°C and line a 12-count, regular sized muffin tin with cupcake liners.
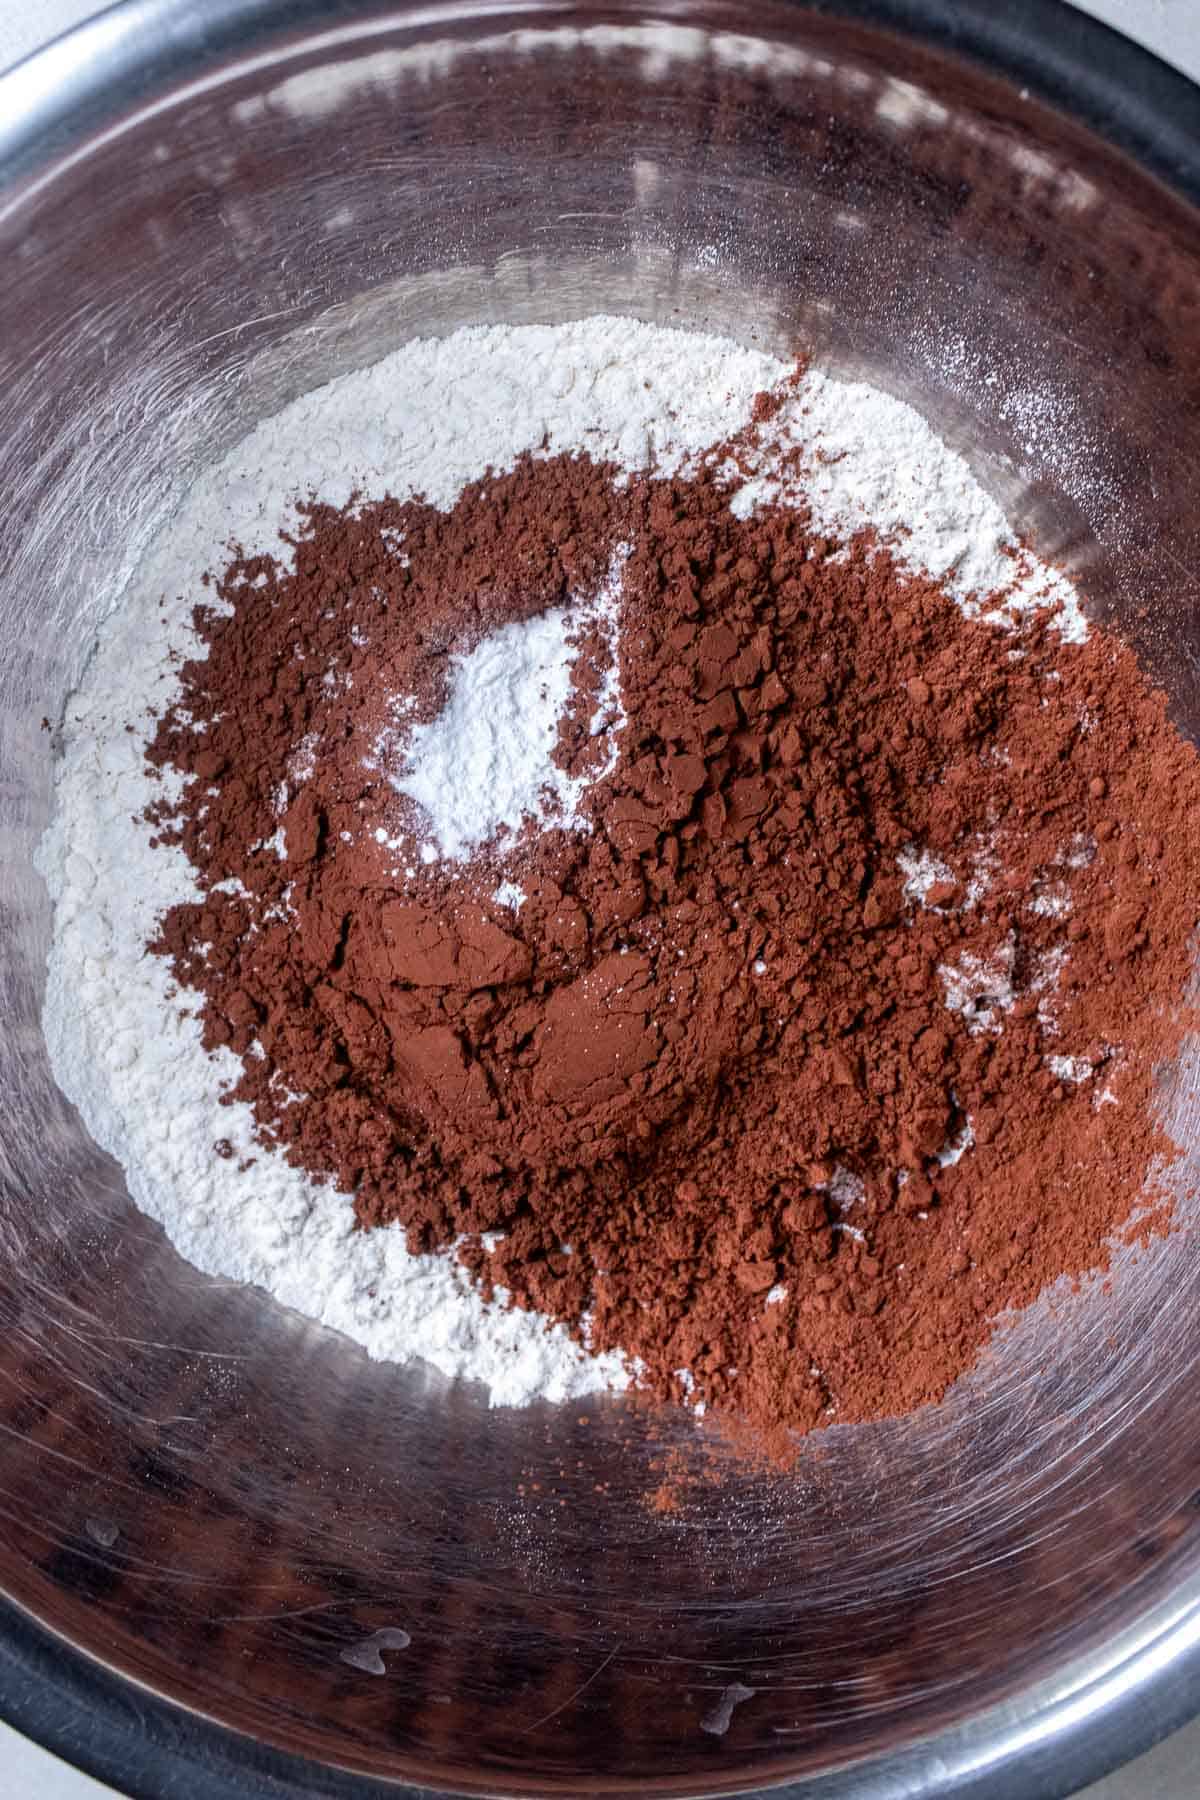
In a mixing bowl, add the flour, baking soda and powder, salt, and cocoa powder. Whisk thoroughly until no white streaks of flour remain and set aside.
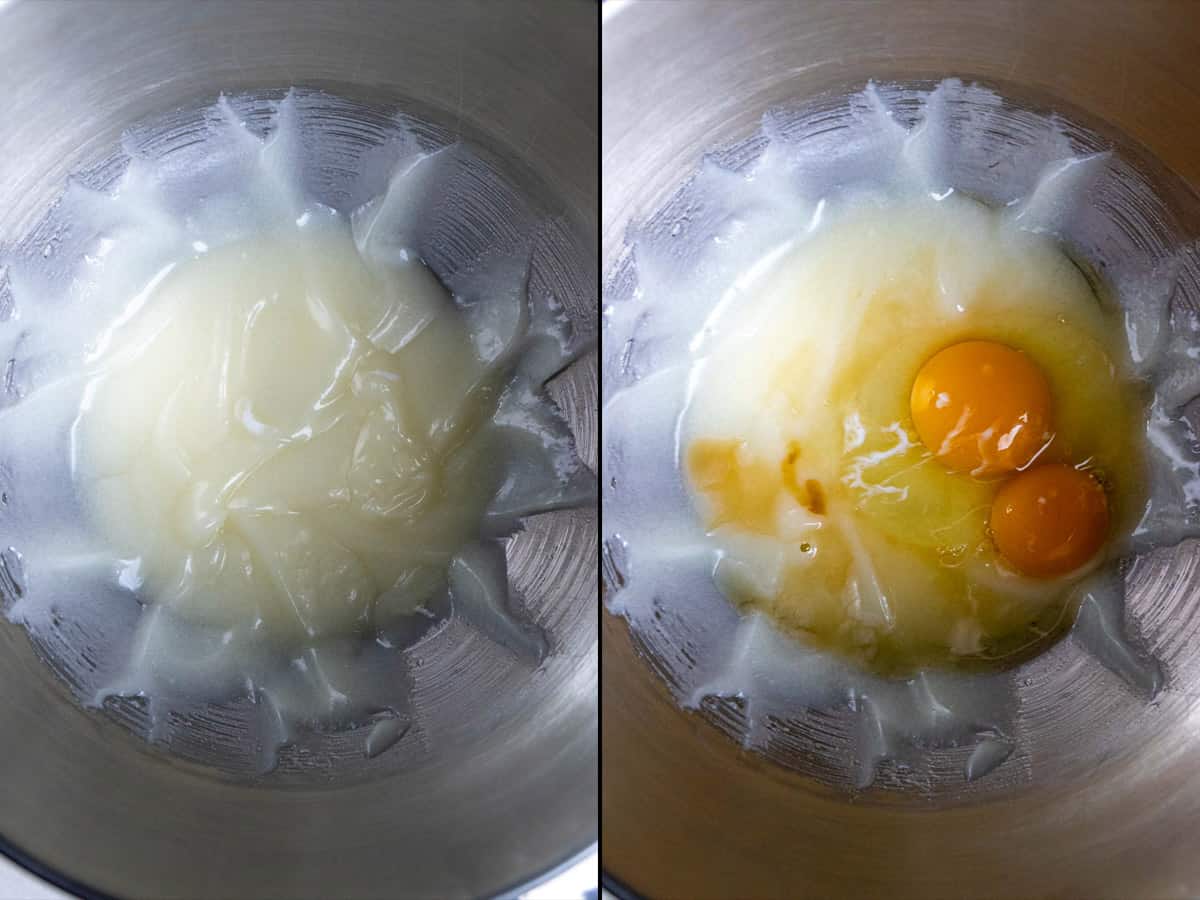
In the bowl of a stand mixer fitted with the paddle attachment, or in a mixing bowl with a hand mixer, add the sugar, oil, sour cream, and vanilla extract. Mix at medium speed until the sugar is dissolved and everything is well mixed. Add the egg and egg yolk and continue mixing until the eggs are just incorporated.
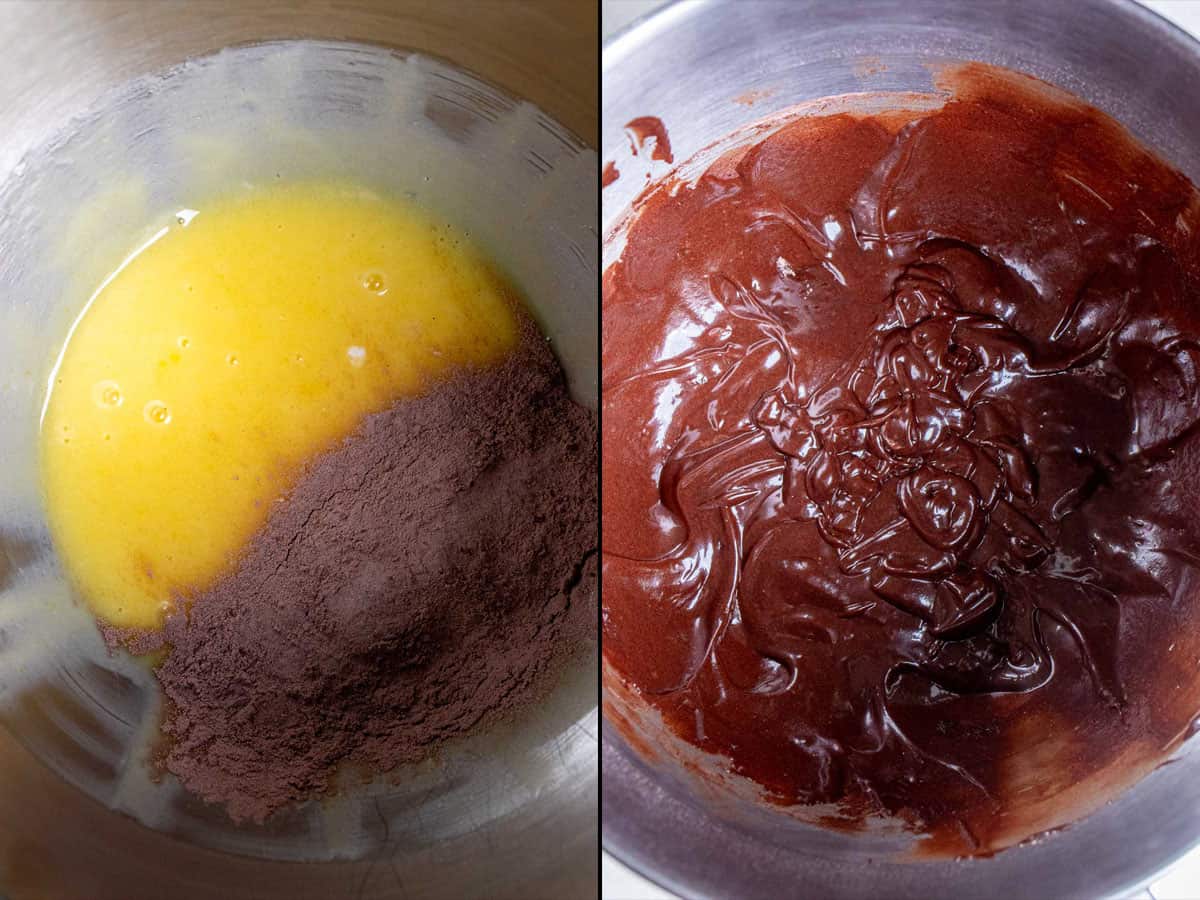
Now add the dry ingredients into the wet ingredients in 2-3 batches, mixing slowly and increasing the speed until just combined. The batter will be very dark and thick, almost like a thin chocolate ganache.
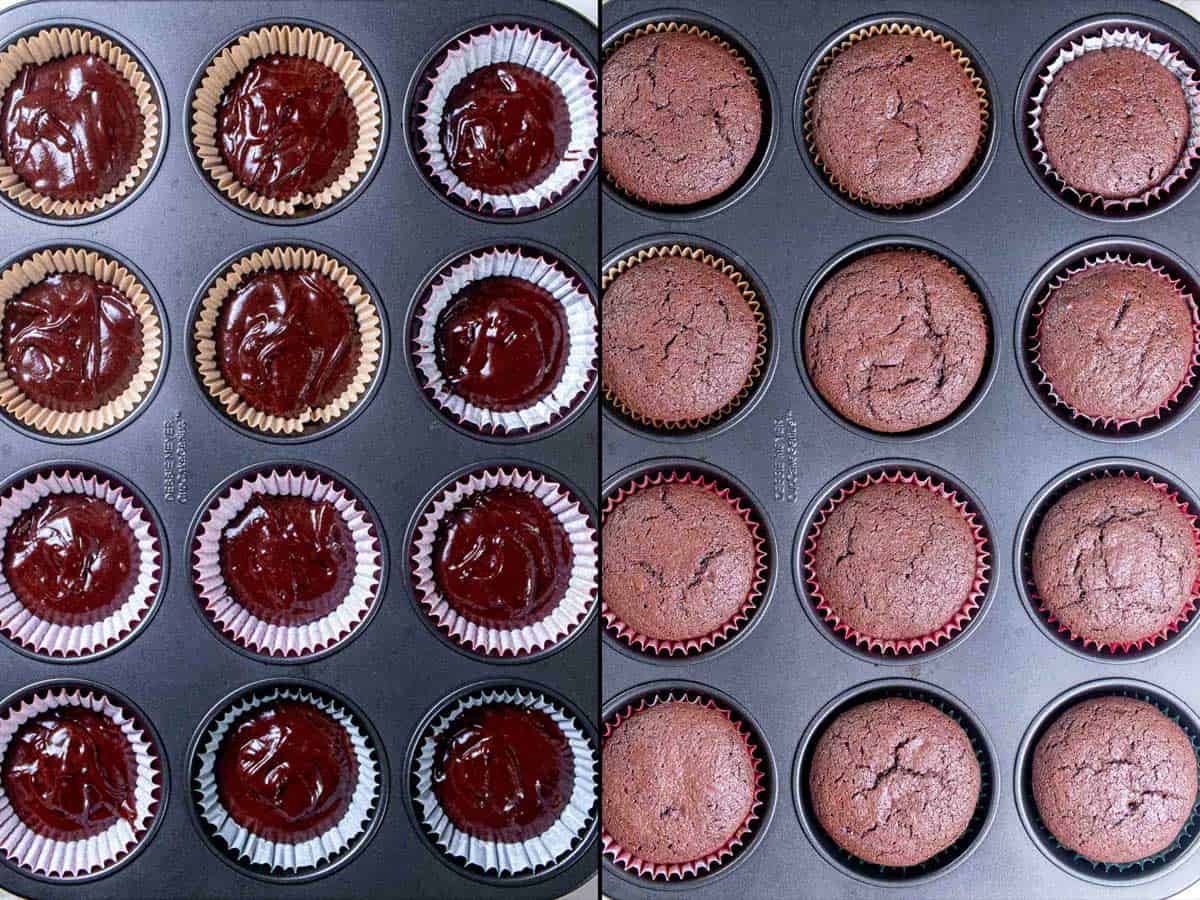
Spoon or scoop the cupcake batter into the lined muffin tin. Each liner should be a little over halfway full. Continue until all the batter is used, making each one roughly the same amount. Place the muffin pan into the center of the oven and bake for 18-22 minutes. A toothpick inserted into the center of a cupcake should come out mostly clean with a few pieces of cupcake on it. Allow them to cool in the pan for at least 5-10 minutes before removing.
Make the Marshmallow Filling
While the cupcakes are baking, start on the filling.
In a microwave safe bowl, add the gelatin and water. Stir to combine and let sit for 5 minutes.
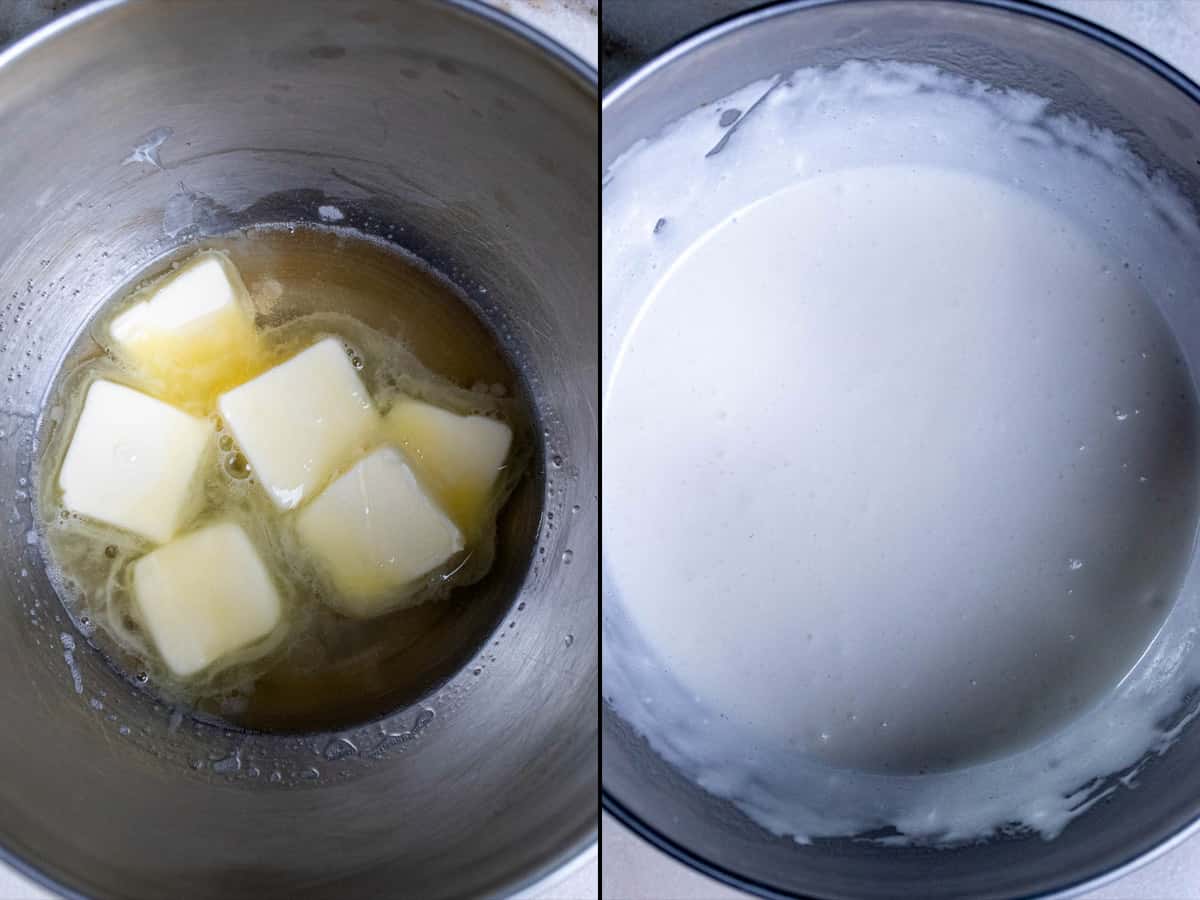
After 5 minutes, give it a quick stir and then microwave 30 seconds on high. If needed, keep microwaving in 10 second intervals until the water is bubbling hot. In a mixing bowl, add the butter, vanilla, a pinch of salt, and the hot gelatin water. Use a hand mixer or whisk vigorously until the butter has melted and mixed with the gelatin.
Add the marshmallow crème and continue mixing or whisking vigorously until you have a thinner, smoother marshmallow mix. Cover and refrigerate for 20-30 minutes while the muffins finish baking and cooling.
Make the Hot Cocoa Buttercream
While the marshmallow filling sets up and the cupcakes are cooling, make the hot chocolate buttercream.
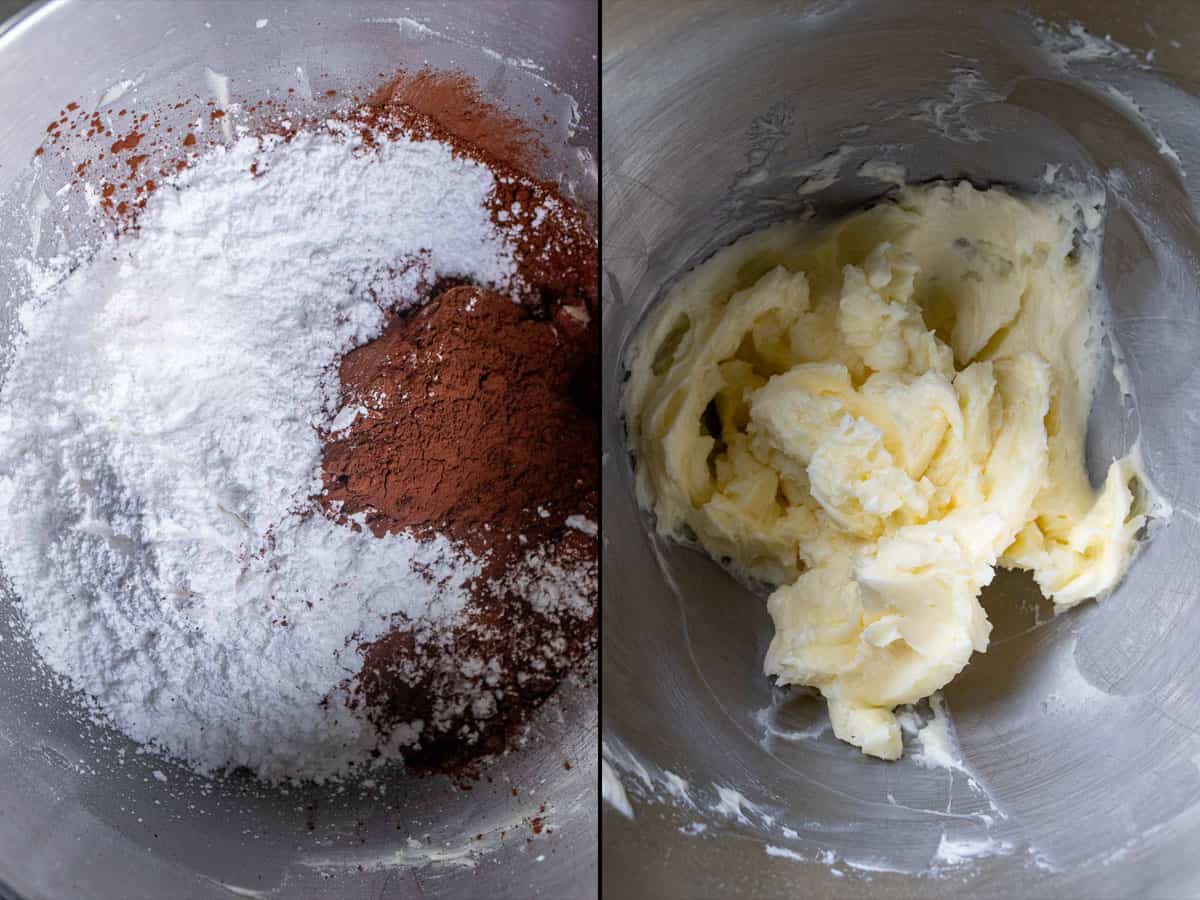
In a large mixing bowl, sift the powdered sugar and cocoa powder together with a pinch of salt. This is optional, but I find sifting the powdered sugar for buttercream reduces the chances of any graininess in the final product.
In the bowl of a stand mixer fitted with the paddle attachment, or in a mixing bowl with a hand mixer, add the softened butter. Mix on medium speed for a minute or two, then add about a cup or so of the cocoa-sugar mixture. Continue mixing on medium speed for 2-3 minutes until the butter is light and fluffy.
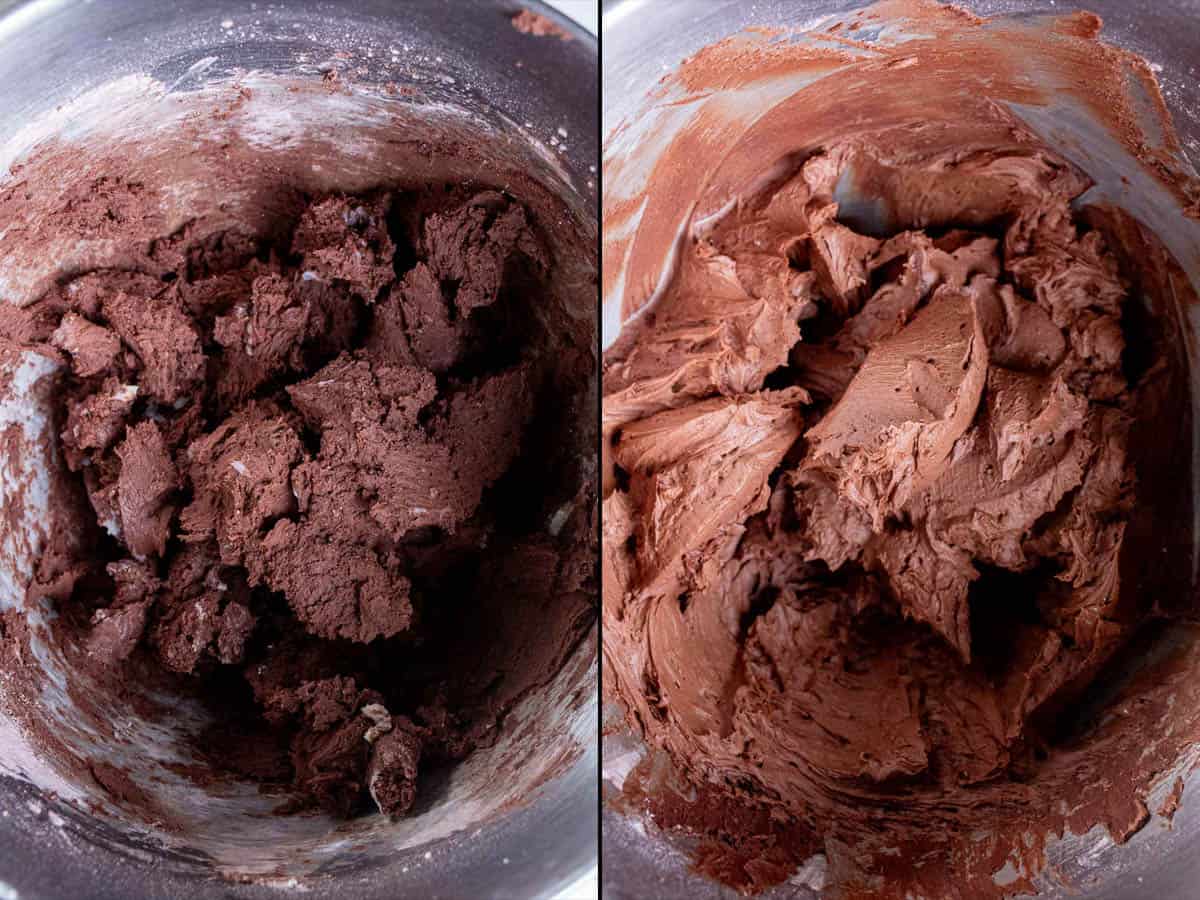
Add the vanilla extract and the rest of the cocoa-sugar mixture in 2-3 batches, mixing at a low speed and speeding up as the powdered sugar incorporates. When you add the final amount of powdered sugar, add most of the heavy cream as well. At this point you can switch the paddle attachment for the whisk attachment, but either one will work.
Mix slowly at first, then continue to increase the speed to high and let it whip together for 2-3 minutes. It should be thick enough to hold its shape, but thin enough to be able to pipe or spread. If it feels too thick, add more heavy cream a teaspoon at a time. If it feels too thin, add more powdered sugar a tablespoon at a time.
Set aside until the cupcakes are fully cooled. If your kitchen tends to run a bit warm, you can refrigerate the buttercream until ready to decorate.
Filling & Decorating
Once cooled completely, it’s time to fill and decorate the cupcakes.
Use a cupcake corer to remove part of the center of the cupcakes. Alternatively, use a sharp paring knife and cut into the cupcake at a 45° angle about a ¼” from the edge. Work your way around the cupcake in a circle and remove the cone shaped piece. In both methods, remove all but a ¼” of the top of the removed piece and set aside.
Scoop or spoon about a tablespoon of the marshmallow filling and place into the hole of the cupcake. Use enough to fill it and then replace the top of the cupcake. Continue for all 12 cupcakes. You should have more than enough filling for all cupcakes.
Now, fill a piping bag with the chocolate buttercream and decorate the tops of the cupcakes. Start on the outer edge of the cupcake and make a loop, slowly heading towards the center of the cupcake. Continue making this loop, going upwards until you’re in the center and finish it off be pressing down slightly, stop piping, and pull straight up.
For reference I used both a Wilton 2D and Wilton 6B piping tip for these. Both made pretty patterns.
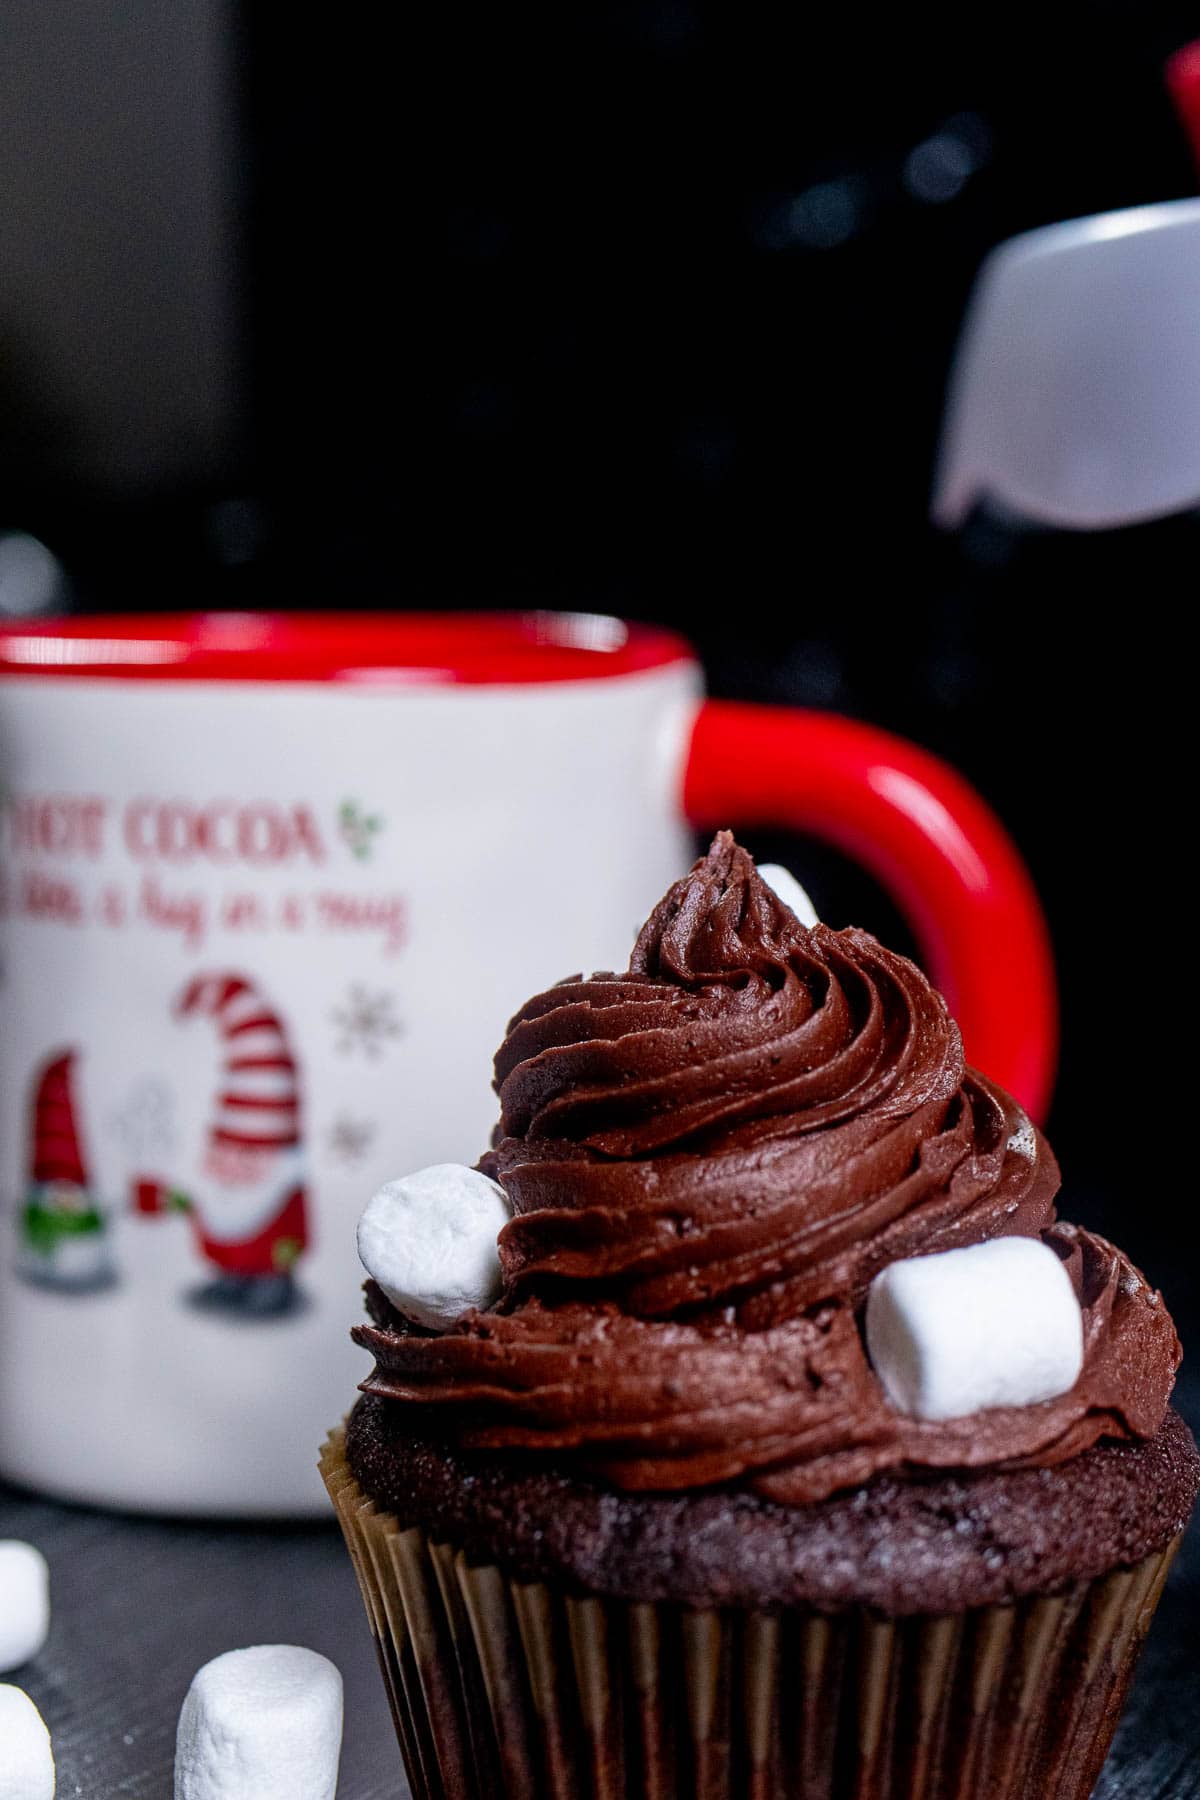
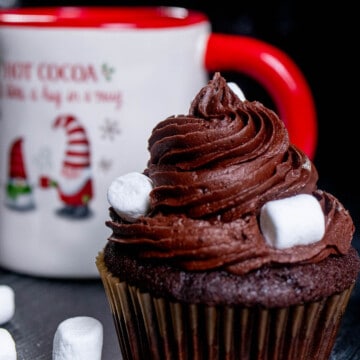
Decorate with mini marshmallows or sprinkles and serve.
📖 Variations
While I love these hot cocoa cupcakes how they are, there’s plenty of room to experiment here also. Here’s a few great examples to get you started.
Easy Hot Chocolate Cupcakes – These cupcakes can be a little more advanced for some home bakers, or the filling and decorating can seem time-consuming. Instead of filling the cupcakes, just smear some of the marshmallow on top. Cut the buttercream recipe in half and just use a knife or offset spatula to frost the top of the cupcakes as well.
Chocolate Filled – Instead of the marshmallow filling, use chocolate ganache instead. This can make for a super-rich, triple chocolate cupcake, or you can flip things around for a chocolate filled and marshmallow topped version. Heat a ½ cup of heavy cream until just shy of boiling. In a heatproof bowl, add about ¾ cup semi-sweet or dark chocolate chips and pour the hot cream over them. Allow to sit for a minute or two and then stir together until smooth.
Marshmallow Buttercream – This works well with the chocolate filling above or skip filling and just use this instead of the hot cocoa buttercream. Replace the Dutch-processed cocoa powder in the buttercream recipe with a 7oz container of marshmallow crème or marshmallow fluff. If you have a culinary torch, you could even lightly toast the outer edges of the piped buttercream.
Peppermint Hot Chocolate Cupcakes – You can ramp up the holiday flavoring by turning these cupcakes into a peppermint version as well. In the cupcakes, change the vanilla extract to ½ teaspoon and add 1-1 ½ teaspoons of peppermint extract. Make a dark chocolate ganache filling with 1 teaspoon of peppermint extract. Make either the chocolate or marshmallow buttercream and add ½ - ¾ teaspoon peppermint extract there also. You can make one of these changes or all three for a really peppermint-y hit of flavor with the hot cocoa.
💭 Frequently Asked Questions
Using oil instead of or in addition to butter can help keep cupcakes moist for much longer. Other ingredients like sour cream or yogurt also add moisture and keep the cupcake crumb tender.
I like to give cupcakes at most 5-10 minutes in the baking pan. Depending on the cupcake, they might need more time to finish cooking and setting before being moved. Leaving them in the pan too long, however, can cause them to steam and have soggy bottoms or overcook. After 5-10 minutes, move to a cooling rack. Give them 45 minutes to an hour before frosting.
Most cupcakes are fine left out at room temperature for 3-4 days. Refrigerating cupcakes will cause them to dry out faster. However, cupcakes made with a lot of dairy, such as a custard filling or cream cheese frosting, need to be refrigerated for food safety reasons.
🍽 Equipment
You don’t need any fancy equipment to make these hot cocoa cupcakes. I’ll mention just a few items here though if you want to decorate yours similarly to mine.
Corer – While you can just use a good paring knife to core out cupcakes for filling, it’s definitely more time consuming. I like this cupcake corer from Norpro because it comes with two size cutters, does a good job of cutting and removing the core, and it’s inexpensive.
Piping Tips – As mentioned in the directions, I used both a Wilton 2D large drop flower piping tip and a Wilton 6B open star piping tip when decorating these. You can use either one, but I do find larger tips work better than small ones on cupcakes. Don’t forget some 12" pastry bags also.
❄️ Storing & Freezing Cupcakes
Once cooled and decorated, hot chocolate cupcakes can be placed in an airtight container and stored at room temperature for 3-4 days just fine. Move to the refrigerator for longer-term storage, up to a week, but they do dry out faster when refrigerated so I don’t recommend this method.
If you’re making cupcakes ahead of time or need to store them longer than 3-4 days at room temperature, freezing is a good option. I prefer this to refrigerating cupcakes as freezing and then thawing keeps them tasing fresher than being refrigerated.
Once completely cooled, wrap each undecorated cupcake in plastic wrap. Place in a gallon freezer bag or airtight container and freeze for up to 3 months. Leave at room temperature to thaw for 30 minutes to an hour and decorate as normal.
While you can freeze frosted cupcakes, I don’t recommend it as it takes up more room and not all frostings do as well frozen. With that said, if you want to freeze frosted cupcakes, move them to the freezer uncovered for a few hours to freeze the frosting. Once frozen, wrap individually as above, and freeze for up to 3 months. When thawing decorated cupcakes, remove the plastic wrapping right away and let them thaw uncovered.
📋 Recipe
Hot Chocolate Cupcakes
Ingredients
Hot Chocolate Cupcakes:
- 1 cup all-purpose flour
- ½ teaspoon baking powder
- ½ teaspoon baking soda
- ¼ teaspoon salt
- ⅓ cup Dutch-process cocoa powder
- ¾ cup granulated sugar
- ⅓ cup vegetable oil, or other neutral oil
- ½ cup sour cream, at room temperature
- 1 teaspoon vanilla extract
- 1 large egg, at room temperature
- 1 large egg yolk, at room temperature
- Mini Marshmallows, optional for decorating
Marshmallow Filling:
- ¾ teaspoon unflavored gelatin
- 3 tablespoons water
- 4 tablespoons unsalted butter, at room temperature
- 1 teaspoon vanilla extract
- ⅛ teaspoon salt
- 1 7-ounce container marshmallow crème
Hot Cocoa Buttercream:
- 1 cup unsalted butter, at room temperature
- 3 ½ cups powdered sugar
- ½ cup Dutch-process cocoa powder
- 1 teaspoon vanilla extract
- ¼ teaspoon salt
- ¼ cup heavy cream
Directions
Make the Chocolate Cupcakes:
- Preheat the oven to 325°F / 165°C and line a 12-count, regular sized muffin tin with cupcake liners.
- In a mixing bowl, add 1 cup all-purpose flour, ½ teaspoon baking powder, ½ teaspoon baking soda, ¼ teaspoon salt, and ⅓ cup Dutch-process cocoa powder. Whisk thoroughly until no white streaks of flour remain and set aside.
- In the bowl of a stand mixer fitted with the paddle attachment, or in a mixing bowl with a hand mixer, add ¾ cup granulated sugar, ⅓ cup vegetable oil, ½ cup sour cream, and 1 teaspoon vanilla extract. Mix at medium speed until the sugar is dissolved and everything is well mixed. Add the egg and egg yolk and continue mixing until the eggs are just incorporated.
- Now add the dry ingredients into the wet ingredients in 2-3 batches, mixing slowly and increasing the speed until just combined. The batter will be very dark and thick, almost like a thin chocolate ganache.
- Spoon or scoop the cupcake batter into the lined muffin tin. Each liner should be a little over halfway full. Continue until all the batter is used, making each one roughly the same amount. Place the muffin pan into the center of the oven and bake for 18-22 minutes. A toothpick inserted into the center of a cupcake should come out mostly clean with a few pieces of cupcake on it. Allow them to cool in the pan for at least 5-10 minutes before removing.
Make the Marshmallow Filling:
- While the cupcakes are baking, start on the filling.
- In a microwave safe bowl, add ¾ teaspoon unflavored gelatin and 3 tablespoons of water. Stir to combine and let sit for 5 minutes.
- After 5 minutes, give it a quick stir and then microwave 30 seconds on high. If needed, keep microwaving in 10 second intervals until the water is bubbling hot. In a mixing bowl, add 4 tablespoons of unsalted butter, 1 teaspoon vanilla extract, a pinch of salt, and the hot gelatin water. Use a hand mixer or whisk vigorously until the butter has melted and mixed with the gelatin.
- Add the 7oz container of marshmallow crème and continue mixing or whisking vigorously until you have a thinner, smoother marshmallow mix. Cover and refrigerate for 20-30 minutes while the muffins finish baking and cooling.
Make the Hot Cocoa Buttercream:
- While the marshmallow filling sets up and the cupcakes are cooling, make the hot chocolate buttercream.
- In a large mixing bowl, sift 3 ½ cups of powdered sugar and a ½ cup of Dutch-process cocoa powder together with a pinch of salt. This is optional, but I find sifting the powdered sugar for buttercream reduces the chances of any graininess in the final product.
- In the bowl of a stand mixer fitted with the paddle attachment, or in a mixing bowl with a hand mixer, add 1 cup of softened butter. Mix on medium speed for a minute or two, then add about a cup or so of the cocoa-sugar mixture. Continue mixing on medium speed for 2-3 minutes until the butter is light and fluffy.
- Add 1 teaspoon of vanilla extract and the rest of the cocoa-sugar mixture in 2-3 batches, mixing at a low speed and speeding up as the powdered sugar incorporates. When you add the final amount of powdered sugar, add most of the ¼ cup of heavy cream as well. At this point you can switch the paddle attachment for the whisk attachment, but either one will work.
- Mix slowly at first, then continue to increase the speed to high and let it whip together for 2-3 minutes. It should be thick enough to hold its shape, but thin enough to be able to pipe or spread. If it feels too thick, add more heavy cream a teaspoon at a time. If it feels too thin, add more powdered sugar a tablespoon at a time.
- Set aside until the cupcakes are fully cooled. If your kitchen tends to run a bit warm, you can refrigerate the buttercream until ready to decorate.
Filling & Decorating:
- Once cooled completely, it’s time to fill and decorate the cupcakes.
- Use a cupcake corer to remove part of the center of the cupcakes. Alternatively, use a sharp paring knife and cut into the cupcake at a 45° angle about a ¼” from the edge. Work your way around the cupcake in a circle and remove the cone shaped piece. In both methods, remove all but a ¼” of the top of the removed piece and set aside.
- Scoop or spoon about a tablespoon of the marshmallow filling and place into the hole of the cupcake. Use enough to fill it and then replace the top of the cupcake. Continue for all 12 cupcakes. You should have more than enough filling for all cupcakes.
- Now, fill a piping bag with the chocolate buttercream and decorate the tops of the cupcakes. Start on the outer edge of the cupcake and make a loop, slowly heading towards the center of the cupcake. Continue making this loop, going upwards until you’re in the center and finish it off be pressing down slightly, stop piping, and pull straight up.
- For reference I used both a Wilton 2D and Wilton 6B piping tip for these. Both made pretty patterns.
- Decorate with mini marshmallows or sprinkles and serve.


Comments
No Comments