
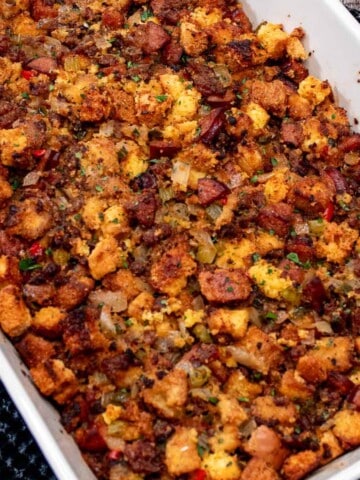
This mildly spiced Hatch chile mac and cheese is creamy, cheesy, smoky, and hands down amazing. Make this macaroni and cheese year-round as a great side dish for holidays or any time you need some comforting food.
Macaroni and cheese recipes exist in almost every country in some form or another. It truly is a universal comfort food. After making this Hatch chile mac and cheese the first time, everyone loved it so much, including myself, that I immediately got more Hatch chiles and made another batch as soon as the first one was gone.
I rank this Hatch chile recipe right up there with my Hatch chile and sausage quiche. It was so good I will be making it for holidays and family get togethers year-round from now on.
This is a baked mac and cheese, and a bit on the dryer side compared to the somewhat soupy versions. It is still very cheesy, and the Hatch chiles and bacon add a lot of depth to the flavor, making it deeply smoky and earthy with pops of spiciness. If you wish to keep it vegetarian, simply omit the bacon if you wish.

Full disclaimer, I have never been a fan of mac and cheese, even as a child. I think it was the soupy style made with heavily processed cheese that turned me off. I’m not a fan of using powdered cheese either. With that said, this Hatch chile mac and cheese with bacon and a crispy top is hands down the best macaroni and cheese I have ever had, and I’m not just saying that because it’s my recipe.
Jump to:
🥘 Ingredients for Hatch Chile Mac & Cheese
While I made this recipe with fresh Hatch chiles, it is way too good to only make it during Hatch chile season. The rest of the ingredients are easy to find, and you can make substitutions to make this your own as well.

Hatch Chiles – As mentioned, I make this fresh Hatch chiles and roast and peel them. A good heaping cup of chopped, roasted chiles works great, from mild to hot. When not in season, you can find Hatch chiles in canned and jarred varieties year-round. Alternatively, you can use a mix of poblano and jalapeno or serrano chiles.
Bacon – Omit if you wish or want to keep this vegetarian. I like to keep some of the bacon grease and add it to butter to make the roux. I also finely chop some of the bacon to add to the bread crumb topping as well.
Pasta – While elbow pasta is a classic, I prefer cavatappi here since it feels a little more grown up, and the ridges hold sauce better. Other great options include fusilli, orecchiette, and gemelli.
Butter – I use unsalted butter to make the roux here. I like to mix half butter with half reserved bacon grease for the best flavor. If you skip the bacon, just double up on the butter. Use some butter for the breadcrumbs as well.
Flour – A bit of all-purpose flour is used here to make the roux.
Milk – Add milk to the roux to create the bechamel for the base of the cheese sauce. I use both whole milk and half-and-half here. You could also use heavy cream for a richer flavor, but I would suggest mixing it with whole milk, plus that’s expensive. I don’t recommend lower fat milks, or you lose creaminess in the flavor.
Seasoning – I keep things rather basic with my seasoning here and only add salt, black pepper, and smoked paprika. This allows the flavor of the bacon and Hatch chiles to shine on their own.
Cheese – I prefer to buy blocks of cheese and shred it myself as it melts and tastes better. Here I use a combination of sharp white cheddar and smoked gouda. Feel free to play around with the blend you use. Reserve a bit of the cheese to add to the top before baking also.
Breadcrumbs – For the topping, I prefer panko breadcrumbs for the added crunch and texture. Lightly toast them on the stovetop with some butter and finely chopped bacon before adding on top of the mac and cheese and baking.
🔪 How to Make Hatch Chile Mac and Cheese
Before starting, place the bacon (if using) in the freezer for 10-15 minutes. This will make it easier to chop.
Hatch Chile and Bacon Prep
If using fresh Hatch chiles, start with them, otherwise skip this part.

Turn your oven broiler to high and line a baking sheet with foil. Move the oven rack to the highest or second highest position. Roast the Hatch chiles for 3-5 minutes a side until fully roasted and blackened. Place them in a zipper-lock plastic bag or a mixing bowl and cover with plastic wrap. Let cool and steam for 10 minutes.
Once steamed and cool enough to handle, peel off the blackened skin and remove the seeds. Dice into small pieces and set aside to fully cool.
While the Hatch chiles are roasting or cooling, start on the bacon if using. Chop the bacon into small chunks and add to a cold pan. Turn the heat to medium or medium-low and cook, stirring occasionally, until the fat has rendered and the bacon is crisp.
This can take 14-20 minutes depending on the heat and how crispy you like your bacon. Remove with a slotted spoon and place on a paper towel lined plate to absorb excess grease. Reserve 2 tablespoons of bacon to the side and 2 tablespoons of bacon grease as well.
Make the Bechamel and Pasta
Fill a large pot a little over half full of water and place it on the stove over high heat. While waiting for the water to boil, begin making the bechamel for the cheese sauce. You’ll work on the pasta and the cheese sauce at the same time.
When the water comes to boil, add a good amount of kosher salt, stir, and add the cavatappi. Cook until al dente according to package directions. Before straining, use a glass measuring cup and reserve some of the pasta water, then strain the pasta with a colander and set aside.

Set a Dutch-oven or large pot over medium heat and melt the butter and add the reserved bacon grease. Once melted and hot, add the flour and whisk constantly to create a roux. Let the flour cook for 2-3 minutes until you have a light roux. Begin adding the milk a little at a time, whisking constantly to avoid lumps.

When you’re done adding the milk, turn the heat to medium-high and add the seasoning. Keep whisking until it comes to a strong simmer for a minute or two, then immediately turn the heat to low. Continue whisking until the mixture feels thickened and turn off the heat. If the pasta still needs a few minutes, leave the heat on low instead.
Begin adding the shredded cheese, a handful at a time, to the bechamel, reserving a heaping ½ cup of each cheese for the topping. Stir until the cheese is melted and continue adding cheese in batches.

Once the cheese is all melted, and the pasta has finished cooking, add the pasta directly into the cheese sauce. Stir to fully combine. Now add the half-and-half and ¼ cup of the reserved pasta water and give it a quick stir. Finally add the chopped Hatch chiles and bacon and stir until well distributed throughout the pasta.
Bake the Macaroni & Cheese
Preheat your oven to 375°F / 190°C.

Take the reserved 2 tablespoons of bacon bits and chop into very fine pieces. In a small skillet, melt some butter over medium-low heat and add the panko breadcrumbs. Stir and toss frequently until just turning light golden brown in color and add the finely chopped bacon.
Remove from the heat and pour into a heatproof bowl to stop the cooking process. Set aside and allow it to cool enough to handle.
In the meantime, transfer the macaroni and cheese to a 13x9 baking dish. Try and distribute it evenly across the baking dish and level off the top without compressing it too much.

Sprinkle the reserved cheese over the top of the mac and cheese and then sprinkle the panko and bacon mix over the entire dish.
Place on the middle rack of the oven, uncovered, and bake for 18-20 minutes. Remove from the oven and let cool for a few minutes before serving.

📖 Hatch Mac & Cheese Variations
I absolutely love this recipe as written, but here’s just a few alternative ideas for people to make it more their own.
No Fresh Hatch – I love using fresh Hatch chiles at the end of the summer every year, but this recipe is way too good to be limited by that. You can find jarred, roasted Hatch chiles and use that, or the small 4oz cans of Hatch chiles as well. Use 2-3 cans or enough from the jarred version to equal a heaping cup. Alternatively, you can roast poblanos and jalapenos for a mild version, or poblanos and serrano chiles for a hotter version.
Vegetarian – For a vegetarian version, simply omit the bacon and replace the bacon grease with and equal amount of butter for the roux. If you need it to be vegan, however, you will need to replace the butter with oil, use non-dairy milk, and vegan cheeses. I do not know how that would turn out however, so if you try a vegan version, let me know.
Creamier No-Bake Version – If you prefer a soupier style of mac and cheese, I suggest these changes. Use another ½ - 1 cup of whole milk and increase the half-and-half to ¾ -1 cup also. Use all the cheese as well, instead of reserving some of each for topping. Fully cook the pasta and brown the panko to a darker golden brown. Skip baking and serve hot.
As an Entrée – If you want to turn this into a full-blown meal instead of a side, add more protein. You can still use the bacon or omit it. Add things pulled pork, shredded brisket, buffalo chicken, or sausage, etc.
🍽 Recommended Equipment
No need for fancy equipment here besides a few pots and pans you probably already have. Here are just a few items I recommend because I find they make the whole process easier.
Enameled Cookware – I prefer these items because they retain and distribute heat more evenly and tend to be much easier to clean as well. When making the mac and cheese on the stove, I recommend a 6-quart enameled Dutch-oven, and for baking I love my 13x9 enameled baking dish.
Rotary Grater – While you can use a box grater or shredding discs on a food processor if you have one, I love this rotary cheese grater for shredding things like cheese and butter. It does a great and quick job and can grate or shred a whole ingredient without worrying about cutting your fingers or knuckles.
Gravy Whisk – This gravy whisk has become my favorite tool when making gravies, a roux, or béchamel. The rounded and angled design makes it easy to get into every corner and being able to keep the whisk flat in deeper containers like a Dutch-oven.

❄️ Storing Hatch Mac & Cheese
Once your Hatch chile mac and cheese has cooled completely, you can cover the baking dish tightly with plastic wrap, or transfer to an airtight container and refrigerate for 3-5 days. If you don’t have a lot of leftovers, you can also transfer individual portions to containers and refrigerate that way.
If you have more leftovers than you think you’ll finish in the next few days, you can also transfer to an airtight container and freeze for 2-3 months.
To reheat this baked macaroni and cheese you have two options. For multiple or single portions, place in baking dish and splash with a bit of milk and then bake, covered at 350°F for 20-25 minutes, then uncovered for another 5-10 minutes.
You can also microwave small or single portions in a microwave-safe bowl. Add a splash of milk and microwave at 50% power for 1 minute. Continue heating in 30 second intervals at ½ power until heated to your preference.
If frozen, you can thaw overnight in the fridge or use the baking method and add an extra 10 minutes or so covered.
📋 Recipe

Hatch Chile Mac and Cheese
Ingredients
Hatch Mac & Cheese:
- 1 cup roasted and chopped Hatch chiles, see note
- 12 ounces bacon, divided
- 1 pound cavatappi pasta, see note
- 2 tablespoons reserved bacon grease
- 2 tablespoons butter
- ¼ cup all-purpose flour
- 3 cups whole milk
- 1 teaspoon kosher salt
- ½ teaspoon ground black pepper
- ½ teaspoon smoked paprika
- 8 ounces sharp white cheddar cheese, shredded, divided
- 7-8 ounces smoked gouda cheese, shredded, divided, see note
- ½ cup half-and-half, or heavy cream
- ¼ cup reserved pasta water
Mac & Cheese Topping:
- ½ cup reserved shredded sharp white cheddar cheese
- ½ cup reserved shredded smoked gouda cheese
- 2 tablespoons butter
- ¾ cup unseasoned panko breadcrumbs
- 2 tablespoons reserved, cooked bacon bits
Directions
- Before starting, place the bacon (if using) in the freezer for 10-15 minutes. This will make it easier to chop.
Hatch Chile and Bacon Prep:
- If using fresh Hatch chiles, start with them, otherwise skip this part.
- Turn your oven broiler to high and line a baking sheet with foil. Move the oven rack to the highest or second highest position. Roast 6-7 (depending on size) Hatch chiles for 3-5 minutes a side until fully roasted and blackened. Place them in a zipper-lock plastic bag or a mixing bowl and cover with plastic wrap. Let cool and steam for 10 minutes.
- Once steamed and cool enough to handle, peel off the blackened skin and remove the seeds. Dice into small pieces and set aside to fully cool.
- While the Hatch chiles are roasting or cooling, start on the bacon if using. Chop all bacon from a 12oz package into small chunks and add to a cold pan. Turn the heat to medium or medium-low and cook, stirring occasionally, until the fat has rendered and the bacon is crisp.
- This can take 14-20 minutes depending on the heat and how crispy you like your bacon. Remove with a slotted spoon and place on a paper towel lined plate to absorb excess grease. Reserve 2 tablespoons of bacon to the side and 2 tablespoons of bacon grease as well.
Make the Bechamel and Pasta:
- Fill a large pot a little over half full of water and place it on the stove over high heat. While waiting for the water to boil, begin making the bechamel for the cheese sauce. You’ll work on the pasta and the cheese sauce at the same time.
- When the water comes to boil, add a good amount (2-3 teaspoons) of kosher salt, stir, and add 1-pound of cavatappi. Cook until al dente according to package directions. Before straining, use a glass measuring cup and reserve some of the pasta water, then strain the pasta with a colander and set aside.
- Set a Dutch-oven or large pot over medium heat and melt 2 tablespoons of butter and add the 2 tablespoons of reserved bacon grease. Once melted and hot, add ¼ cup all-purpose flour and whisk constantly to create a roux. Let the flour cook for 2-3 minutes until you have a light roux. Begin adding 3 cups of whole milk a little at a time, whisking constantly to avoid lumps.
- When you’re done adding the milk, turn the heat to medium-high and add 1 teaspoon kosher salt, ½ teaspoon ground black pepper, and ½ teaspoon smoked paprika. Keep whisking until it comes to a strong simmer for a minute or two, then immediately turn the heat to low. Continue whisking until the mixture feels thickened and turn off the heat. If the pasta still needs a few minutes, leave the heat on low instead.
- Begin adding the shredded sharp white cheddar and smoked gouda cheeses, a handful at a time, to the bechamel, Reserving a heaping ½ cup of each cheese for the topping. Stir until the cheese is melted and continue adding cheese in batches.
- Once the cheese is all melted, and the pasta has finished cooking, add the pasta directly into the cheese sauce. Stir to fully combine. Now add ½ cup half-and-half and ¼ cup of the reserved pasta water and give it a quick stir. Finally add the chopped Hatch chiles and bacon and stir until well distributed throughout the pasta.
Bake the Macaroni & Cheese:
- Preheat your oven to 375°F / 190°C.
- Take the reserved 2 tablespoons of bacon bits and chop into very fine pieces. In a small skillet, melt 2 tablespoons of butter over medium-low heat and add ¾ cup panko breadcrumbs. Stir and toss frequently until just turning light golden brown in color and add the finely chopped bacon.
- Remove from the heat and pour into a heatproof bowl to stop the cooking process. Set aside and allow it to cool enough to handle.
- In the meantime, transfer the macaroni and cheese to a baking dish. Try and distribute it evenly across the baking dish and level off the top without compressing it too much.
- Sprinkle the reserved cheese over the top of the mac and cheese and then sprinkle the panko and bacon mix over the entire dish.
- Place on the middle rack of the oven, uncovered, and bake for 18-20 minutes. Remove from the oven and let cool for a few minutes before serving.

Comments
No Comments